Notice: We request that you don't just set up a new account at this time if you are a previous user. If you used to be one of our moderators, please feel free to reach out to Chris via the facebook Outerlimits4x4 group and he will get you set back up with access should he need you.
Recovery:If you cannot access your old email address and don't remember your password, please click here to log a change of email address so you can do a password reset.
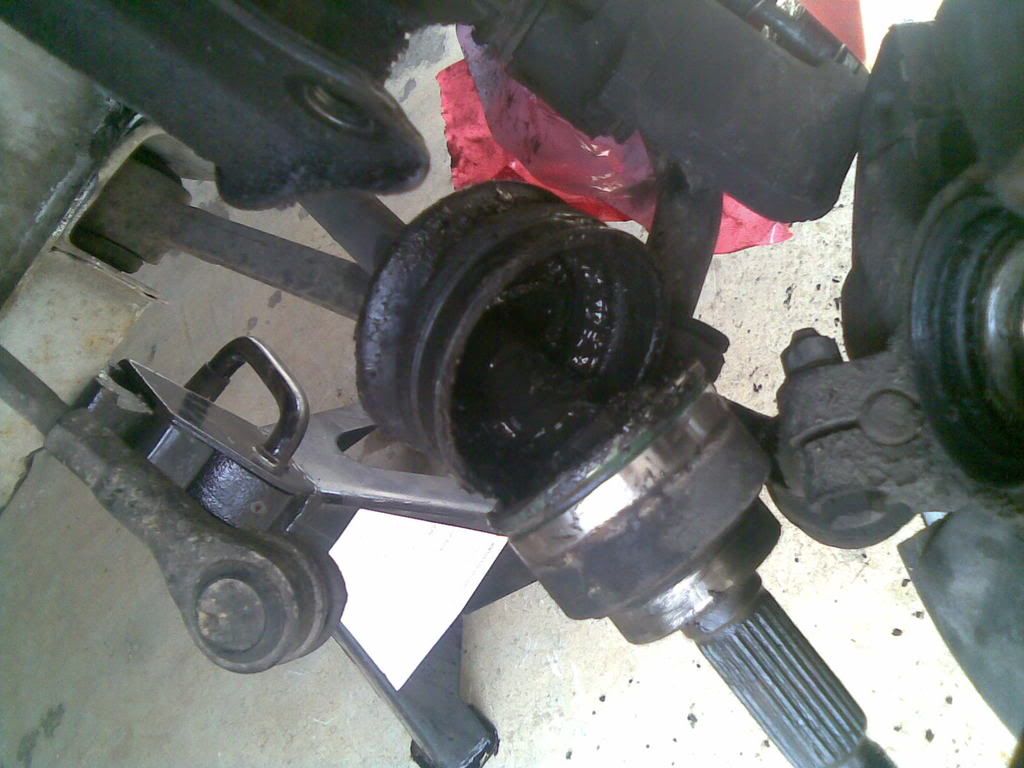
Well interesting night. Rushed home and put the hubs back together as I believe I need to change the short end of the inner axles over (i.e. from birfeild joint to free wheeling hub) from the MQ to G60.
Had a few light hearted taps with some wood in between and was worried I would break something. Gave up and called my long time mate (also happens to be a original 4WD mechanic from the 70’s to late 90’s when he retired. Had a good chat about MG’s and classic cars and then onto CV’s.
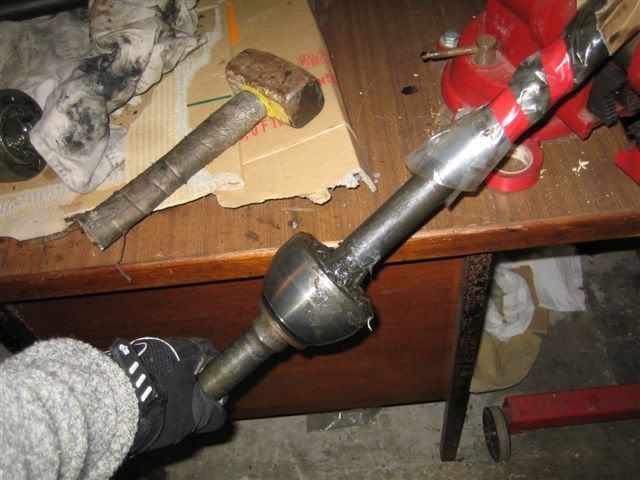
In short he said to put the axle in a vice at 45 degrees and hit with a heavy hammer on the edge of the CV while holding the short shaft straight. Should take no more then 2 hits. Any more then this could damage it.
Anyhow then had a call from another Sydney G60 owner who contacted me on the weekend. Had a great chat about Patrols and he’s restoring a 1962 G60. He will sow himself later, where going to catch up in the near future as well. It’s good as I now know two other G60 owners in Sydney.
Once I know I’m going the right way will fix up the disc conversion thread. John as for your comments about it being useless for you. It just means the kit will need the G60 inner axles as well.
Axle in place getting ready for a hit. This feels so freaky using this much force with metal hammer on steel.
Disassembling a CV joint is not difficult if you know how. The first trick is getting the CV joint off the end of the axle shaft. Some joints just pull off while others are held with a snap ring or lock ring which must first be released.
Once the joint is off, it can be disassembled by tilting the inner race to one side. This is done by inserting a dowel or similar tool into the splines of the inner shaft and tilting the race as far as it will go to one side. This will expose one of the balls which can be popped out of its cage window with a small screwdriver. The inner race is then tilted to opposite side so the next ball can be removed, and so on until all the balls have been removed from their cage windows. The cage can now be rotated sideways allowing it and the inner race to be removed from the housing.
What to look for: nicks, gouges, cracks, spalling, roughness, flaking, etc. on the surface of the balls or tracks in the inner and outer races. The cage windows should also be inspected for dimples, wear or cracks. Each ball should fit snugly in its respective cage window because looseness here is what often causes the clicking or popping noises associated with a worn CV joint.
CV joints are precision fit assemblies, so the balls should be kept in order so they can be reassembled in their same respective positions as before. Each ball and track develop a unique wear pattern as the joint ages, so mixing up the balls may change tolerances and create problems that didn�t exist before the joint was disassembled.
If the CV joint shows no wear or damage, it should be okay to reuse. If it does not pass inspection or is obviously defective, it needs to be replaced. Either way, before the CV joint goes back on the shaft it should be packed with CV joint grease (never ordinary chassis grease!). Special grease is usually provided with the replacement boot along with instructions on how to pack the joint. About a third of the grease is typically packed into the joint, and the rest is put inside the boot before it goes on to serve as a reservoir for the joint. There is some debate as to how much the grease actually moves around inside the joint and boot as the vehicle is being driven, but it is there for a purpose so it should be used.
BOOT INSTALLATION
When the new boot is installed over the joint, it must be properly positioned on both joint and housing. Most boots have a lip on the inside diameter of both ends that fits into a groove on both parts to assure a tight seal. Installed boots must not be crimped, twisted or collapsed. If the boot is not in its normal shape, loosen a clamp and "burp" it by carefully sliding a screwdriver between the boot lip and driveshaft or joint housing. This should allow enough air into the boot to return it to its normal shape.
Boot clamps must be installed according to vehicle manufacturer instructions or instructions provided with the replacement boot or joint. Some types of clamps require special tightening/crimping tools while others do not.
Other items that should also be inspected:
On FWD transaxles with equal length halfshafts, the intermediate shaft U-joint, bearing and support bracket should be inspected for looseness by rocking the wheel back and forth and watching for any movement. A bad bearing would call for bearing or shaft replacement.
Transaxle oil leaks around the inner CV joints. This would indicate a faulty transaxle shaft seal. To replace the seal, the halfshaft must be removed.
CV JOINT REPLACEMENT
When a CV joint has failed and needs to be replaced, there are a variety of replacement options: new joints, remanufactured joints and complete replacement shaft assemblies with new and/or remanufactured joints. Many professional installers prefer complete shaft assemblies because they eliminate the mess of changing individual joints and save installation time. Many shafts also have a lifetime warranty, which eliminates worries about comebacks (or at least covers the replacement cost & labor).
The degree of difficulty to remove a halfshaft from a FWD vehicle varies considerably from application to another. Some applications require special tools. Separating the lower ball joint from the steering knuckle may require a ball joint puller or fork. Pushing the outer CV joint stub shaft back through the wheel hub often takes a special puller. On some Japanese applications, the shaft must be pressed out which often damages the wheel bearings. On some cars, the inner CV joint stub shafts are retained in the transaxle by a circlip and may not pull out without the help of an axle puller. Some older Chrysler applications even require removing a cover on the transaxle so a retaining clip inside the differential can be released before the shafts can be pulled out. Some applications (older Ford Escorts, for example) also require the use of a pilot tool (or removing only one shaft at a time) to prevent the differential gears from slipping out of position.
The general procedure goes as follows:
1. Loosen the axle hub nut with the wheel on the ground using a breaker bar or torque wrench. An impact wrench should not be used because the hammering can damage an otherwise good CV joint as well as the differential gears in the transaxle. The brakes should be applied to keep the car from rocking. On vehicles where the hub nut has been staked to hold it in position, DO NOT attempt to unstake the nut. Just turn it off.
NOTE: Most vehicle manufacturers recommend replacing the axle hub nut. Once used, the nut loses its ability to retain torque. So the old nut should be discarded and replaced with a new one.
2. Raise the vehicle and support it under the chassis crossmember or side rails so the front suspension can hang free. The wheel can now be removed.
3. What comes next depends on how the inner CV joint is attached to the transaxle:
If the joint is bolted to a stub shaft (such as the cross groove Rzeppa joint found on many imports), disconnect the inner CV joint first and then separate the outer joint from the steering knuckle hub. On many GM applications, the inboard CV joint stub shaft is retained in the differential gear by a circlip (except on the left hand side of automatics). To pull the shaft out, a special slide hammer axle puller tool is needed.
If the inner joint "plugs into" the transaxle and the stub shaft is part of the joint housing (tripod plunge joint and double-offset Rzeppa joints) the outer joint must be disconnected from the steering knuckle before the inner joint can be pulled out of the transaxle.
To separate the outer CV joint from the knuckle, one end of the knuckle (the lower ball joint or the MacPherson strut) must be disconnected so there will be enough clearance to push the outer CV stub shaft back through the knuckle.
On those applications where it is easiest to disconnect the knuckle from the strut (GM for example) it will be necessary to disconnect the brake hose clip and to remove the brake caliper from its mount.
On applications where disconnecting the ball joint is the path of least resistance (Ford and Chrysler for example) it may also be necessary to disconnect the sway bar from the lower control arm and/or the tie rod from the steering knuckle.
Once the knuckle is free to swing out, the end of the halfshaft can be pushed back through the wheel hub (a puller may be needed for this step). DO NOT pound on the end of the shaft as doing so may damage the wheel bearings, the splines in the hub, the differential gears or either CV joint.
As soon as the end of the shaft is free, DO NOT let it hang. Support it with a piece of wire until the inboard joint can be removed or unbolted from the transaxle. Allowing the halfshaft to hang or pulling on it will pull the inboard joint apart.
Installing the shaft is just the reverse. Once everything is back together and the wheel is in place, the lug nuts and hub nut should be installed and tightened to specifications using a torque wrench (not an impact gun unless torque limiting sockets are used).
We are put on this earth for one thing, and one thing only, to die. What you do in the mean time is entirely up to you!
Want to learn how to disassemble CV's and DOJ's????? Own an 80's Subaru. 6 DOJ's and 2 CV's, none of them particularly strong. We had it down to a trackside repair, 1.5 manhours for the front CV's being the worst (3 ppl x 1/2 hr)
George Carlin, an American Comedian said; "Think of how stupid the average person is, and realise that half of them are stupider than that".