Notice: We request that you don't just set up a new account at this time if you are a previous user.
If you used to be one of our moderators, please feel free to reach out to Chris via the facebook Outerlimits4x4 group and he will get you set back up with access should he need you.
Recovery:If you cannot access your old email address and don't remember your password, please click here to log a change of email address so you can do a password reset.
DIY Front Bar
DIY Front Bar
Have almost finished building a front bar for my son's Holden Drover and thought I would add to my clubs web site as a DIY.
I your interested you follow it here
http://www.macarthur4wd.net/gallery/thu ... hp?album=9
This is where I'm up to...
After working out what shape we wanted, we started the basic bullbar build by working out where the rear bar would bend. On this build we used mock-ups and mk-I eyeball more so than the tape measure though it was never far away.
Next we started bending. We marked the angle we wanted on the garage floor in chalk as a type of pattern and bent to that so both ends would be the same.
Once we finished bending the bottom bar, we double checked the angle on the 4b (my youngest son's drover) and then maked where we wanted to cut the ends.
With the ends cut to size, it was time to play with the grinder and file to notch them so the top bar will sit flush (well sort of flush, this is mostly mk-I eyeball , a true DIY on the cheap :-) )
Back to the 4b to check how the bottom and top bars are coming together.
To give the radiator a little more protection and to give us somewhere to mount the number plate, we added a couple of uprights. At this pont nothing has been joined, all the bars are just resting on each other
With the bars tacked together, it is time to lay the bar flat and weld all the joints. This was done bit by bit in an attempt to avoid bending from the heat.
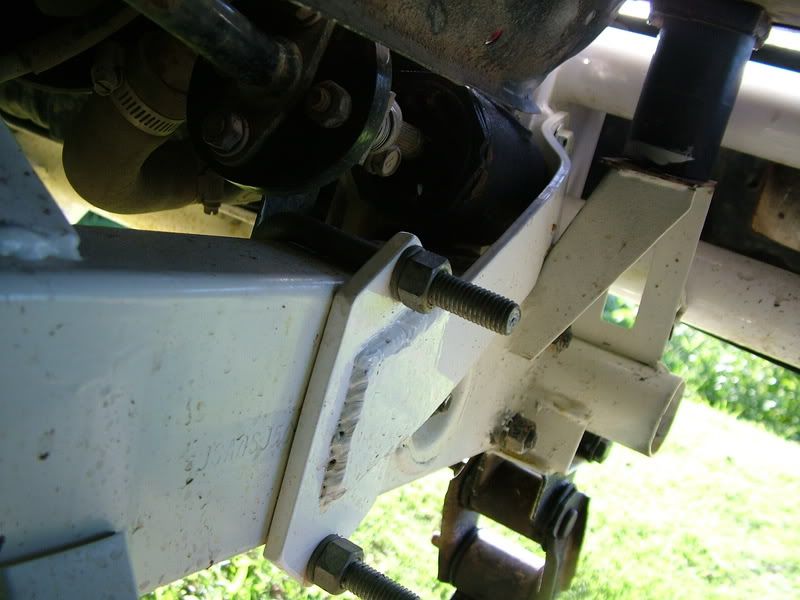
This pic shows the first two brackes in place, another two will go on the other side of the chassis rail opening. Also in this pic you can see the original bumper mount ends have been removed just past the front body mounts. This is to allow for larger tyres
We bent up another bar that will become a top hoop for the bar. This will have a UHF areial mounted on it and should give a little protection to a pair of driving lights the will be mounted under it.
Almost there. Still waiting on the second pair of mounting brackets, aerial and spotlight mounts plus a little clean up and paint. The original indicators and parking light were inserted into the front bumper. Here you can see the truck clearance lights we have added next to the headlights as a substitute.
Last edited by Nev62 on Wed Jun 04, 2008 5:50 pm, edited 1 time in total.
FJ62 Crusier GM V8 Diesel Lockers 33 MTs/35 117 extremes
Macarthur District 4WD Club http://www.macarthur4wdclub.com.au
Not at the moment but thinking about it. We will do a rear bar in the future (gotta do mine for my FJ62 first) and thinking of going for the round LEDs therealien wrote:nice dude! similar in style to mine, but rounder =)
i opted for LED lights, are yours LED?
FJ62 Crusier GM V8 Diesel Lockers 33 MTs/35 117 extremes
Macarthur District 4WD Club http://www.macarthur4wdclub.com.au
Just be careful with LED lights used for front parkers and indicators. There are relatively few LED lights that are ADR approved for front indicator and parker applications, and the ones I have seen are very bulky - i.e for the front of large trucks.
The small ones are generally amber front outline markers and are not ADR approved as an indicator.
Something to look out for. Defects have been raised for this and it's a PITA if you've built in light that's not approved.
Steve.
The small ones are generally amber front outline markers and are not ADR approved as an indicator.
Something to look out for. Defects have been raised for this and it's a PITA if you've built in light that's not approved.
Steve.
[quote="greg"] some say he is a man without happy dreams, or that he sees silver linings on clouds and wonders why they are not platinum... all we know, is he's called the stevie.[/quote]
mine have ADR as an indicator.. theyre marked as trailer indicators - not sure if they still make em but i think theyre HELLA or NARVA... mine are about 15mm wide by 70mm tall including mounting holes etc. The actual light area is about 10mm wide by 45mm tall - and they passed both inspections i had done.
The worst thing about censorship is ███████.
I got the bender from a guy at work who had no use for it (was his dad's who had passed away). It is only a cheapie one like the toolex brand from Gasweld for $149 to 12 tonnenorm84 wrote:nice work mate,
just wondering where you got the pipe bender from and how much was it
Last edited by Nev62 on Wed Jun 04, 2008 6:05 pm, edited 2 times in total.
FJ62 Crusier GM V8 Diesel Lockers 33 MTs/35 117 extremes
Macarthur District 4WD Club http://www.macarthur4wdclub.com.au
Yep, this is what we had in mind though not quite as tall between the the chassis bar and the body. We are also going to use the backet as an anchor point for the recovery hooks.just cruizin' wrote:For the mounts on the inside of the chassis rails take them up to the main bar. this will stiffen the whole thing up a bit more, if you push the top of the hoop it will probably a bit flexy.
FJ62 Crusier GM V8 Diesel Lockers 33 MTs/35 117 extremes
Macarthur District 4WD Club http://www.macarthur4wdclub.com.au
And hence the reason I work in IT and not a boilermakersuzimad wrote: THE WELDS LOOK TERRIBLE !
They do look awful but the penitration is very good. I could make them look pretty but it was a very quick job with function being the outcome and not apperance. If in the future I get board I might make it look nice but for now.....
FJ62 Crusier GM V8 Diesel Lockers 33 MTs/35 117 extremes
Macarthur District 4WD Club http://www.macarthur4wdclub.com.au
so the bolts that go threw the chassie to hold the bar on you just put it onto that and used a U bolt on the other end? what did you do for the bottom bolts?want33s wrote:If you plan on fitting recovery hooks (and using them) you might want to add a strengthening brace so you don't rip those four liitle bolts out at the front of the chassis.
I've snatched and winched heaps of 2 tonne 4bies with mine and no problems.
91 SWB Sierra. 16v 1.6efi, extractors, 6.1gears, SPOA, 32 BF muddys and 2inch bodylift
bar
looks good, just wondering what type of pipe you used and what thickness.
98 105 series LANDCRUISER
Re: bar
the pipe is 2 " and 3.6 thickPaul Smith wrote:looks good, just wondering what type of pipe you used and what thickness.
Tires are like boobs, they always look big until you have played with them for a while, then you just want a bigger set
Who is online
Users browsing this forum: No registered users and 1 guest