Notice: We request that you don't just set up a new account at this time if you are a previous user.
If you used to be one of our moderators, please feel free to reach out to Chris via the facebook Outerlimits4x4 group and he will get you set back up with access should he need you.
Recovery:If you cannot access your old email address and don't remember your password, please click here to log a change of email address so you can do a password reset.

How To: Fitting TJ Flares

Tech Talk for Suzuki owners.

Moderators: lay80n, sierrajim

Post Reply
Posts: 122
Joined: Mon Jul 16, 2007 9:32 pm
Location: Toowoomba

How To: Fitting TJ Flares

Post by neil_se »

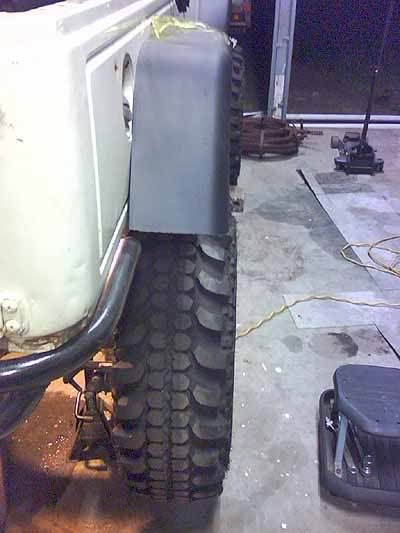
My standard flares were starting to look like crushed drink cans especially after my comp last weekend, so it was time to fit the TJ flares i've had sitting in the garage. I'm not a fan of using front TJ flares on the front so i got 2 sets of rears.

Before:
Image

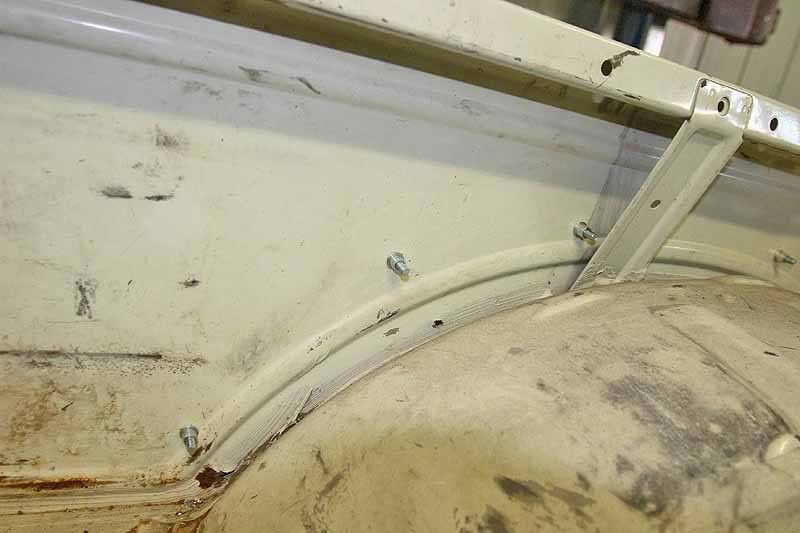
Start by removing the standard guards. If yours are as crushed as mine you'll need to hammer them out to get to the brackets. There's 5-6 screws and one 10mm nut for each flare. If you're lucky the bolts will come out whole. My front flares had been lifted by the previous owner so most came out fine, i only had to drill out one rear that rounded out.
Image

This will leave you with the flare bracket remaining. My front was tek screwed in which saved a lot of work.
Image
Image

Trim the back the inside of the TJ flares so they can sit flush with the body. Sit them over the flare brackets so they sit in the same position all round.
Image
Image

Mark the position with wax or chalk. Also mark on the flares where to cut the extra length off front and rear, and you might have to trim around the indicator if they sit over like mine.
Image

Using an angle grinder, grind back the spot welds that attach the flare bracket until you see the outline. Then gently lever the flare using a screwdriver or chisel to break the welds.
Image
Image

Grind back the welds until they're flush with the panel and paint over to prevent rust. Clamp the flares back into position and mark through the flare holes onto the body for screw positions.
Image
Image

Drill out the holes and fit the flares with tek screws. Done!
Image
Image

Bushwackers might look nicer but for $50 these will do. I still need to round off the edges of the flares and trim them in the middle level with the body or sliders. They'll be resprayed when I spray my car in the next few weeks.
Posts: 7345
Joined: Wed Jun 02, 2004 3:29 pm
Location: Melbourne

Post by Gwagensteve »

I always wondered what a Sierra would look like with rear TJ flares on the front. That looks 946586058405bazilliiontygazillion times better than those f$^#ing horrible TJ fronts people try and jam on the front of a sierra.

Good thread neil_se

Steve.
[quote="greg"] some say he is a man without happy dreams, or that he sees silver linings on clouds and wonders why they are not platinum... all we know, is he's called the stevie.[/quote]
Posts: 3940
Joined: Wed Dec 27, 2006 1:09 pm
Location: Sunshine Coast Qld

Post by want33s »

Would look good if you moved the side repeater to post 90 model position instead of half covering with the flare.
Jas.
Posts: 2600
Joined: Thu Sep 27, 2007 2:40 pm
Location: Townsville

Post by GRPABT1 »

Gwagensteve wrote:I always wondered what a Sierra would look like with rear TJ flares on the front. That looks 946586058405bazilliiontygazillion times better than those f$^#ing horrible TJ fronts people try and jam on the front of a sierra.

Good thread neil_se

Steve.
I was thinking this just the other day when I saw a dodgey pic of a zook with rear tj's all round in a magazine. Does look heaps better but I'm still umdercided yet...
Build Thread - http://www.outerlimits4x4.com/viewtopic.php?f=16&t=168546&p=1927514&hilit=GRPABT1%27s+zook#p1927514
Posts: 122
Joined: Mon Jul 16, 2007 9:32 pm
Location: Toowoomba

Post by neil_se »

I couldn't agree more, i hate the TJ fronts (i've got 2 sitting in the garage). There's a reason the bushwacker sets use modified rears all the way round. It would be better with the indicators moved, i might do it when i respray (and it'll be more legal rather than having them partly covered). Should i trim the flares level to the checkerplate on the side? I will be making new solid sliders someday soon.

I couldn't find any decent threads here or in the US about TJ rears all round so i thought people might want to see.
Posts: 2600
Joined: Thu Sep 27, 2007 2:40 pm
Location: Townsville

Post by GRPABT1 »

Can you take some pics from side on and from the front?
Build Thread - http://www.outerlimits4x4.com/viewtopic.php?f=16&t=168546&p=1927514&hilit=GRPABT1%27s+zook#p1927514
Posts: 3722
Joined: Sat Jan 18, 2003 7:32 pm
Location: perth wa

Post by bazooked »

Gwagensteve wrote:I always wondered what a Sierra would look like with rear TJ flares on the front. That looks 946586058405bazilliiontygazillion times better than those f$^#ing horrible TJ fronts people try and jam on the front of a sierra.

Good thread neil_se

Steve.
dont remember my old zook? :finger:

Image

Image
buggy time............
Posts: 7345
Joined: Wed Jun 02, 2004 3:29 pm
Location: Melbourne

Post by Gwagensteve »

That bottom photo is the only one I remember of your car and I hadn't made the connection.

I like the smooth look a lot more than the bushwacker pocketed style which look a lot more 1980's.

Neil_se - I do think they need a trim to make them look a it less bulky.

Steve.
[quote="greg"] some say he is a man without happy dreams, or that he sees silver linings on clouds and wonders why they are not platinum... all we know, is he's called the stevie.[/quote]
Posts: 122
Joined: Mon Jul 16, 2007 9:32 pm
Location: Toowoomba

Post by neil_se »

I'll move the GFs car and get some more pics today. I need to get a jigsaw and file to neaten and smooth the edges. I only had a metal cutoff wheel yesterday which just melts everything.
Posts: 7345
Joined: Wed Jun 02, 2004 3:29 pm
Location: Melbourne

Post by Gwagensteve »

Try a flap disc on the grinder. If you use a jigsaw you'll be up for a lot of filing/sanding to smooth out the cuts.

Steve.
[quote="greg"] some say he is a man without happy dreams, or that he sees silver linings on clouds and wonders why they are not platinum... all we know, is he's called the stevie.[/quote]
Posts: 122
Joined: Mon Jul 16, 2007 9:32 pm
Location: Toowoomba

Post by neil_se »

Ah true true, i've got an old flap disc around here somewhere that would be perfect.
Posts: 2169
Joined: Fri Jun 16, 2006 4:41 pm
Location: melbourne

Post by joeblow »

Gwagensteve wrote:I always wondered what a Sierra would look like with rear TJ flares on the front. That looks 946586058405bazilliiontygazillion times better than those f$^#ing horrible TJ fronts people try and jam on the front of a sierra.

Good thread neil_se

Steve.
breath deeply little man...breath deeply.....settle down.....
lwb 1.6efi,4sp auto,f&r airlockers,dual t/cases.custom coils.builder of ROAD LEGAL custom suzukis...and other stuff.
CAD modelling-TECH drawings-DXF preparation.
http://www.auszookers.com/index.php
Posts: 2600
Joined: Thu Sep 27, 2007 2:40 pm
Location: Townsville

Post by GRPABT1 »

Yeah I reckon they'd look hot with a bit of a trim on the very outside vertical edge to make them look a little more "petite" so to speak. And with a bit of a paint.
Build Thread - http://www.outerlimits4x4.com/viewtopic.php?f=16&t=168546&p=1927514&hilit=GRPABT1%27s+zook#p1927514
Posts: 654
Joined: Thu Nov 28, 2002 10:04 am
Location: Central Coast

Post by Bentzook »

Image
"Gravitron " : drives the first layer of Gravity
Posts: 5226
Joined: Sun Jul 27, 2003 2:03 pm
Location: Sydney

Post by Squik »

Wow... how did you get that red box to fit so well? Did you have to trim the guards much? Is it held on by pop-rivets or silicon? Does it come in any other colours? Can I get a box like that for my wiper shims??? :shock:
DRS smells like a cat-food milkshake... and wet socks... and gorgonzola cheese... all whizzed up in a blender
Posts: 2199
Joined: Sat May 01, 2004 4:59 pm
Location: dandenong vic

Post by built4thrashing »

Hey Bentzook.
you just need to widen the front bar to the same width as the flares and it would almost look factory.
1999 SQ625 Manual Grand Vitara. Lifted, Twin Locked, 31' Extremes, dual Batteries, Winch.
Lots of custom gear as I cant afford the proper stuff.
Posts: 2600
Joined: Thu Sep 27, 2007 2:40 pm
Location: Townsville

Post by GRPABT1 »

Bentzook wrote:Image
What's the point of widened flares if your tyres still stick out past them?
Build Thread - http://www.outerlimits4x4.com/viewtopic.php?f=16&t=168546&p=1927514&hilit=GRPABT1%27s+zook#p1927514
Posts: 154
Joined: Sat Nov 17, 2007 12:08 pm
Location: why should i tell you

Post by over land 4x4 »

if someone is looking for cheap tj flares to do this then have a look here

http://cgi.ebay.com.au/ws/eBayISAPI.dll ... :IT&ih=014

thanks :)
I dont know squat!!!!!!!!!!

"Just when I think you've gone and said the stupidest thing ever, you keep on talking!"
Posts: 654
Joined: Thu Nov 28, 2002 10:04 am
Location: Central Coast

Post by Bentzook »

GRPABT1 wrote:
Bentzook wrote:Image
What's the point of widened flares if your tyres still stick out past them?
Since this photo last year, I`ve taken out the wide forerunner diff and replaced it with a Bunderra diff, bringing the overall wideth back, the tyres are now only 30mm outside the guard and will get covered by a side rail exo. The wheel spacers on the front Hilux diff will get removed aswell, bringing them into line with the rear.

Image
Last edited by Bentzook on Tue Jul 08, 2008 8:05 pm, edited 1 time in total.
"Gravitron " : drives the first layer of Gravity
Posts: 654
Joined: Thu Nov 28, 2002 10:04 am
Location: Central Coast

Post by Bentzook »

Th e TJ flares were put on using Nutserts, a very easy way to install flares on thin sheet metal.

Image
"Gravitron " : drives the first layer of Gravity
Posts: 3685
Joined: Sat Sep 27, 2003 8:38 am
Location: Sydney

Post by Roctoy »

Hey Marcus, did you get those brake caliper brackets to work in the end? I cut one corner of one up here and it fitted (bracket still had 3 bolts holding it on, that's one up on a factory mount! :armsup:
Outers & Arms up stickers coming soon you hungry bitches!

http://www.myultimate4wd.com
GRIMACE wrote:How I miss the days of care free wheelin with the crews!
Posts: 654
Joined: Thu Nov 28, 2002 10:04 am
Location: Central Coast

Post by Bentzook »

They were difficult but a little grinding and all 4 bolts mounted up


Image
"Gravitron " : drives the first layer of Gravity
Posts: 122
Joined: Mon Jul 16, 2007 9:32 pm
Location: Toowoomba

Post by neil_se »

I used tek screws because i couldn't get behind the panel for most of the screws and i wanted them to be easily removable.
Posts: 7345
Joined: Wed Jun 02, 2004 3:29 pm
Location: Melbourne

Post by Gwagensteve »

You don't need to get behind the panel to use nutserts/rivnuts.

They're grouse. My kit gets lots of use.

Steve.
[quote="greg"] some say he is a man without happy dreams, or that he sees silver linings on clouds and wonders why they are not platinum... all we know, is he's called the stevie.[/quote]
Posts: 2600
Joined: Thu Sep 27, 2007 2:40 pm
Location: Townsville

Post by GRPABT1 »

maybe you should do a how to on using them?
Build Thread - http://www.outerlimits4x4.com/viewtopic.php?f=16&t=168546&p=1927514&hilit=GRPABT1%27s+zook#p1927514
Posts: 122
Joined: Mon Jul 16, 2007 9:32 pm
Location: Toowoomba

Post by neil_se »

Indeed, i've never used them before.
Posts: 7345
Joined: Wed Jun 02, 2004 3:29 pm
Location: Melbourne

Post by Gwagensteve »

http://avdel-global.com/en/products/thr ... tsert.html

This shows a pneumatic installation tool. I have a manual tool that's really like a rivet gun

http://www.daggertools.com/m5_view_item ... tem=DT1440

like this. Most engineering suppliers have them. there are also lots of cheaper ways of doing it too like doing up bolts in them to close them up etc.

Steve.
[quote="greg"] some say he is a man without happy dreams, or that he sees silver linings on clouds and wonders why they are not platinum... all we know, is he's called the stevie.[/quote]
Posts: 1889
Joined: Mon Sep 20, 2004 10:23 pm
Location: Brisbane

Post by just cruizin' »

Gwagensteve wrote:http://avdel-global.com/en/products/thr ... tsert.html

This shows a pneumatic installation tool. I have a manual tool that's really like a rivet gun

http://www.daggertools.com/m5_view_item ... tem=DT1440

like this. Most engineering suppliers have them. there are also lots of cheaper ways of doing it too like doing up bolts in them to close them up etc.

Steve.
Can do the bolt trick but it doesn't always work as the nutsert will spin as you try and do up the bolt thus you don't get the right clamping force. But they are a great item for this type of work
;)
Posts: 7954
Joined: Fri Sep 05, 2003 5:43 pm
Location: Tasmania

Post by DeWsE »

Is that the Zook that can defy gravity?

It had to be said!
[quote="STD CONSUMER"]haha, i'm tellin you, my camp was hard to find on Saturday night!
then i shared my bed with 2 second tom... [/quote]
Posts: 654
Joined: Thu Nov 28, 2002 10:04 am
Location: Central Coast

Post by Bentzook »

DeWsE wrote:Is that the Zook that can defy gravity?

It had to be said!
Gravitron. Mark II
"Gravitron " : drives the first layer of Gravity
Post Reply

Who is online

Users browsing this forum: No registered users and 71 guests