Notice: We request that you don't just set up a new account at this time if you are a previous user.
If you used to be one of our moderators, please feel free to reach out to Chris via the facebook Outerlimits4x4 group and he will get you set back up with access should he need you.
Recovery:If you cannot access your old email address and don't remember your password, please click here to log a change of email address so you can do a password reset.
Stuff I'm Making
Moderators: toaddog, TWISTY, V8Patrol, Moderators
Stuff I'm Making
So after being told by a few people to stop spamming up the TOTT thread (and any others), I decided that this would be my own little space to post up photo's of stuff that I make.
Will you learn anything? Hopefully a thing or two
Am I looking for advice/criticism/pointers? Of course.
I'm a third yr apprentice boilermaker/fabricator so any hints or tricks that I can find I will take on board.
This brings us to the trailer I just built for my old man. Maybe it might give some people an idea or two, maybe not.
Theres a zillion photos so I'll try and break up the posts as much as I can.
This is what I started with. A basic 6x4 tradesman trailer with a 750kg rating but constantly pushing the 1000kg mark. It was built some 20 years ago and needed some real tender lovin...
Not bad, but years of abuse had taken it's toll. Frame was bent and twisted, drawbar had a kink in it, there were some bodgy hack repair jobs underneath (not me ) and from my calculations it consisted of 35% metal, 25% paint, 5% rust and the rest held together with hopes and dreams....
The plan was to put the body onto a new chassis that could safely carry 1500kg ontop of a H/D axle, Hilux SR5 wheels, springs and full brake set up.
Also be able to carry a helicopter (trowel machine) toolbox out back for concrete pins, interior storage shelf and a new roof rack with removeable front racks for long pieces of formwork etc.
So the build started, 75x50x3 for the entire chassis.
Will you learn anything? Hopefully a thing or two
Am I looking for advice/criticism/pointers? Of course.
I'm a third yr apprentice boilermaker/fabricator so any hints or tricks that I can find I will take on board.
This brings us to the trailer I just built for my old man. Maybe it might give some people an idea or two, maybe not.
Theres a zillion photos so I'll try and break up the posts as much as I can.
This is what I started with. A basic 6x4 tradesman trailer with a 750kg rating but constantly pushing the 1000kg mark. It was built some 20 years ago and needed some real tender lovin...
Not bad, but years of abuse had taken it's toll. Frame was bent and twisted, drawbar had a kink in it, there were some bodgy hack repair jobs underneath (not me ) and from my calculations it consisted of 35% metal, 25% paint, 5% rust and the rest held together with hopes and dreams....
The plan was to put the body onto a new chassis that could safely carry 1500kg ontop of a H/D axle, Hilux SR5 wheels, springs and full brake set up.
Also be able to carry a helicopter (trowel machine) toolbox out back for concrete pins, interior storage shelf and a new roof rack with removeable front racks for long pieces of formwork etc.
So the build started, 75x50x3 for the entire chassis.
love_mud wrote: my hose is small .. but it's comfortable and full of life.
Re: Stuff I'm Making
"Why use blue steel instead of galv"
Good question. Firstly, because it is far easier and less time consuming to weld steel with blue paint than steel covered with galv. I weld a lot of galv at work and I am very confident in my ability to weld it together. However, no matter what settings or how many times I do it, every now and then you'll get a snap, crackle and pop, and discover that your seemingly neat weld looks like an aero bar on the inside.
Secondly, I hate the fumes with a deep passion. It is avoidable by removing the galv after each cut around the area to be welded but that is extra time and mucking around that I do not wish to spend for little to no gain. Blue steel is more expensive but we were happy to pay a few extra dollars to save us time and headaches.
Anyway's, frame was finished (for the most part). Heavy bastard too. By my calculations the bare frame weighed approx. 135kg. Moving that around and turning it over and upwards on your own is no fun at all. All welds were done in a standard horizontal fillet position, no vertical downs or overheads on the chassis. Once done it came time to mount the axle, springs and wheels. 50mm square solid axle with Landcruiser 6 stud hubs and drum brakes, 1650kg rated with 1500kg leaf springs. Mounts are just standard 10mm plate mounts.
Now this presented me with a wee bit of a problem. The 10mm plate mounts weren't the issue, it was the fact that all the spring/axle mounts were going to be hanging off of a pieve of RHS 3mm thick by 50mm wide. Not beef enough. So after some brainfarting, I stitched some 40x6mm flat bar along the underside of the rails. 6mm welds to 3mm nicely, and 10mm welds to 6mm nicely. Plenty beef enough
Good question. Firstly, because it is far easier and less time consuming to weld steel with blue paint than steel covered with galv. I weld a lot of galv at work and I am very confident in my ability to weld it together. However, no matter what settings or how many times I do it, every now and then you'll get a snap, crackle and pop, and discover that your seemingly neat weld looks like an aero bar on the inside.
Secondly, I hate the fumes with a deep passion. It is avoidable by removing the galv after each cut around the area to be welded but that is extra time and mucking around that I do not wish to spend for little to no gain. Blue steel is more expensive but we were happy to pay a few extra dollars to save us time and headaches.
Anyway's, frame was finished (for the most part). Heavy bastard too. By my calculations the bare frame weighed approx. 135kg. Moving that around and turning it over and upwards on your own is no fun at all. All welds were done in a standard horizontal fillet position, no vertical downs or overheads on the chassis. Once done it came time to mount the axle, springs and wheels. 50mm square solid axle with Landcruiser 6 stud hubs and drum brakes, 1650kg rated with 1500kg leaf springs. Mounts are just standard 10mm plate mounts.
Now this presented me with a wee bit of a problem. The 10mm plate mounts weren't the issue, it was the fact that all the spring/axle mounts were going to be hanging off of a pieve of RHS 3mm thick by 50mm wide. Not beef enough. So after some brainfarting, I stitched some 40x6mm flat bar along the underside of the rails. 6mm welds to 3mm nicely, and 10mm welds to 6mm nicely. Plenty beef enough
Last edited by Chook91 on Wed Sep 25, 2013 11:37 pm, edited 1 time in total.
love_mud wrote: my hose is small .. but it's comfortable and full of life.
Re: Stuff I'm Making
On the above pic it shows 2 pieces of 50x50x4 angle welded to the chassis. It sits flush with the top and adds another bolt down location for rear toolbox.
Anyway, we mounted the axle and some spare Navara wheels (temporarily), flipped it, and voila! 10x's easier to move around.
While I was busy busting knuckles and catching my shin's on the frame, my old boy bent up some tie-down rails for the front out of 20mm solid, the oxy, and some thick pipe to make the curves. Turned out nice!
Now to put the tow hitch/ coupling on. Again, possibly went overkill on this one but at least I know that if the whole world ends, the hitch and mount plate will still stand a chance.
Cut some 6mm plate and fully welded around the top edges to the front of the drawbar. Had the welder up pretty hot for this (as hot as a 180amp mig with 0.8mm wire can go anyway).
Capped the front of the chassis with 4mm plate aswell. Welded another piece of 50x8mm plate for the U-bolts to bolt through on the underside of the chassis rails. Also welded in a spacer to act a little bit like an "anti crush" spacer.
Ain't going no where!
love_mud wrote: my hose is small .. but it's comfortable and full of life.
Re: Stuff I'm Making
The jockey wheel came so that you could set it at any height you want, it just had to be welded where appropriate. Quick run around and we're all set.
With the jockey wheel done, front tie down rails finished, hitch mounted, and 2 pieces of 50x4 flat bar welded flush with the top of the frame, the front was pretty well finished.
We no longer had to rely of bricks, timber off cuts, picnic bench seats of half a dozed weet-bix in the morning to hold the frame up and steady while we worked on it. Also meant we could move it out of the shed and give it a sweep!
love_mud wrote: my hose is small .. but it's comfortable and full of life.
Re: Stuff I'm Making
Now for the guards. The one's on the trailer were bent, twisted and looked like shit. That and the fact a 30x9.5 wheel wouldn't fit inside. So the plan was to hack off the guards from the original body, and have some bling alloy ones bent up. We also decided to make them run the full length of the body and sturdy enough to act as a step for when loading stuff onto the roof rack. So heres what I came up with...
Angle is 75x50x5 and the RHS spanning between the angle is 50x25x4. The angle has been cut so at the frame end it is 75mm wide but on the outside it matches with the 50mm RHS.
love_mud wrote: my hose is small .. but it's comfortable and full of life.
Re: Stuff I'm Making
We had to add another piece of RHS to the rear due to the fact we decided to use a different size toolbox. It also meant we could bring the side's out 20mm past the width of the wheel and make the guard pieces to suit. Please note that the wheels in this pic are 275 profiles, much wider and different offset to the wheels that will be used. Because the guard steps were longer behind the wheel than the ones in front, we added a brace inbetween.
And so the rear end looks like so
Next stage involved stripping the other trailer and modifying it to suit the frame. Will post updates over the next few days.
Chook
And so the rear end looks like so
Next stage involved stripping the other trailer and modifying it to suit the frame. Will post updates over the next few days.
Chook
love_mud wrote: my hose is small .. but it's comfortable and full of life.
Re: Stuff I'm Making
Welds look neat and strong
Nitto Mud Grapplers, Lockrite, 4.3s, Trail Ready BL, PTO, High pinion rear,Gu diff with Buds Customs armour and heaps of Superior gear, 24% Reduction .
Re: Stuff I'm Making
Looks good some nice fab work there.
Re: Stuff I'm Making
Looks excellent!!
Do you make rear bars for GQs?
1992 Nissan Patrol GQ LWB TD42
Re: Stuff I'm Making
Cheers guys!
Have some more photo uploading to do so will post an update tomorrow arvo
Chook
Well I've got a front bar, side steps and side rails to do for my old boys Hilux, aswell as a rear bar (have a nifty idea on this one) for it. Plus one of the guys at work wants a rear bar for a 4runner. So I'm gonna be flat knacker for a little bit!Maverick93 wrote:Looks excellent!!
Do you make rear bars for GQs?
Have some more photo uploading to do so will post an update tomorrow arvo
Chook
love_mud wrote: my hose is small .. but it's comfortable and full of life.
Posts: 689
Joined: Sat Oct 09, 2010 5:12 pm
Location: SMUGGLING COOOOOKIES ACROSS THE MEXICAN BORDER
Re: Stuff I'm Making
I hope you had this up and running when you went for that job..
like I said, it gives you a one up on every other guy..
no one does this stuff...
as soon as you get up with the semi trailers, making and stuff,
move on.. next field..
gives you more experience..
like I said, it gives you a one up on every other guy..
no one does this stuff...
as soon as you get up with the semi trailers, making and stuff,
move on.. next field..
gives you more experience..
AUSTRALIA
WORTH LOOKING AT WORTH LOOKING AFTER
Re: Stuff I'm Making
More on this point later.CRUZAAMAD wrote:I hope you had this up and running when you went for that job..
like I said, it gives you a one up on every other guy..
no one does this stuff...
as soon as you get up with the semi trailers, making and stuff,
move on.. next field..
gives you more experience..
I promised pics so I better deliver...
As mentioned, next step was removing the old body from the old chassis, which was a giant pain in the ass. I didn't snag any pics during this process (mostly because I was bawling my eyes out at the amount of farking around involved) but I'll explain as best I can.
First things first, we put the trailer up on blocks and removed the wheels, springs and axle. These are still perfectly useable and more than likely I'll build another trailer in the future just to flog off. Then we cut off the guards and tie down rails. Once done, the drawbar was hacked off and we were left with a bare box but still with a chassis attached. So we flipped it over and I marked out where the new chassis would sit, and cut the profiles out underneath. If I hadn't done this, the body would've sat on top of 50mm angle, on top of the new chassis. Not a good look, and a bit hack looking. Cutting the profiles out meant the body would sit nice and flat on the new frame. After all the cutting was done, we (barely) managed to flip the body back over and place it on the new frame. The body was slightly crook so 6 large clamps were used to hold it down level while it was welded to the new frame.
Anyone lost yet??
Here is the result.
I better explain the above picture and why I used that technique. The metal on the body was some 25-30 odd years old and was covered with a layer of primer, paint and rust. After that had been cleaned off, I had a layer of silicone on the inside of the body to deal with. That is a fawk load of prep work involved for a few welds. I cleaned each spot fairly well before I welded it, but I knew that even if I tried to lay a straight fillet weld, I would get a bad reaction from the contaminants behind the metal. So I did what I sometimes do when welding galv. I turned the welder up a notch and went spot/spot/spot/spot along until I finished. The trick was to keep my timing even, so that I had a consistent weld, and managed to keep the puddle red hot between each spot. The result? A strong weld with no porosity.
Some might disagree and that is totally ok. But I do this everyday for a living so I kind of like to think I can recognize a proper weld when I see one. Im 100% happy with how it turned out so that's that.
love_mud wrote: my hose is small .. but it's comfortable and full of life.
Re: Stuff I'm Making
In the above pics it shows that we also chopped the original roof rack. Figured I could make something a bit stronger and slightly less dodgy looking (slightly).
25x25x2.5 RHS and some more 20mm solid bar for tie down rails and this is what I wound up with.
I was starting to bring the suck with picture taking at this point but when finished it also had side rails which stick up 125mm. We made the rack 1250 wide so that a standard width sheet of form ply would fit inbetween the rails. Also when we cut off the original roof rack, we also cut the mounts down 30mm so the rack sat a little closer to the doors when they were fully open. Also means a bit less of a stretch when tying stuff down
love_mud wrote: my hose is small .. but it's comfortable and full of life.
Re: Stuff I'm Making
Going to have to jump forwards quite a bit for the next set of pics as only finished product pics were taken.
Next on the agenda after the roof rack was a spare tire mount. Had to be beef enough to hold a full size spare and not fall to pieces when travelling over corrugations. Remember the sheet metal on the body is only 2mm
Had a good think about how I was going to do this and I decided my best bet was to use as much surface area as possibly for the spare tire mount, in an effort to add strength and to minimize stress in isolated areas. The big cross shaped section is 50x25x4 RHS and the angle is 50x50x4. Everything is fully welded all the way round, with the joins in the RHS beveled to ensure maximum weld penetration. The last thing I want is a spare tire taking flying lessons at 100km/h, therefore overkill is a necessity. Drilled 2 holes for wheel studs in the angle and welded 2 20mm Hi tensile bolts to the underside. The whole frame was then stitch welded to the back panel of the trailer. Welded 50mm, skipped 100mm and repeat. Also added a piece of 6mm flat bar between the top of the spare wheel frame and the roof rack, as a just in case back up plan. The ends of the RHS were also capped and smoothed off.
love_mud wrote: my hose is small .. but it's comfortable and full of life.
Re: Stuff I'm Making
Also decided to make an internal storage shelf for small bits like drills, angle grinders and other small stuff. Much easier than digging around in a black recycling tub. Simple rectangular frame out of 25x25x2 RHS and a couple of upright supports to the roof of the trailer. 2mm ally chequerplate was riveted to the underside to act as a base, then we cut some rubber sheet to sit inside the frame so that tools wouldn't go sliding around while driving.
This pic also shows the only part of the trailer I'm not happy with. It's been rust treated/proofed etc but it still looks like shiyte. I wanted to fix it but there was a lot of dicking around involved and time was of the essence.
Righto, too tired for anymore. Let me know what you think and I'll post some more pics soon. (For the record, the trailer is completely finished, I'm just breaking up the posts to try and keep you guys interested )
And if you have any questions, just ask. I might be able to help out.
Cheers
Chook
love_mud wrote: my hose is small .. but it's comfortable and full of life.
Re: Stuff I'm Making
Any idea what it weighs laden/unladen? Looks bloody heavy!! But I guess that's what you pay for solid and well built.
Dave
Re: Stuff I'm Making
Not sure how other states work, but with me being in NSW a state that knows how to charge for registration, I would have put a deck on it, some guards and lights and gone and registered it as a flat deck, then came back to adding the "load" at a later date to reduce the registered weight of the trailer.Canyonero 4x4 wrote:Any idea what it weighs laden/unladen? Looks bloody heavy!! But I guess that's what you pay for solid and well built.
If God did not intend for us to eat animals, then why did he make them out of meat?
Re: Stuff I'm Making
Yeah I had a 6x4 tradesman trailer and when I registered it in NSW I had to pay a heap in rego and needed a pink slip every year. The thing didn't even have brakes. The canopy bolted on/off so I took it off, had it weighed again, re rego'd and put the top back on as a 'load'. Paid $50 a year after that, no pinky, thanks for coming.r0ck_m0nkey wrote:Not sure how other states work, but with me being in NSW a state that knows how to charge for registration, I would have put a deck on it, some guards and lights and gone and registered it as a flat deck, then came back to adding the "load" at a later date to reduce the registered weight of the trailer.Canyonero 4x4 wrote:Any idea what it weighs laden/unladen? Looks bloody heavy!! But I guess that's what you pay for solid and well built.
Dave
Re: Stuff I'm Making
Im only guessing but here's what I reckon:Canyonero 4x4 wrote:Yeah I had a 6x4 tradesman trailer and when I registered it in NSW I had to pay a heap in rego and needed a pink slip every year. The thing didn't even have brakes. The canopy bolted on/off so I took it off, had it weighed again, re rego'd and put the top back on as a 'load'. Paid $50 a year after that, no pinky, thanks for coming.r0ck_m0nkey wrote:Not sure how other states work, but with me being in NSW a state that knows how to charge for registration, I would have put a deck on it, some guards and lights and gone and registered it as a flat deck, then came back to adding the "load" at a later date to reduce the registered weight of the trailer.Canyonero 4x4 wrote:Any idea what it weighs laden/unladen? Looks bloody heavy!! But I guess that's what you pay for solid and well built.
Whole frame -135kg
Axle/springs/wheels/hubs- 75-80kg
Service Body- Myself, my old man and a 16yr old brother with chicken wings could lift it up onto the frame with only slight difficulty. I'll take a stab at 80-90kg.
Roof rack-15kg
Guards/front and rear decks- couldn't be more than 20kg I think It's all 3mm ally chequer plate but the guards are 2mm.
Hitch/coupling/jockey wheel-12kg
Internal rack- 5kg
Grand total= 360kg (give or take)
Like I said, these are all guesses but I think they are fairly accurate. Trailer hasn't been over a weigh bridge yet but that will happen shortly.
The trailer was taken to Kessner Trailers (the original manufacturers) where it was inspected, passed, and had a VIN stamped for it. Cost $40. I think rego was something like $85.
Anyway I better throw up all the completed (for now, big plans ahead) photos.
You can see 2 pieces of 50x50rhs welded to the front with a nut and bolt as well. These are for remove able racks in the future
Small rubber lined clips for brake line.
love_mud wrote: my hose is small .. but it's comfortable and full of life.
Re: Stuff I'm Making
So as far as a work trailer is concerned, she is pretty well done. Toolboxes for the front and rear will eventually happen but for now they are not vital.
My old man took the trailer loaded with camping gear down to 42mile crossing on the long weekend through the sand dunes. I was a bit anxious to hear how this trailer loaded up would travel over sand. He says it floated over the dunes. With the tyres down to 16psi, he barely knew it was there
Which brings us to the next part of the build. He had some time to talk to some friends who had camper trailers with them and after much bullshizen here is the new plan;
Removable enclosed drawer system to sit on the flat deck on the draw bar that will house 2 drawers and a 110L Waeco. RHS frame with ally chequer plate panels. Completely weather proof.
On the rear, have a similar box that will swing out from the back of the trailer (more than likely use a trailer stub axle for a pivot) and voila, camping kitchen with gas burner, drawers and a sink, aswell as an area for food prep. This whole combination also removeable.
Ontop of the drawer system on the front of the drawbar, have a 2 person rooftop tent.
A queen size camp mattress will fit inside the trailer bed once cleared. This means we throw an extra swag in and we all are comfy.
Weather proof the service body. It's pretty good at the moment but it could be better.
And a few other bits and pieces
Will keep you updated, progress should start either during the week or on the weekend.
Cheers
Chook
love_mud wrote: my hose is small .. but it's comfortable and full of life.
Re: Stuff I'm Making
Not trailer related this time but the title is "Stuff" I'm Making. Figured there hasn't been an update in a while so I better make some stuff. And I know how much you guys luurve a lil bootay fab, so here are my efforts.
Not before Christmas, but definitely in the near future, I'm going to be making bit's and pieces (sliders, tray's, front bar for the old man etc) where I'd like to use dimple dies. For speed purposes you see.
Seen a few cracker examples of home made dimple presses over on Pirate so I thought I'd give the poor man's route a shot.
Now I am by no means what so ever a machinist. I got shown the on button, the off button, and where not to stick valuable (reproductive) body parts. Rest was up to me.
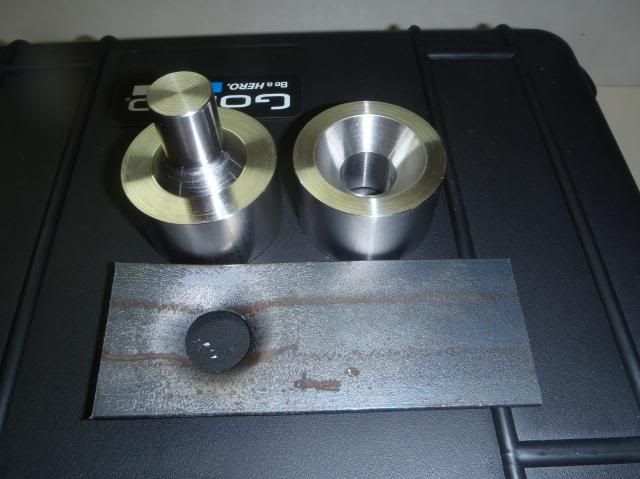
Machined down a piece of 50mm solid round for a female end and bored out the centre to 22mm. Put a chamfer on the inside and welded it to a piece of 200x200x16 plate for a base.
The top was harder. again, made it out of 50mm solid, and machined the end down to 19mm. Another chamfer was added to suit the female end. This piece was then welded to a short length of 65mm heavy wall pipe, with a nut and bolt so it could be used on our workshop press (300 tonne, bit overkill but ehh).
And this is how it turned out;
The finish is quite rough, something I definitely want to work on. But considering how much time I've spent on a lathe, I was pretty happy. Whole ordeal took about 5hrs I think. Could've shortened that somewhat if I had some clue what I was doing
Found some 2.5mm sheet, cut myself a slice, and punched out some 20mm holes in the cropper. Then put it through the press and here we go;
I mean, if you pulled out the micrometer then sure, you'd figure out that each dimple is not an exact replica of the previous. But from the naked eye and about half a meter back, you'd barely even know. My issue at the moment is keeping the male die straight in the press. I have a few ideas on how to rectify that though. And yes the plate does bend a little. Hammer and a block of timber fixes that pretty quick, but again, I have an idea on how to fix.
So yeah, that's what I've been doing. Once I iron out the bugs with this one, I am going to make a few more different sized dies.
Let me know what you think.
Cheers
Chook
love_mud wrote: my hose is small .. but it's comfortable and full of life.
Re: Stuff I'm Making
Nice work on the dimple die, how much in materials it cost you?
1993 80 series, 4" tough dog adjustable bb lift kit, LPG, 35" MTR'S
brooksy wrote:Branden Tagg.....He is the King of all f@rkups & a Gimps bitch after hours
Re: Stuff I'm Making
Cost me nothing.
H/d pipe was an off cut in the scrap bin.
Piece of plate was a spare from another project, cut a few extra plates by mistake.
50mm solid was from a spare length (about 1500mm) that was used as a temporary brace on a big frame we made.
And I found the nut and bolt in a pile of rubbish.
Work was slower than a drunk snail on that day and the foreman was happy for me to goof around for a few hours.
A win on all fronts I reckon
Chook
love_mud wrote: my hose is small .. but it's comfortable and full of life.
Re: Stuff I'm Making
Nice work mate, dimple die looks good. I turned one up at work too, having the same issue as you keeping material flat.
Who is online
Users browsing this forum: No registered users and 135 guests