hey guys,
thinking of re-wiring the 40 longer term. I was thinking with a wiring diagram it shouldn't be too hard to rig a pretty complete loom before having to install it..
i guess if i was to do it myself i wouldn't mind taking my time and doing things properly.. sealed box for fuse,relays, labled in easy reach, etc..
does anyone have any tips for someone with basic auto elec skills (wire up spotties, horns, can read elect diags a bit) on doing such a job?
what the prefered guage of wire to use,
what some fancy things the comp rigs use?
any comments appreciated...
Notice: We request that you don't just set up a new account at this time if you are a previous user.
If you used to be one of our moderators, please feel free to reach out to Chris via the facebook Outerlimits4x4 group and he will get you set back up with access should he need you.
If you used to be one of our moderators, please feel free to reach out to Chris via the facebook Outerlimits4x4 group and he will get you set back up with access should he need you.
Recovery:If you cannot access your old email address and don't remember your password, please click here to log a change of email address so you can do a password reset.
re-wiring tips - fancy tricks
Moderator: -Scott-

Not an easy job but not impossible.
regards the guages........... The cable must be able to handle whatever the number of amps are thats being sucked through.
Different items will draw different ammounts of power and hence not all cables will be the same size.
Similarly each fuse should be rated to protect the cable........and ultimately your truck.
Also ensure that the cable is well protected at any point that it passes through the firewall or near any sharp metal edges..........also take care where you are running it under the truck.......... Remember a fourbee rattles and shakes and vibrates a massive ammount and that can wear through not properly protected cable really quick...........same with rocks flying up underneath etc.
A final tip is not to just willy nilly pull it all apart......... trace every cable and write on them at both ends so you know exactly where it came from or went to.
Thats a pretty basic start but should help you a bit.
Go Hard or Go home
Thanks for the tips..
in regards to the guage of wire to use.. is it ok to go overkill? eg. find the max amps that will be found on the vehicle and use all cable to that spec for everything (maybe not the battery cables, but you know wot i mean right)? If a device doesnt use the max amps its not going to stop it working is it?
I have no intentions of pulling everything out and starting from scratch.. more like take the time to do it slowly and properly.. I agree its a pretty big job but nothing you can't do with some time and patience..
i want to get a few fuse boxes togheter (incab and engine bay), upgraded looms and better wiring.. when your figuring out lengths, do you just estimate and plan on triming the length on one end? eg longer is better then shorter (obviously)..
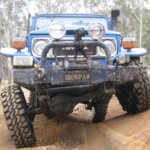
At the moment I have a heap of relays on my airbox that I would like to try and clean up (among all other wiring) as you can see there is crap everywhere..

I guess figuring out what accessories to account for in the future would help ensure the expandability of the loom in the future..
I was also going to make sure everything is properly protected once the looms complete.. cos as you can see its a dogs breakfast at the moment.
I would like to try and make it as watertight as I can as well..
I was thinking this is probably a project that I could stretch out for ages.. just doing particular circuits here and there every so often... no doubt having a plan would help..
What would be better? Relays and Fuses in cab or under bonnet? Its getting a bit tight for space in the engine bay at the moment.. and I guess if I remove the aircon from inside the cab I could have a bit of usable space in the pax footwell...
in regards to the guage of wire to use.. is it ok to go overkill? eg. find the max amps that will be found on the vehicle and use all cable to that spec for everything (maybe not the battery cables, but you know wot i mean right)? If a device doesnt use the max amps its not going to stop it working is it?
I have no intentions of pulling everything out and starting from scratch.. more like take the time to do it slowly and properly.. I agree its a pretty big job but nothing you can't do with some time and patience..
i want to get a few fuse boxes togheter (incab and engine bay), upgraded looms and better wiring.. when your figuring out lengths, do you just estimate and plan on triming the length on one end? eg longer is better then shorter (obviously)..
At the moment I have a heap of relays on my airbox that I would like to try and clean up (among all other wiring) as you can see there is crap everywhere..
I guess figuring out what accessories to account for in the future would help ensure the expandability of the loom in the future..
I was also going to make sure everything is properly protected once the looms complete.. cos as you can see its a dogs breakfast at the moment.
I would like to try and make it as watertight as I can as well..
I was thinking this is probably a project that I could stretch out for ages.. just doing particular circuits here and there every so often... no doubt having a plan would help..
What would be better? Relays and Fuses in cab or under bonnet? Its getting a bit tight for space in the engine bay at the moment.. and I guess if I remove the aircon from inside the cab I could have a bit of usable space in the pax footwell...

Hi shorty_f0rty, BIG JOB but once it’s finished it will be very gratifying.
As for the relays, as most will be for headlights and the like, you are best fitting them and there related fuses as close to the battery as possible.
This will reduce voltage drop that occurs in long runs of wire, no matter how thick the wire is.
By using thick wire and keeping the wire runs short, you should end up with brighter lights.
Using thicker wire all over is a bit of an over kill but it will not effect anything other than make your fuses blow quicker if there is a short and obviously this is a good thing.
Before you do anything get a workshop manual for your make and model, it will save you a lot of time if you do make an error in the new wiring loom.
Cheers and have fun.
2007 TDV8 Range Rover Lux
2009 2.7 Discovery 4
2009 2.7 Discovery 4
Maybe instaed of running a dozen cables into the cab to supply power for all the different items in there..........you could run just one.
You will need to get a good idea of the total max amps likely to be drawn.........that depends on the various accessories............ anything that draws massive amps such as an inverter or winch, amplifier, fridge.........give them there own dedicted line.
But all the small stuff like stereo, radios, switch wires to relays for lights etc
Lets say the total draw if all were on together is 50amps.
It would look something like this..........
Battery.
Small ammount of cable.......say 300mm.......capable of handling 60+ amps.
60amp fuse.
More of the cable capable of handling 60amp+....... run this into the cab to a fuse box.
Fuse box in cab.
Branch the supply to the various fuses
Wallah......... you know have just one cable going in.
Earth is of course gained from the body of the vehicle.
If you visit an electrical supplies store you can buy small numbers that attach to the cables.
This could be handy for you to have as you could then mark each cable with numbers at either end and keep a note of them so that any time in the future you can easily identify either in the engine bay or under the dash what each cable is for.
Go Hard or Go home
thanks for the comments so far guys but keep em comin..
topcat.. i like your idea..
I popped into ARB @ nudgee to day and they had 6 blade fuse blocks which allowed you to run a heavy cable into the block, and out to ground, with smaller terminals running off each fuse. this is considerably more useful than the narva 8fuseblock that requires individual wiring for each fuse..
ive also been considering a turbo and that might require the relocation of my 2nd battery to behind the drivers seat.
I dont think i have any high amp devices, no fridge or electric winch, just 2 sets of spotties, interior lights, horn, uhf, and a single 300w invertor etc..

This is the sort of job I enjoy the most for some messed up reason.
First, for cable you might want to check out Cameron's Cable Accessories in Geebung. I don't get a commission or anything but I like recommending him because he is cheap and doesn't mind helping out even if you're not an auto elec.
My approach would probably be to start at the battery, put a nice solid fuse block right next to it and then run heavy cable to that.
From there run a cable into the cabin and set up a fuse box there, one with enough fuses for your various interior accessories - wouldn't be that many on a 40 would there?
Also next to the fuse block in the engine bay set up your sealable box for relays.
And then I would just do the rewiring one thing at a time. Do your headlights as one job. Do your spotlights as another. Do the thermo fans or air con or whatever as another job. Stereo and CB as another etc.
I think this woulde be easier than trying to rip everything out and start from scratch.
And in future if you added an electric compressor or whatever (just an example) you can just wire it in using the existing fuse block and relay box... etc.
Just buy a couple of colours of cable but buy a few other colours of heatshrink, then you can use the heatshrink colour as your own coding system. I had a 100m roll of yellow wire that is only just running out, it is 1.5mm2 which is thick enough for a lot of interior stuff and would be fine for switches that trip relays etc. For your headlights and spotlights and things of similar current draw (maybe stereo power too, depending) get 4.5mm2 or 6mm2 cable, white might be a good colour to get and then you could use red or black heatshrink at the end, or if you have the money you could get one roll of red (so you never mistake a power wire for something else) and a roll of white for everything except +12V.
Use a system that's consistent and remember that you want it failsafe, so for example you +12V wires should terminate with insulated female terminals, which are less likely to cause a short if the cable comes loose. Power should always have a fuse as close to the battery as possible, too.
Just my thoughts.
Jason
This is not legal advice.
Good stuff Jason.........well written and some good thoughts mate.
Regards the Invertor.......... I think you will find that its going to need a direct feed from the battery.
My inverter is a 500W job which is capable of providing a spike of 700W.
That means it can draw up to almost 60 amps.........thats a lot of grunt and hence needed a 16mm2 cable for supply and ground.
Im guessing your 300W would have the abilityy to spike to 500W and hence it will need a 10mm2 cable minimum............. I doubt your fuse box can handle this along with the other stuff so just run it direct but include a 50amp inline fuse close to the battery.
Regards the spotties........... the switch wire which will be located in the cabin will only draw a very small ammount of power as its only job is to turn the relay on............ however the main supply to the relay and from the relay to the lights will have much more power running through it and hence should be rated accordingly.
If you are running 2x 100W lights then the supply to the relay needs to be in 2.5mm2, the supply to the lights if seperate supply then 1.5mm but if they both go through the same line and then branch off then it has to be 2.5mm2.
I particularly like chimpboys idea of doing it bit by bit.
Go Hard or Go home
Hi again shory_f0rty, to make the end job look good but also to allow you easily correct any mistake you might make, get some split tube.
It’s fairly cheap and and all you have to do is lay it out where you intend to run wire and as each wire is run, push it into the tube. When you are finished and everything is correct, simply wrap the some tape around the split tube and secure it away.
Cheers
It’s fairly cheap and and all you have to do is lay it out where you intend to run wire and as each wire is run, push it into the tube. When you are finished and everything is correct, simply wrap the some tape around the split tube and secure it away.
Cheers
2007 TDV8 Range Rover Lux
2009 2.7 Discovery 4
2009 2.7 Discovery 4

I just totally re-did the wiring on my40, I have to say it wasn't as bad as I thought it would be.
My goals were to keep all the switches, relays and fuses in easy reach, I also wanted to be able to operate all the switches etc when strapped in with the harness.
This was because the locker switches etc used to be on the dash so you had to loosen the harness to get to them, not a great idea.
I bought two rolls of fairly heavy guage wire from Jaycar (Red & Black) and basically used that for everything.
I ran a heavy cable from the battery (Behind Drivers seat in mine) to a waterproof box between the seats that holds all the switches, relays and fuses.
I then wired all the fuses and relays with long tails on the cables and put them approximately where they needed to be and completed the wiring, connected it all up and hey presto, it all pretty much worked first time.
Labeling everything first is good advice, trying to work out the indicator wiring was a real pain !!
I can take some photos if you like, let me know
[url]http://www.my4x4.com.au[/url]
thanks for the tips everyone! Greenfourby would really appreciate some pics if you have them!
well this thread has been revived because i have major issues at the moment.
I have just sourced a bus bar and a blade fuse box to try and get things started.
I would ultimately like to move my 2nd battery to behind my seat but at the moment its been required a bit for jumpering.. so i want to integrate a pushbutton (key?) that i can use to bridge the batterys as jumper cables would.. so i could crank it over, get started and then disconnect..
this as well as having a dual battery controller which seems to favour the 2nd battery for some reason.
I want to be able to monitor both batteries from the cab (was at glascraft marine today and saw their batterymeter that can switch between batteries)..
Who is online
Users browsing this forum: No registered users and 1 guest