Page 2 of 2
Posted: Wed Jul 25, 2007 10:50 pm
by rodw
Stop doing this to me Atari! This job just gets bigger and bigger! Looks like it will be worth it in the end though!
So what did you do to the front and rear bars?
Posted: Wed Jul 25, 2007 10:56 pm
by atari4x4
custom bracketometry, front & rear....... i have photos somewhere lost on a disk.
Posted: Thu Jul 26, 2007 3:53 pm
by vicelore
meh i like the gap in my sierra looks cool..
nice job tho.
Posted: Thu Jul 26, 2007 10:08 pm
by paulyp
rodw wrote:Well, I just cruised by
just cruisin' this arvo and picked up one of his body lift kits, which you can see the details here:
http://www.outerlimits4x4.com/phpBB2/vi ... p?t=115505
Greg had come around to my place and checked out my Rig before finalising this kit, but I hadn't had a chance to pick it up til today. We had a bit of a look at my Rig again and think it's pretty straight forward.
Here is two links to get you going:
http://www.granitepath.com/~kd7hcg/side ... index.html
http://www.k9rdj.co.uk/ProjectGV/bodylift.htm
but Greg's kit is way superior than these, the first is particularly bodgy. Note that Greg uses 80mm diameter blocks instead of 50mm ones to minimise the chance of floor pan cracking as discussed by
cj in this thread. Also included are blocks for the small rubber blocks that just sit on the chassis.
After I do the lift I will build a couple of brackets to lift the rear bar 50mm, and modify my bull bar mounts so the bull bar is also lifted 50mm.
where is this just cruisin in brisbane as i plan to lift my 4 door vit soon and hav been looking all over for a quality kit?
Posted: Fri Jul 27, 2007 8:56 am
by just cruizin'
I live on the Northside and work on the southside so let me know which suits if you want to have a look at the kit.
Greg
Posted: Fri Jul 27, 2007 4:48 pm
by paulyp
just cruizin' wrote:I live on the Northside and work on the southside so let me know which suits if you want to have a look at the kit.
Greg
im northside where abouts are you?
Posted: Fri Jul 27, 2007 4:56 pm
by just cruizin'
Paul,
You have a PM
Greg
Posted: Sun Jul 29, 2007 8:18 pm
by rodw
Hi all,
Just a note to say that I have fitted Just Cruizin's body lift kit to my LWB Vitara with no real dramas.

The kit itself was a joy to install, everything worked as expected. Here are some notes to get anybody else going. I wil post some pics and some more detail when I get it all done, but that might take a while!
You should have these on hand:
1. 16mm Drill
2. Caulking gun
3. Tube of rubber body adhesive (from a panel beater supply shop)
4. File, grinder or BFH for front mounts
The front mounts need to have a small amount ground off to clear a body seam (you could bend it out of the way with a BFH). I used a bench grinder to modify the mount, but a file would also make short work of this.
Here are some pointers.
1. I reamed out the rubber blocks with the 16mm drill and lubricated the rubber before pushing the tube bolts through the hole.
2. Disconnect brake clips on the LHS and pull the line clear of the clips
3. Disconnect a brake line on the RHS that runs down onto the chassis (at the botom end). There are two there, one is plenty long enough, the other is only just long enough, I will extend it before going off road.
4. Drill a new 16mm hole in the LHS inner guard about 50mm below the existing brake line entry point and relocate the brake line
5. The steering shaft needed no modification. There is a flat area on the steering box shaft that gives a fair bit of movement along the shaft. In my case, just enough!
6. Remove the small rubber mounts clipped to the body, run the supplied bolt through the hole so the head is in the recess, through the 50mm block, fill the recess with adhesive, put a liberal amount around the protruding bolt thread and a good quantity on the top surface (I also used some between the block and the rubber. This should prevent any rattles. If you have a LWB, you'll need an offsider to position the two mounts while you jack the body down onto these blocks, ensuring the bolt ends go in the hole in the body the clips were in.
7. Sort out the T-case shifter issue. I elected to invert the rubber boot, but still have some minor issues to sort out. (Road test before putting the console back in...)
8. Note that the rear plastic bar is only attached to the body. In my case, I could refit it again (it sagged a little), I will sort this out better eventually, maybe with a custom bar. For a quick and dirty fix, I think you could get a length of 50mm SHS and bolt it onto the internal metal bar so the plastic has something to rest on. (Hey and make your rock sliders out of the rest of the length

)
9. I am not happy with the sharp bend that is in the rubber hose near the air cleaner on my 1600 EFI. I am going to get two longer bolts and put a 25mm spacer under the alloy pipe where it mounts to the bracket above the outlet manifold. I think that will be more than enough to fix it.
10. The fuel filler was not a problem, loosened the top clamp and the pipe popped of when jacking it up. There was enough slack to reinstall it to its original position.
Guys, if you have never done something like this before and if you aren't a mechanic (like me) and even if you think you are a pretty handy bush mechanic (like me), allow a full weekend to do this job. I ran into a few snags of my own making and because I needed to get clearance around a dual battery. Took me a day and a half, a stocker, I would have taken me a day... If only I knew what I have listed above when I started...
Posted: Sun Jul 29, 2007 8:58 pm
by just cruizin'
Great write up Rod, great feedback and some very handy tips.
Posted: Sun Jul 29, 2007 9:09 pm
by rodw
Greg,
Great kit, it all goes in flawlessly, it's just all the little things to fix after it is in... Hope you sell a few more, I'd be really annoyed If I was the only Idiot in Oz to put one in...

Posted: Sun Jul 29, 2007 9:19 pm
by just cruizin'
Rest assured Rod there are some other idiots (read as smart, savy, personable and may I say attractive) out there just like you who have already purchased this fine kit.

Posted: Sun Jul 29, 2007 9:59 pm
by rodw
Thanks , makes the aches I'm feeling tonight worth it! I don't think tackling this job the day after spending two days in bed with the flu was good timing, but you do what you have to do sometimes...
Posted: Sun Jul 29, 2007 10:05 pm
by Eddy
just cruizin' wrote:Rest assured Rod there are some other idiots out there just like you who have already purchased this fine kit.

Posted: Sun Jul 29, 2007 11:33 pm
by just cruizin'
Yes Eddy, I include you as the latest of those smart, savy, personable and may I say attractive people.
Posted: Sun Jul 29, 2007 11:59 pm
by Eddy
Posted: Mon Jul 30, 2007 5:10 pm
by rodw
For those souls (idots or otherwise) who are contemplating this kit, here are a few more pointers I've picked up while doing the overall tidying up:
1. It is possible the body settles in a slightly different position after installing the kit. If your metal rear bar is like mine and has a few good dings in it (all before my time), make sure it is not rubbing on the body anywhere. Mine was and I had the most annoying squeak and rattle you could imagine. Out with the crowbar and it's all fixed!
2. A 25mm SHS spacer is just perfect under the EFI alloy air inlet pipe. I used some aluminium on hand and added plastic end caps for 82c of extra bling!. Bolt the single bolt at the throttle end on firm, and gently lift the pipe up to bend the mount a tad, slip a short length of SHS under and get some longer (50mm) replacement bolts. Drill two holes through this spacer and place it under the pipe mounts on the Air Cleaner end. This lifts the end of the pipe just the right amount to remove all stress on the rubber hose.
3. If you end up with the steering wheel crooked after disconnecting the steering shaft, a steering wheel puller is only $15 from SuperCheap. Remove the four screws holding the horn centre and unclip the wire. (It's probably easier to remove the plastic steering column surround to get access to these screws. There are several screws underneath.) Undo the 19mm hub nut and attach the puller. You might also need to remove or loosen the back cover of the steering wheel (4 screws on the spokes) to ensure you can screw the puller well into the holes. Make sure the steering is in the straight ahead position, pop the wheel off, re-align and replace the nut.
Posted: Tue Jul 31, 2007 4:59 pm
by rodw
Hi Guys,
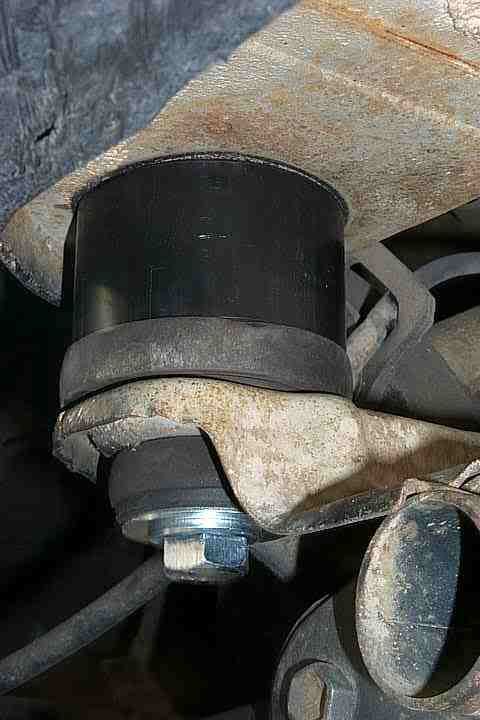
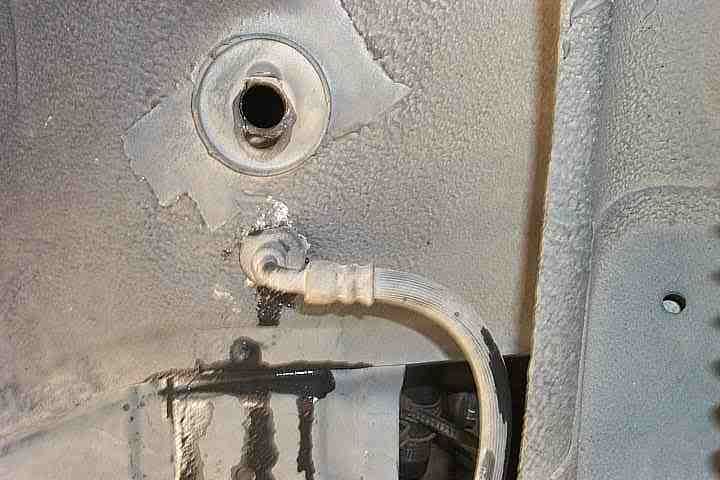
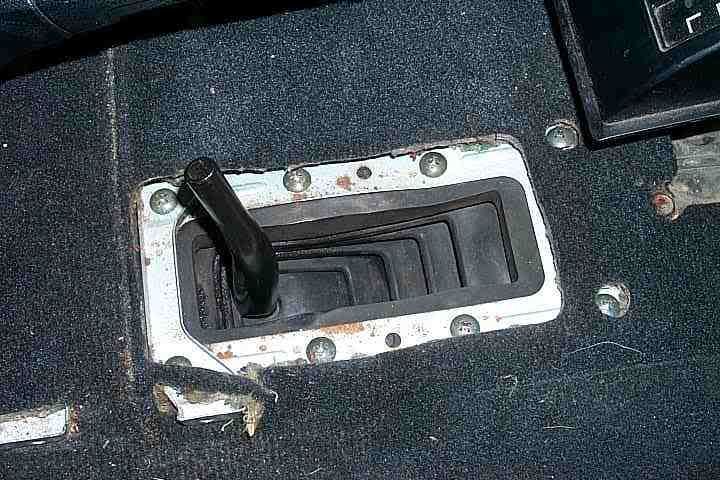
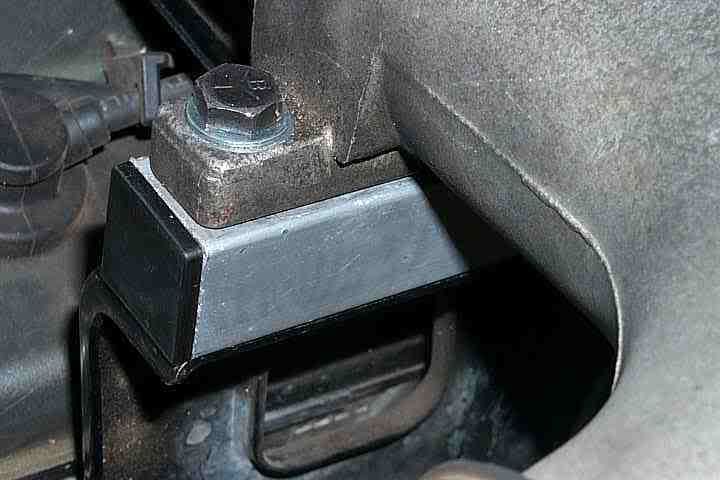
Thought now most of the tidying up has been done, I'd post a few photos:
Here is what the installed body lift block looks like:
This is what what I did to the left hand side brake line:
Here is what the shifter boot looks like when it is inverted:
This is the little spacer I made up for the air inlet on my 1.6L EFI. 25.4 mm aluminium SHS with a couple of end caps. This fixes my unhappiness outlined in point 9 of my post on 29 July and now I am happy!

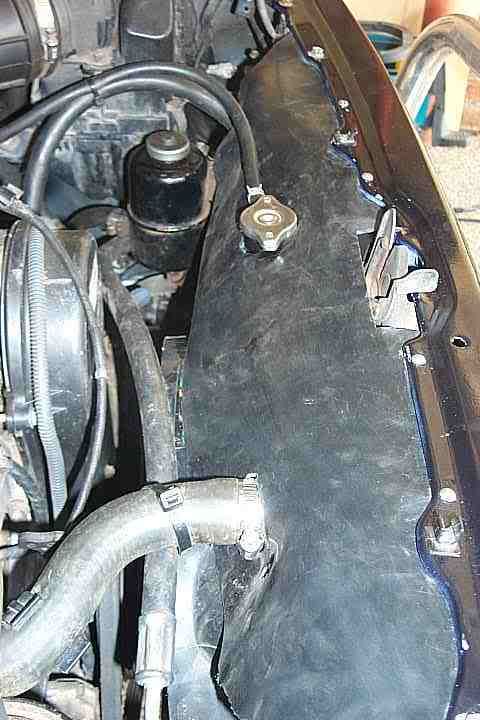
I followed Atari's lead and got some 3mm neoprene rubber sheeting from Clark Rubber and fashioned a cover to stop air flowing over, rather than through the radiator. This is how it turned out:
Posted: Sat Aug 04, 2007 5:36 pm
by rodw
Still tidying up the body lift. I followed Atari's lead and created some splash guards fro the front wheel well. The little hard plastic one in the front of the strut tower is held in by a couple of Christmas Tree clips, so I decided these would be good to hold the rubber flaps on. Tossed the stock splash guards out after making longer rubber ones. I also filled in the gap behind the strut tower the same way. The rubber is mounted from the inside of the wheel well as the stock one was done this way and it will allow water to run down the guard without pooling around the top of the rubber. You can see the points of the Christmas Tree clips poking through.
I was also a bit concerned about water ingress around the top of the strut towers so I used the three existing threaded holes to bolt a piece of rubber over the strut mount. (I saw one thread complaining about battery corrosion becasue it got wet all the time.) Note that the threaded holes are in different positions on each side. This is the right side surrounded by the Battery, Washer bottle and my cruise control.
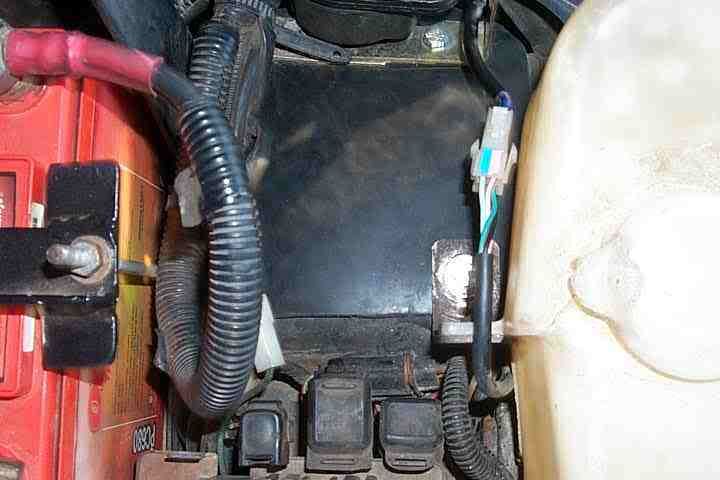
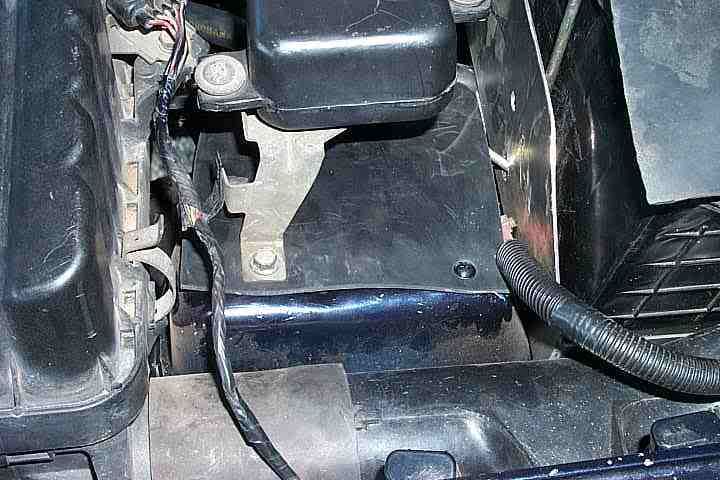
This is the left hand side beside the air filter inlet (dual battery tucked in on the right). I added a self tapper to the corner on this side.
I have not done the rear wheel wells like Atari did, Not sure if this is really worth it as there is quite a gap between where it would hang and the chassis, so mud will go up both sides anyway.
Posted: Mon Sep 17, 2007 12:06 pm
by eXc
I am new to the idea of body lift, but how much difference does it make out in the bush? Cause the gearbox/transfer are still going to be just as low?
I am just strugling with height where my gearbox mount keeps scraping. I was going to get some 15/30mm spacers to get a bit more height, but maybe a body lift could be a better option.
Posted: Mon Sep 17, 2007 12:18 pm
by sierrajim
eXc wrote:I am new to the idea of body lift, but how much difference does it make out in the bush? Cause the gearbox/transfer are still going to be just as low?
I am just strugling with height where my gearbox mount keeps scraping. I was going to get some 15/30mm spacers to get a bit more height, but maybe a body lift could be a better option.
Basically a suspension lift will raise the WHOLE car and all of its associated weight. Therefore raising the centre of gravity further than just raising the weight of the body (body lift)
A 2" body lift won't make any difference in the bush unless you're running a larger size tyre, generally the main reason for doing a body lift.
If you want a little more height but want to retain your current tyres you'd be better off looking at a suspension lift.
Posted: Mon Sep 17, 2007 1:07 pm
by eXc
Thanks. That is what I thought.
Cheers
Chris
Posted: Mon Sep 17, 2007 5:03 pm
by rodw
Chris,
The reason why I did the body lift was to get my sills up out of the road after I did some damage one day. The plan is to put in some sliders now I have done the body lift. That means I won't loose clearance when I add the sliders. I'll get to it one day...
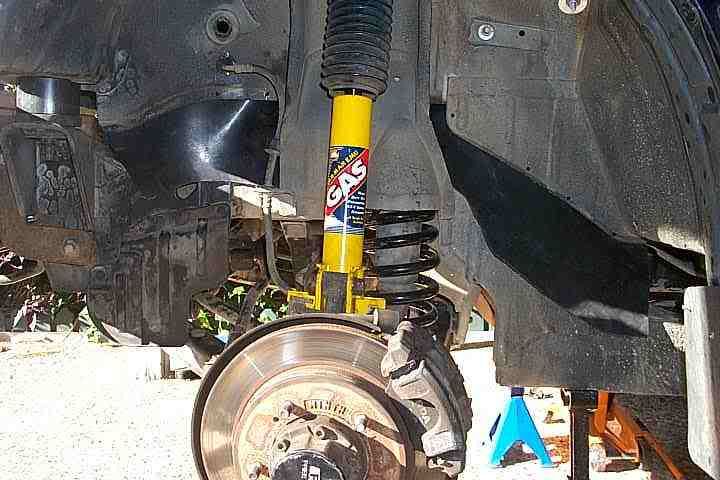
Probably the next stage for me is to add some diff drop brackets, spring spacers and strut spacers which will gain another 30mm of suspension lift at the front and should keep the CV angles the same as I got now. The Old Man Emu Lift kit I put in only lifted my Rig about 30mm. After that, I'll look at larger tyres.
The low spot for me is the front member bottoming out when I am following my mates in some Toyotas and Patrols with larger tyres digging ruts too deep for me.
Posted: Sun Oct 21, 2007 9:29 am
by rodw
Because QT have approved the Just Cruisin' body lift kit, I finally got round to extending the brake line on the right hand side in preparation for when I go over the pits. Here is a pic of the new line beside the old one:
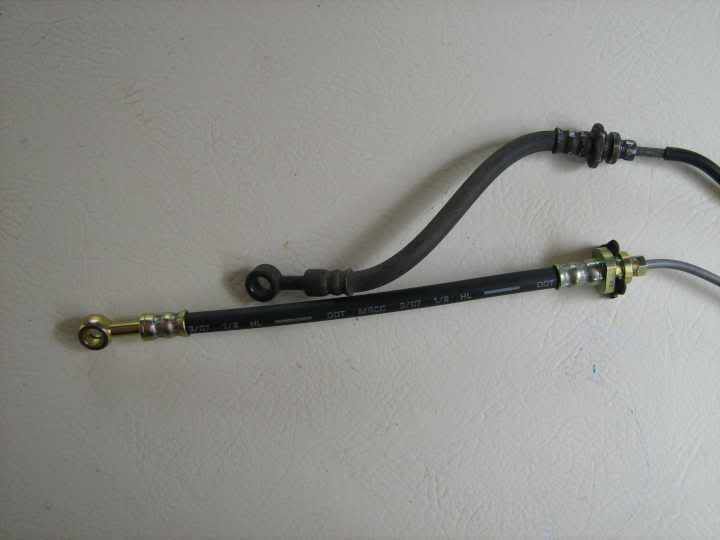
The new 50mm longer line was made up while I waited by Slacks Creek Brake and Clutch Repairs over near Moss St for $27. I could not undo the flexible line from the metal line, so I undid it from the brake cylinder. The nut was pretty butchered by my unsucessful attempt to undo it, so they made up a replacement metal line as well which cost me an extra $15.