Moph wrote:Any chance you could do a quick 'how to' write up for TIG settings awill? Just explaining the general effect of 2T/4T, pulse width, pulse frequency, AC frequency, AC balance, etc?
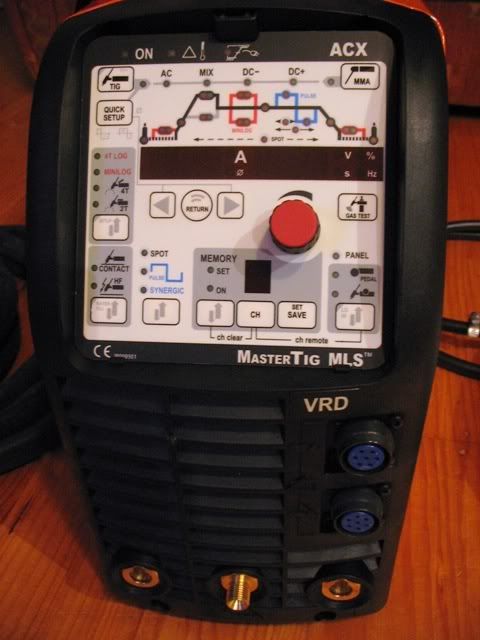
Ok Moph, I'll give a bit of a run through of stuff that relates to my Kemppi as that will help Steel Art as well so I'll go through some of the Kemppi features as seen on the fascia panel below.

With the Kemppi it's a case of following the bouncing ball, (or red light in this instance) as it moves along the line you are adjusting.
Top line is obvious, the light that comes on signifies you are welding either AC, Mix Tig, DC-, DC+ or MMA (electrode)
The next series of lights follow the black, red and blue lines and are controlled by the arrow buttons either side of the return button.
The 1st light is initial current (if you are using the torch switch in 4T mode) this is set as a percentage figure of your average welding current.
Next is ramp up time in seconds.
Then Mix Tig settings if you're using this function. I have to admit I've never really played with this much.
Next is current and Minilog (red section) which is a great setting if you don't have a foot pedal. Minilog allows you to set an amperage as a percentage below what your welding current is. This is great for thin Aluminium as with a touch of the torch button the amps will drop, it's great as the Alum heats up and allows you to keep the arc going but not overheat the weld joint. When it's cooled enough tap the button again and it's back on the welding current. As I reach the end of a weld joint I often cycle back and forth repeatedly so it doesn't overheat at the end of the joint.
The blue section represents the pulse settings, the upper is what you set the amps you want and the lower is the percentage below what the hot amps are (I usually work at around 30-40%) Pulse ratio can also be set and I usually use a 50% pulse and 50% base current so both sides of the complete circuit are the same length in time.
Pulse frequency can also be set here, I'll generally use a frequency of around 0.7-0.9 pulses per second, any more than that and you don't have time to react in synching your filler feed to the upper pulse current.
The 2T, 4T, Minilog and 4T log are how you set your torch switch, 2T is basically On/Off as you press and let go the switch, 4T is starting current when you hold the switch down, let it go and it goes to welding current, press again and it goes to crater fill I think, then let it go and it goes off.
Minilog is as I explained previously, it's basically a 4T but with the added feature of Minilog when you just tap the switch rather than holding it down.
I can't tell what 4T Log is as I use Minilog exclusively if I'm not using the foot pedal.
Quick setup allows access to the AC Hertz frequency, AC balance and AC waveform in either square wave or sine wave.
To access, press the quick setup button then quickly press the arrows either side of the return button. Once your into the feature you want to adjust just adjust it with the big red knob .
I normally weld with square wave and an AC balance around -40 to -45. I'm constantly changing the AC frequency from around 70 Hz if I want a soft weld to 200+ Hz if I want a really tiny tight weld. (it's a fabulous feature, and this feature alone is what makes inverters great)
Sine wave I will use when I'm after a really soft flowing weld like welding an outside joint like you would do when welding a fuel tank shell.
I use HF start all the time never contact.
Synergic, pulse and spot.
Synergic is a very fast pulse usually used for Stainless welding.
Pulse is to turn on the pulse to whatever settings you have set yourself.
Spot I've only used rarely. sometimes on thin Stainless.
Memory are settings you save when you find a setting you like. I don't really bother I just write them down on a white board for commonly repeated welding jobs.
Pedal and the torch icon signify your using either the pedal or the switch on the torch. If your using the pedal you have to light up the panel light with the up and down arrows to change the welding settings.
I hope this is a help as I'm tired of typing now.
Regards Andrew.


