Page 2 of 3
Posted: Mon Mar 21, 2005 4:11 pm
by Madmac
im thinking about doing the same to a maverick, just a question what is silkafix and where do you get it? im assuming its some kind of flexible sealant
Posted: Mon Mar 21, 2005 7:39 pm
by Camshaft1
I didnt weld mine it but i had a lip that slid inside on the outer edge and it just sat flush the rest of the way around
Posted: Tue Mar 22, 2005 2:53 pm
by DieselBoy
Posted: Tue Mar 22, 2005 4:03 pm
by shakes
thats some nice work there diesel boy!
I've been considering doing something like this myself, but havent found a nice spot for the gas filler... it's currently vry nicely located on the part of the gaurd i wanna chop off (dont start giving me lectures i know how dangerous it is)
and i dont particluary wanna run it up inside the gaurd near the wheel or thru the kick panel. Idea's?
Posted: Tue Mar 22, 2005 5:09 pm
by hottiemonster
shakes wrote:thats some nice work there diesel boy!
I've been considering doing something like this myself, but havent found a nice spot for the gas filler... it's currently vry nicely located on the part of the gaurd i wanna chop off (dont start giving me lectures i know how dangerous it is)
and i dont particluary wanna run it up inside the gaurd near the wheel or thru the kick panel. Idea's?
mine is at the rear of the car, when i had the standard rear bar on it, it was on the passenger side through the silver bit, just beside the corner bumper.
Posted: Tue Mar 22, 2005 5:11 pm
by hottiemonster
dieselboy, have you thought about bracing the corner which is closest to the tyre? as how it is now might not hold up to a decent wack close to the wheel arch.
Posted: Tue Mar 22, 2005 5:51 pm
by shakes
mine is at the rear of the car, when i had the standard rear bar on it, it was on the passenger side through the silver bit, just beside the corner bumper
thats where it originally was, but part of the vic RWC requirments now make mounting the filler anywhere other than on the body illegal. the reason given is for "vibration" reasons
hi-luxmadness --
Sikaflex is just a brand, its a type of gunk has similar sealant properties to silicon, but better suited to metals as it doesn't bring on corrosion like silicon. Make sure you get the metal based one most auto parts/hardware stores stock it
Posted: Tue Mar 22, 2005 5:57 pm
by hottiemonster
shakes wrote:thats where it originally was, but part of the vic RWC requirments now make mounting the filler anywhere other than on the body illegal. the reason given is for "vibration" reasons
you serious?


Posted: Tue Mar 22, 2005 6:02 pm
by DieselBoy
The Bar you mean??
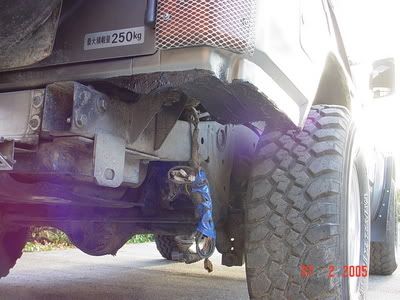
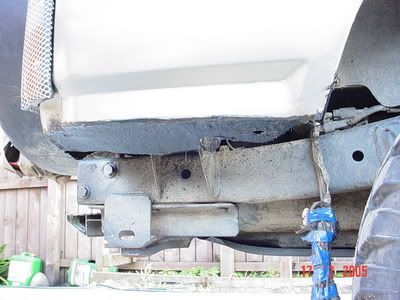
Its anchored at the front to the body mount with a piece of angle iron, i had to do it after i had them in place so i could get every thing lined up properly, i will have to do another under body shot

I think it should be ok to use the Hi-Lift on, but I'm not keen to try untill im forced to

Posted: Tue Mar 22, 2005 6:06 pm
by hottiemonster
good stuff. maybe an updated pic would be good.
Posted: Thu Mar 24, 2005 3:53 pm
by shakes
yep!
last sept when i got my shorty it was thru the rear bumper.
They made me mount the filler through the body, on a 4wd your also supposed to have the entire gas fuel line in braided hose both my mechanic and another GAS system joint told me
Posted: Mon Apr 04, 2005 1:52 pm
by familybus
wooooohooooo! i did the chop on the ass of the familywagon and i reckon i didnt do such a bad job after all! im stoked! i wroked out how much it cost me and it worked out to @ $5 and i used about 6 tools and that includes the milk crate used as a seat! it was that much fun that even my young bloke whos only 4.5 years old got into it and gave me a hand. if anyones interested let me know and ill try and chuck up some pics! now im on a roll.
Posted: Mon Apr 04, 2005 2:05 pm
by robbie
good move familybus.. get up some pics soon

Posted: Mon Apr 04, 2005 5:20 pm
by rOd
PICS!
Please
Posted: Mon Apr 04, 2005 5:52 pm
by familybus
ill just post them in order and the last two pics are the most important! they were the only tools i needed to get it done!
Posted: Mon Apr 04, 2005 5:56 pm
by familybus
heres a pic from underneath once it was cut!
Posted: Mon Apr 04, 2005 5:59 pm
by familybus
for anyone out there planning on doin this! dont be as lazy as me! move your wiring before cutting!

Posted: Mon Apr 04, 2005 6:00 pm
by familybus
pic of the drivers side all done minus the bottom plates!
Posted: Mon Apr 04, 2005 6:01 pm
by familybus
heres the only tolls i used! as you can see proffesional tools for a profesional job!
(yeh right)
Posted: Mon Apr 04, 2005 6:02 pm
by familybus
last but not least the most important peice of equipment! my helpfull 4.5 year old son, WHAT A DAMN LEGEND! he stuck with me all the way through the job and helped! i knew there was another use for kids besides emptying out mum and dads wallet! ( and before anyone mentions slave labour he cost me $5 for his services)
Posted: Mon Apr 04, 2005 6:32 pm
by robbie
good work, too bad there were no progress shots.
Posted: Mon Apr 04, 2005 6:52 pm
by familybus
a few more!
Posted: Mon Apr 04, 2005 7:02 pm
by rOd
Dude what happend to the plastic flare on the left side???
Posted: Mon Apr 04, 2005 7:07 pm
by Madmac
ill be doing mine next week hopefully, i just bought some early model tail lights on ebay, as soon as they arrive im going to go for it, im going to use an air body saw rather than the angle grinder though, then im going to make a rear bar, ill put some pics up when ive done it
Posted: Mon Apr 04, 2005 7:16 pm
by familybus
i couldnt undo the screw on the flare so i used the master key on it! then i grinded the screws off!
ive got more pics but thats all thats goin up her cause for some reason the rest wont post! (might need the master key on the pc aswell!)

Posted: Sun Apr 17, 2005 4:15 pm
by DieselBoy
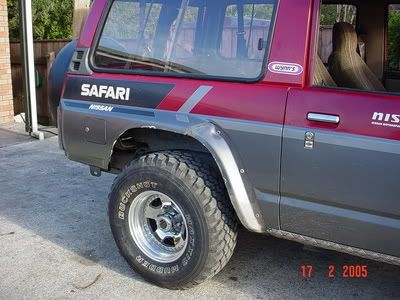
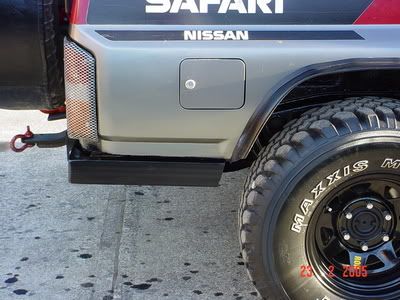
Finally got round to getting that up to date pic of the bar under the cut quater panel:

Posted: Tue Jul 12, 2005 7:42 pm
by Beastmavster
Well, so much for my previous comments - due to too much quarter panel damage it's the chop job for me.
I'm currently trying to fold over the back section (with some "fingers about 2cm wide at the front to mate it with), then sikaflex it up rather than cut clean off and stick a plate in. This will allow the original holes (wiring and drain) to be used.
One problem I've found is that there is a couple structural support in the middle of the bottom of the quarter...
How have others got around this?
Also if you leave this in place your rear bar needs to be angled down in line with the v on the panel.
Posted: Tue Jul 12, 2005 9:26 pm
by Beastmavster
Some mid choppy chop pics.
Plan is for a the folded over bits of panel are just to be the to be the mounting point of steel checkerplate to be sikaflexed over the top of it.
The bar will cover any remaining lack of neatness.
Posted: Tue Jul 12, 2005 10:03 pm
by Madmac
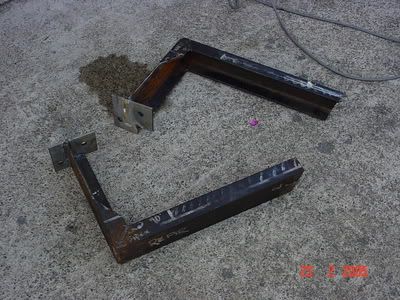
heres a pic of the bar i made for mine after i chopped it

Posted: Tue Jul 12, 2005 10:08 pm
by Beastmavster
The bar will cover up many sins
Interested in some recovery hooks I saw on a GQ SWB on the weekend... a loop that's bolted into the standard mounting points for the rear bar. Thy kind of drop down a bit so they go under the new that'll be going on.
Any ideas where they come from?