Notice: We request that you don't just set up a new account at this time if you are a previous user.
If you used to be one of our moderators, please feel free to reach out to Chris via the facebook Outerlimits4x4 group and he will get you set back up with access should he need you.
Recovery:If you cannot access your old email address and don't remember your password, please click here to log a change of email address so you can do a password reset.
Nutter Engineering Turbo Conversions (Dial Up Will Die)
Disclaimer:
its 2 AM and I'm using a borrowed keyboard because i though mine might like some beam and coke earlier in the week, if things don't make sense its cause I haven't slept for a while. Let me know and I will edit things.
Car Specs
1992 GQ LWB Wagon
2.2 ton unloaded
RB30 Carby motor
9.2 to 1 static compression
Running Bunsen burner/BBQ ring gas system.
4.3 Diff ratios
5 speed manual
100kw at Flywheel
2 inch body lift
2 inch spring lift
52kw at Rear Wheels
0-100 in 15.6 seconds
1/4 Mile in 20.6 seconds
Top speed on 31 inch tyres 132kph after approx 2km of flat out in 4th
All stock, no exhaust mods no internal mods.
OK so I started with this:
Now what we do is remove everything, intake manifold, exhaust manifold, charcoal canister all fuel and pollution equipment, and there is a lot of this shit as it was hard to make the GQ comply with ADR's with a carby. Of course for those of you who dont know they ran carby instead of injection like the VL and R31 Skyline as they somehow apparently got a better torque spread with carby.
Next step was to Source a VL or Skyline intake manifold, for those of you contemplating this don't waste your money on a genuine turbo manifold there not as good. A lot of guys fit the longer runner N/A manifold to there VL's and make more power over wider rev band. You can source the N/A intake for $20 or less.
You then buy six 18mm welsh plugs and JB weld them (JB weld is a super strong resin) into the injector holes (disregard this if you are running it on petrol and keeping the injection you will need these bosses).
I also stripped of the EGR valves, warmer pipes, fuel rail and reg and anything else EFI or pollution related, most holes where covered with 1.5mm tin and bolted using original holes.
Next bit is to fit it up, using new gaskets and your laughing should start looking like this:
Next step fitting the new exhaust manifold, I choose to go High mount for a few reasons.
1. No engine mount or body mods.
2. I can remove turbo in about 15 minutes everything is easy to get to.
3. its out of the water and mud, yes it still gets some but not submerged so no cracked housings.
4. Huge runners, fast spool times, plenty of room for head and cam mods later.
Pics below.
Don't bet getting excited by how pretty it looks after 5 minutes they go all different colors, and you can hardly see them.
The Turbo
I have chosen to use a Garrett T3 as originally used on VL's. I have had it completely rebuilt including new core, wheels shaft and all seals bearings etc. So its brand new inside. It is running a newer style front wheel which produced lower air temps on the compressor side and flows better at higher revs. Basically like High Flowing but without going over the top.
It still runs standard rear wheel so it spools early and hard, also has fantastic throttle response, no lag great combo. These are a direct bolt up for the manifold as they use the T3 flange.
The waste gate can be done one of two ways, the easy way and the cheap way.
Easy way is to get a blank flange and bolt it to the back of the turbo and run your exhaust from that. On the high mount manifolds they have a 7th runner for an external gate, you bolt it on and youre done.
The cheap way (fine for 15PSI or less) is to take the VL dump pipe and cut it off so only the gate is left, you then weld a 3 inch flange to this so you can bolt your exhaust onto it. You cant use the VL dump pipe stock as once you high mount your turbo its upside down, so a stock dump pipe would go through your bonnet and over the car.
Because the turbo is upside down you also need to fit the waste gate to the opposite side. I made a bracket from angle iron and just kept grinding till it was nice
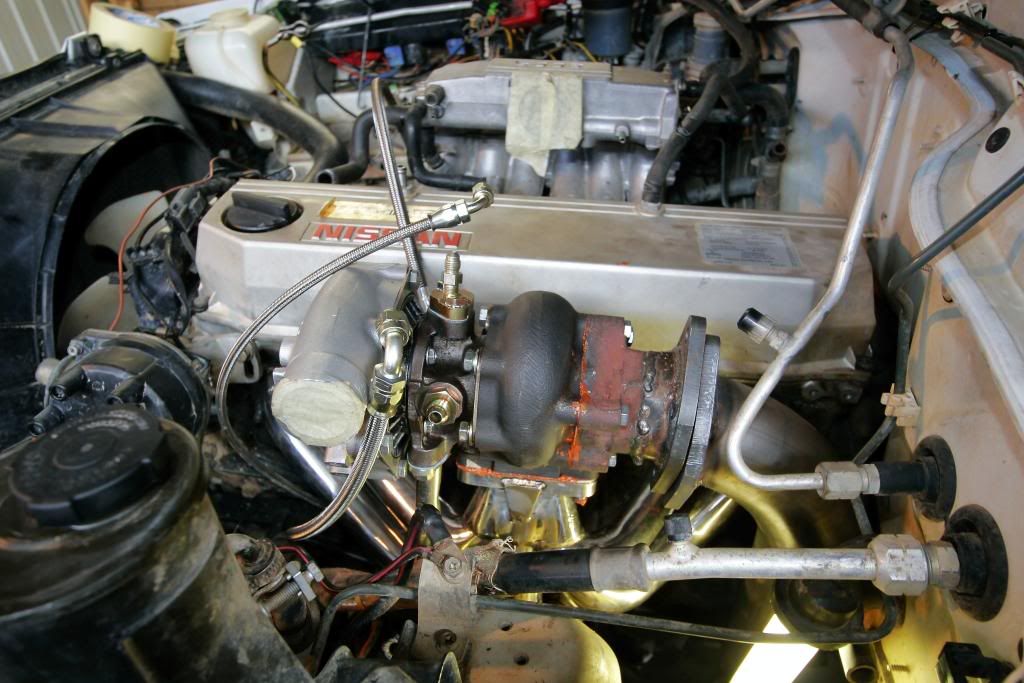
Pic below shows the lines and modified wastegate, the gate is not the prettiest thing in the world but makes the same power as a $200-$300 custom one.
In the below photo you can see the 3 braided lines that feed oil pressure and water in and out of the turbo. There is a 4th steel tube mounted on the bottom that gravity feeds hot oil back to the sump.
The lines are pretty expensive part of the conversion, looking at $400 just for 3 lines and the drain
As far as I know patrols all use the late style RB30 blocks that have oil and water feeds and returns already there. Series 1 VL commodores don't have these feeds so check b4 you buy your next block.
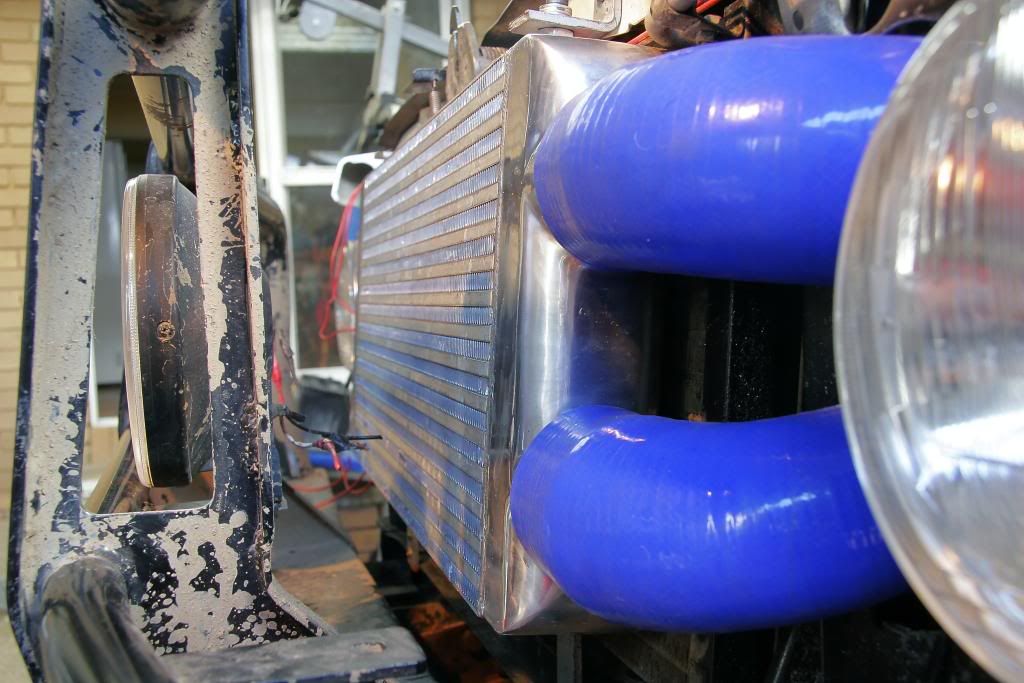
Next step is to mount the intercooler, for this I have chosen a 600X300X75mm unit, it is a dual pass, bar and plate unit so what happens is the air enters hot through the bottom hose, goes across the cooler then up at the end tank and back through for a second pass. Its like having 2 coolers one on top of the other. These are a little more than traditional coolers but at $250 no a huge investment.
These are very effective coolers providing you don't get one thats too small for your application. Mine pulls so much heat out the top half of the cooler never even gets warm.
To bolt it up its simply 4 bits of flat steel or in my case aluminum bent 90 degrees and bolt through the radiator support panel and lower support rail.
You now need to cut two 100mm holes in the support panel to allow for the cooler pipes to pass through these are easy to mark once the cooler is in place. I then cut come old fuel hose long ways and stuck it around the holes before placing the silicone joiners in.
The joiners are worth a fortune I found a great place on the net selling good ones for great prices, much better than I could get even at trade.
By now you should be looking like this:
Next is the fun part.....I wanted it to look stock..So instead of gutting the grill I got the grinder out and spent 2 hours grinding the back of the grill till there was nothing left. The end result is being able to fit the grille with all horizontal bars intact and looking like factory.
If you want the world to know your packing boost disregard above step and chop ya grill up fully hektic styles
End result should be like this:
Are we there yet????
Not quite but not long to go......
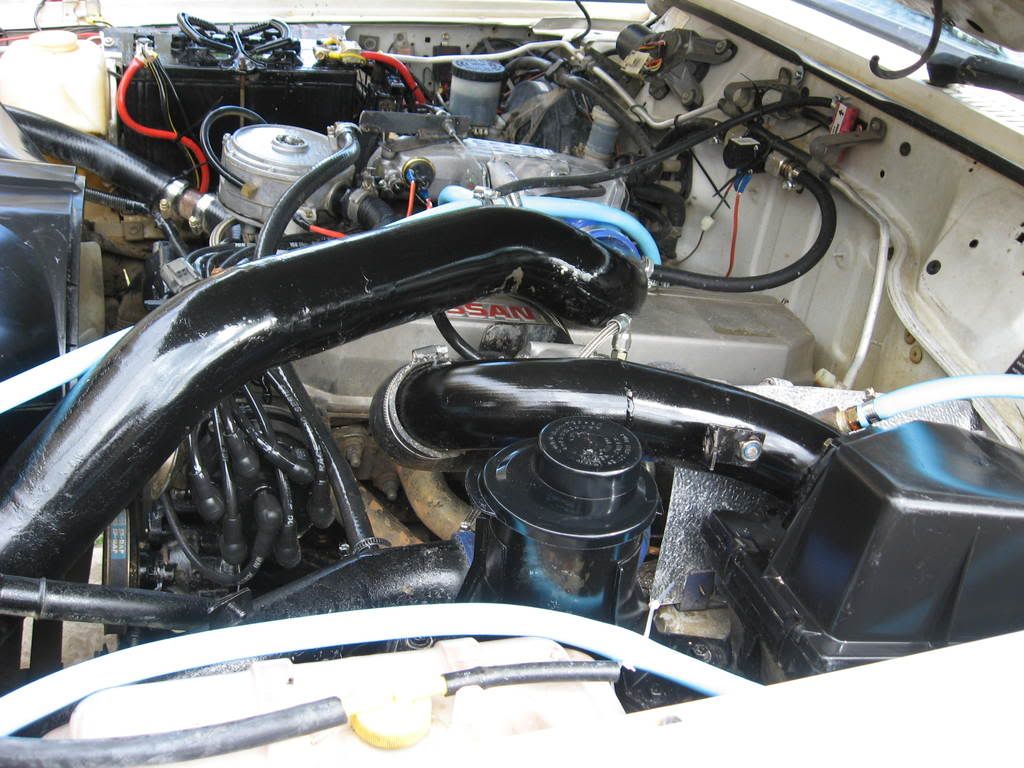
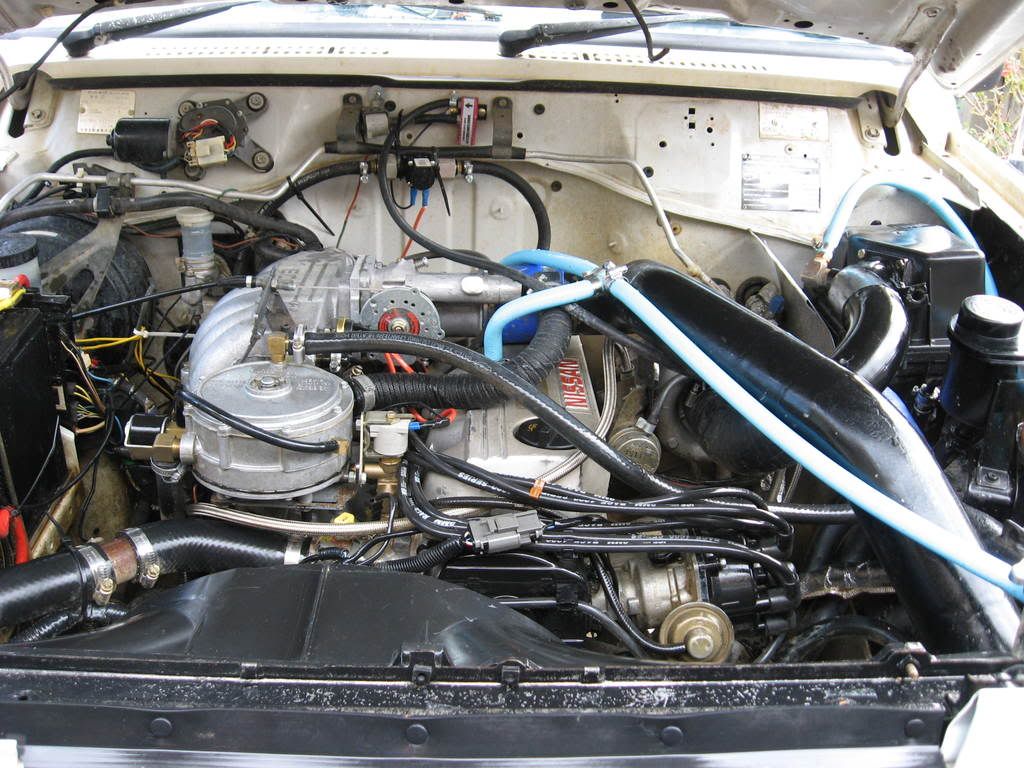
Next step is the cooler pipes, from the turbo outlet to the cooler I used 2.5 inch as the turbo is only about 45mm exit diameter, from the cold side of the cooler to the throttle body I ran 3 inch as thats the carby size and cooler outlet size.
POD Filter was only temporary and has now been replaced with an Airbox as pictured.
Should now be looking like this :
At this point youre nearly done....
Next point is to either buy 3 inch mandrels and make a new exhaust or go and get one custom made. Mine is 3 inch from the dump pipe back running 1 straight through muffler, at cruise speeds you wouldn't even know it has an exhaust under acceleration you can just tell, for me its perfect as I an a V8 boy I hate the sound of a 4 or 6 with sports system so the less I hear it the happier I am.
Mine is tucked up high and only has a dump tip under the body you cant see the outlet from behind unless you get under.
Basically at this point your done, I may have missed a step or 2 but its mostly there, from here we tow it to Gas research to get it fitted with a throttle body and converter under the grant $2000 of the install price.
Before anyone bags out there gear, probably not worth telling me I have used it on my own cars and customer cars for years and love it.
As already stated, metering of the gas comes from a Gas Research carby. The huge benefit this carby has over the rest of the products is that it not only regulates the air into the engine, but meters the amount of gas at the same time. Nearly (if not) all other products only meter the air and "hope" to get the gas mixture right. (Not speaking about injector systems of course). Here's the carby and converter....
At this point we change the spark plugs and fit 9mm ICE leads, if you are running a factory wastegate actuator you will need a bleed valve to raise the boost. These basically let pressure out of the waste gate actuator causing it to open less and therefore make more boost.
Finished
With it all together we fire it up and run it to 10PSI only as its a High Comp motor, I couldnt hang around to see the power figures and havent picked the dyno sheet up yet, but the end result on the road speaks for its self.
The car now has more power off boost, can be driven at lower revs without surging, runs 0-100km/h in 6.2 seconds. This is with very conservative timing as the distributor has not been re-curved yet. It will do standstills or doughies like its wet
For those of you who have driven up princess highway to labourtouce (spelling) and found the hills a struggle, well this applies no more, with the 35's recovery gear, eski, passenger full gas tank etc I can leave it in 5th and just walk over the hills. No more dropping to 3rd and holding 4500rpm.
General manners day to day are awesome no different to b4 except it has more power even off boost.
In terms of economy it betters my mates identical non turbo car by 10litres at the end of the day and because it was my first day after completion i was abusing it really badly. We are converting his starting in a week or 2.
Below I will put the completed Pics and some vids, I will no doubt have left a few steps out but if you have specific question just ask, I have nothing I wish to hide about this install.
Link below 0-160km/h
http://www.youtube.com/watch?v=gwnpV7Olzjo
Link below standstill on road bonnet open turbo glowing
http://www.youtube.com/watch?v=OlJJiTs-mvU
Link below quick squirt in first and second
http://www.youtube.com/watch?v=wFlz9uyS3Dw
its 2 AM and I'm using a borrowed keyboard because i though mine might like some beam and coke earlier in the week, if things don't make sense its cause I haven't slept for a while. Let me know and I will edit things.
Car Specs
1992 GQ LWB Wagon
2.2 ton unloaded
RB30 Carby motor
9.2 to 1 static compression
Running Bunsen burner/BBQ ring gas system.
4.3 Diff ratios
5 speed manual
100kw at Flywheel
2 inch body lift
2 inch spring lift
52kw at Rear Wheels
0-100 in 15.6 seconds
1/4 Mile in 20.6 seconds
Top speed on 31 inch tyres 132kph after approx 2km of flat out in 4th
All stock, no exhaust mods no internal mods.
OK so I started with this:
Now what we do is remove everything, intake manifold, exhaust manifold, charcoal canister all fuel and pollution equipment, and there is a lot of this shit as it was hard to make the GQ comply with ADR's with a carby. Of course for those of you who dont know they ran carby instead of injection like the VL and R31 Skyline as they somehow apparently got a better torque spread with carby.
Next step was to Source a VL or Skyline intake manifold, for those of you contemplating this don't waste your money on a genuine turbo manifold there not as good. A lot of guys fit the longer runner N/A manifold to there VL's and make more power over wider rev band. You can source the N/A intake for $20 or less.
You then buy six 18mm welsh plugs and JB weld them (JB weld is a super strong resin) into the injector holes (disregard this if you are running it on petrol and keeping the injection you will need these bosses).
I also stripped of the EGR valves, warmer pipes, fuel rail and reg and anything else EFI or pollution related, most holes where covered with 1.5mm tin and bolted using original holes.
Next bit is to fit it up, using new gaskets and your laughing should start looking like this:
Next step fitting the new exhaust manifold, I choose to go High mount for a few reasons.
1. No engine mount or body mods.
2. I can remove turbo in about 15 minutes everything is easy to get to.
3. its out of the water and mud, yes it still gets some but not submerged so no cracked housings.
4. Huge runners, fast spool times, plenty of room for head and cam mods later.
Pics below.
Don't bet getting excited by how pretty it looks after 5 minutes they go all different colors, and you can hardly see them.
The Turbo
I have chosen to use a Garrett T3 as originally used on VL's. I have had it completely rebuilt including new core, wheels shaft and all seals bearings etc. So its brand new inside. It is running a newer style front wheel which produced lower air temps on the compressor side and flows better at higher revs. Basically like High Flowing but without going over the top.
It still runs standard rear wheel so it spools early and hard, also has fantastic throttle response, no lag great combo. These are a direct bolt up for the manifold as they use the T3 flange.
The waste gate can be done one of two ways, the easy way and the cheap way.
Easy way is to get a blank flange and bolt it to the back of the turbo and run your exhaust from that. On the high mount manifolds they have a 7th runner for an external gate, you bolt it on and youre done.
The cheap way (fine for 15PSI or less) is to take the VL dump pipe and cut it off so only the gate is left, you then weld a 3 inch flange to this so you can bolt your exhaust onto it. You cant use the VL dump pipe stock as once you high mount your turbo its upside down, so a stock dump pipe would go through your bonnet and over the car.
Because the turbo is upside down you also need to fit the waste gate to the opposite side. I made a bracket from angle iron and just kept grinding till it was nice
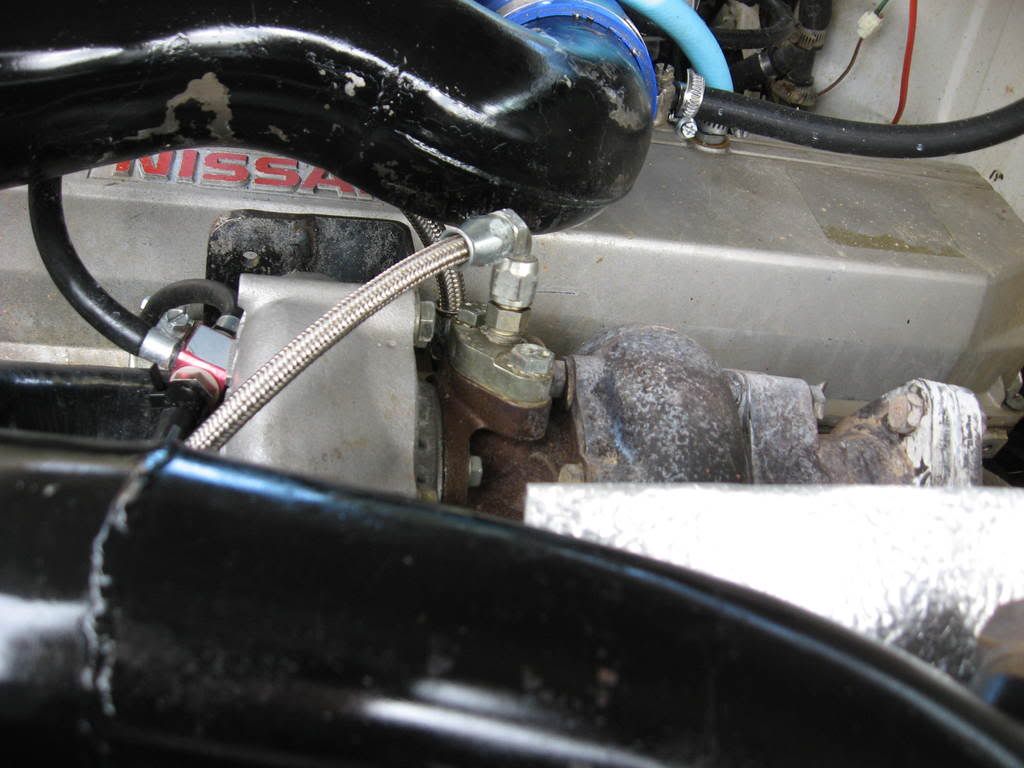
Pic below shows the lines and modified wastegate, the gate is not the prettiest thing in the world but makes the same power as a $200-$300 custom one.
In the below photo you can see the 3 braided lines that feed oil pressure and water in and out of the turbo. There is a 4th steel tube mounted on the bottom that gravity feeds hot oil back to the sump.
The lines are pretty expensive part of the conversion, looking at $400 just for 3 lines and the drain
As far as I know patrols all use the late style RB30 blocks that have oil and water feeds and returns already there. Series 1 VL commodores don't have these feeds so check b4 you buy your next block.
Next step is to mount the intercooler, for this I have chosen a 600X300X75mm unit, it is a dual pass, bar and plate unit so what happens is the air enters hot through the bottom hose, goes across the cooler then up at the end tank and back through for a second pass. Its like having 2 coolers one on top of the other. These are a little more than traditional coolers but at $250 no a huge investment.
These are very effective coolers providing you don't get one thats too small for your application. Mine pulls so much heat out the top half of the cooler never even gets warm.
To bolt it up its simply 4 bits of flat steel or in my case aluminum bent 90 degrees and bolt through the radiator support panel and lower support rail.
You now need to cut two 100mm holes in the support panel to allow for the cooler pipes to pass through these are easy to mark once the cooler is in place. I then cut come old fuel hose long ways and stuck it around the holes before placing the silicone joiners in.
The joiners are worth a fortune I found a great place on the net selling good ones for great prices, much better than I could get even at trade.
By now you should be looking like this:
Next is the fun part.....I wanted it to look stock..So instead of gutting the grill I got the grinder out and spent 2 hours grinding the back of the grill till there was nothing left. The end result is being able to fit the grille with all horizontal bars intact and looking like factory.
If you want the world to know your packing boost disregard above step and chop ya grill up fully hektic styles
End result should be like this:
Are we there yet????
Not quite but not long to go......
Next step is the cooler pipes, from the turbo outlet to the cooler I used 2.5 inch as the turbo is only about 45mm exit diameter, from the cold side of the cooler to the throttle body I ran 3 inch as thats the carby size and cooler outlet size.
POD Filter was only temporary and has now been replaced with an Airbox as pictured.
Should now be looking like this :
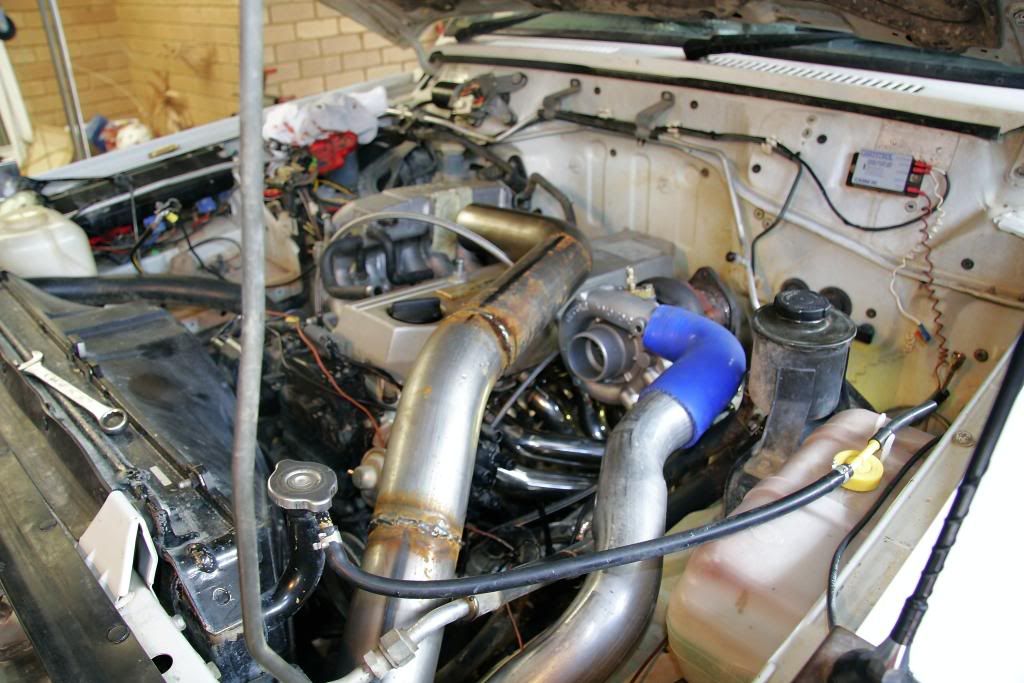
At this point youre nearly done....
Next point is to either buy 3 inch mandrels and make a new exhaust or go and get one custom made. Mine is 3 inch from the dump pipe back running 1 straight through muffler, at cruise speeds you wouldn't even know it has an exhaust under acceleration you can just tell, for me its perfect as I an a V8 boy I hate the sound of a 4 or 6 with sports system so the less I hear it the happier I am.
Mine is tucked up high and only has a dump tip under the body you cant see the outlet from behind unless you get under.
Basically at this point your done, I may have missed a step or 2 but its mostly there, from here we tow it to Gas research to get it fitted with a throttle body and converter under the grant $2000 of the install price.
Before anyone bags out there gear, probably not worth telling me I have used it on my own cars and customer cars for years and love it.
As already stated, metering of the gas comes from a Gas Research carby. The huge benefit this carby has over the rest of the products is that it not only regulates the air into the engine, but meters the amount of gas at the same time. Nearly (if not) all other products only meter the air and "hope" to get the gas mixture right. (Not speaking about injector systems of course). Here's the carby and converter....
At this point we change the spark plugs and fit 9mm ICE leads, if you are running a factory wastegate actuator you will need a bleed valve to raise the boost. These basically let pressure out of the waste gate actuator causing it to open less and therefore make more boost.
Finished
With it all together we fire it up and run it to 10PSI only as its a High Comp motor, I couldnt hang around to see the power figures and havent picked the dyno sheet up yet, but the end result on the road speaks for its self.
The car now has more power off boost, can be driven at lower revs without surging, runs 0-100km/h in 6.2 seconds. This is with very conservative timing as the distributor has not been re-curved yet. It will do standstills or doughies like its wet
For those of you who have driven up princess highway to labourtouce (spelling) and found the hills a struggle, well this applies no more, with the 35's recovery gear, eski, passenger full gas tank etc I can leave it in 5th and just walk over the hills. No more dropping to 3rd and holding 4500rpm.
General manners day to day are awesome no different to b4 except it has more power even off boost.
In terms of economy it betters my mates identical non turbo car by 10litres at the end of the day and because it was my first day after completion i was abusing it really badly. We are converting his starting in a week or 2.
Below I will put the completed Pics and some vids, I will no doubt have left a few steps out but if you have specific question just ask, I have nothing I wish to hide about this install.
Link below 0-160km/h
http://www.youtube.com/watch?v=gwnpV7Olzjo
Link below standstill on road bonnet open turbo glowing
http://www.youtube.com/watch?v=OlJJiTs-mvU
Link below quick squirt in first and second
http://www.youtube.com/watch?v=wFlz9uyS3Dw
Last edited by NutterGQ on Tue Jun 09, 2009 7:02 pm, edited 13 times in total.
His making a write up about the engine conversion that he has just done and got awersome results while at it...
I hate when the keyboard gremlin comes out and stuffs all that up
But i really hate when i'm closing MSN windows or closing imageshack window after uploading something and click the X to fast and close my big post on a forum that i just spend for every typing...
Anyway can't wait till this write up is posted
Rick.
Jee that thing bloody hammers!
How much boost did u end up running in those vids above?
Also i wouldn't mind knowing how much rwkw you made as i'm going to up my boost just not sure if a single converter will do or not .. trying to get away with a single converter but twin may be needed not sure yet..
Cheers
Rick.
How much boost did u end up running in those vids above?
Also i wouldn't mind knowing how much rwkw you made as i'm going to up my boost just not sure if a single converter will do or not .. trying to get away with a single converter but twin may be needed not sure yet..
Cheers
Rick.
Well my car goes like a heap of crap compared to that
I have 6psi and non intercooled i wounder even 14psi and a front mount cooler would make it go anything like that
Man that's impressive !
U were spinning 35's and did that 0 - 160 pass with 35's?
Is ur auto?
How do u find a single converter ? I'm thinking i may need twin converter but kinda want to stay with one..
Thanks alot mate
And god if my car went that hard i would never complain..
Rick.
Looks good, I did the tuning for Gasresearch Aust and the performance centre for about 10 years. Beware one converter won't always show a lean out on the dyno due to the slower acceleration rate on the dyno than the road in 1st and 2nd. Its only good for about 160-180 rw kw
The 4.2 can do everything the RB30 can, what it looses in technology it makes up in inches, my old shorty was good for 200 rwkw at 16 psi with a 300k old engine and a set of valve springs. Did someone say auto, turbos love autos, its a shame but you loose so much boost on manual gear shifts.
Speak to Micheal at ICE for the re-curve as he knows what to do with gas, ive dealt with him for years, I'd generally just lock the mechanical advance and keep the vacuum.
Joel
-Pre trip inspections/ servicing
-Suspension/ custom modifications
-4wd Dyno & tuning
-Qualified mechanics
-Suspension/ custom modifications
-4wd Dyno & tuning
-Qualified mechanics
Why Valve springs I dont understand why valve springs? Do the carby motors have different springs to the efi ones? I run 14 psi and dont seem to have any problem? It is limited to 5500rpm. I would assume that there would be a loss in power and would be able to pick this up on the dyno graph if the valves are blowing open? Would this be correct?
In that vid it was running 31's but it happily spins the 35x12.5 BFG AT's. It still pulls clean to 160 with them on. Its manual there are no auto RB30 PatrolsMulisha wrote:Well my car goes like a heap of crap compared to that
I have 6psi and non intercooled i wounder even 14psi and a front mount cooler would make it go anything like that
Man that's impressive !
U were spinning 35's and did that 0 - 160 pass with 35's?
Is ur auto?
How do u find a single converter ? I'm thinking i may need twin converter but kinda want to stay with one..
Thanks alot mate
And god if my car went that hard i would never complain..
Rick.
On the dyno tune the converter seems to support it fine, I will pull some plugs soon and check for detonation but so far so good.
PGS 4WD wrote:Looks good, I did the tuning for Gasresearch Aust and the performance centre for about 10 years. Beware one converter won't always show a lean out on the dyno due to the slower acceleration rate on the dyno than the road in 1st and 2nd. Its only good for about 160-180 rw kw
The 4.2 can do everything the RB30 can, what it looses in technology it makes up in inches, my old shorty was good for 200 rwkw at 16 psi with a 300k old engine and a set of valve springs. Did someone say auto, turbos love autos, its a shame but you loose so much boost on manual gear shifts.
Speak to Micheal at ICE for the re-curve as he knows what to do with gas, ive dealt with him for years, I'd generally just lock the mechanical advance and keep the vacuum.
Joel
My idea was to get rid of mechanical as well, makes life easy, I'll keep an eye out for leaning but so far so good. I still haven't asked what it makes at the wheels but by the times it seems to make a bit.
With ur cooler would u mind posting a pic of how u squezzed it in there behind the grill?
Did u keep air con or get rid of that?
On mine im thinking of getting rid of the air con and fitting a 600x300x76mm front mount just wounder if it would fit with air con though..
Cheers
Rick..
Also what type of cooler is that? Do you call it just a front mount or is called something else as i never seen one before..
I kept the aircon, fruck the idea of cooking my ass off. I have no pics of the back but when you pull off the grill you will see there are raised ridges all over the shop, you basically grind em all down gently till they clear and the grill fits flush.
If you or anyone has a pic of the back of a grill send it to me and i will photo shop it to show what I chopped off.
Turbo rebuild is $650 for small hiflow (slightly bigger newer style comp wheel) or $950 using TO4Z WheelGRINCH wrote:how much was the turbo rebuild? and how much did it cost?
Last edited by NutterGQ on Wed Aug 05, 2009 2:56 pm, edited 2 times in total.
Awesome Conversion, has got me interested in trying it myself. Only problem with the EFI Rb30 is if you ever get the crank angle sensor wet, or even slightly damp, you've got to replace them. I owned 2 VL turbo commodores and had to do the CAS on both of them while owning them all because of water. RBs are damn strong engines
Yes the boost on the back of the intake valve can blow it open and its normally identified on the dyno printout as a wavy power line at the higher rabgesZac Zec wrote:Why Valve springs I dont understand why valve springs? Do the carby motors have different springs to the efi ones? I run 14 psi and dont seem to have any problem? It is limited to 5500rpm. I would assume that there would be a loss in power and would be able to pick this up on the dyno graph if the valves are blowing open? Would this be correct?
Joel
-Pre trip inspections/ servicing
-Suspension/ custom modifications
-4wd Dyno & tuning
-Qualified mechanics
-Suspension/ custom modifications
-4wd Dyno & tuning
-Qualified mechanics
Yeah i was told the same thing for intercooler piping that mild steel shouldn't be used but intercooler piping gets a light film of oil through it i was told so it should rust anyway.mickyd555 wrote:correct me if im wrong but wont that intake pipe start to rust on the inside and wont that rust then be forced into the engine?
Nutter may have sprayed a light coat of paint on the inside as well though..
Rick.
awesome, then he'd get paint flaking and going in the engine:DMulisha wrote:mickyd555 wrote:correct me if im wrong but wont that intake pipe start to rust on the inside and wont that rust then be forced into the engine?
Nutter may have sprayed a light coat of paint on the inside as well though..
Rick.
Who is online
Users browsing this forum: No registered users and 67 guests