Wheel carrier mount and other stuff
Posted: Wed Apr 18, 2007 8:43 pm
Rather than send another thread off topic and to respond to a PM from NIK rearding my wheel carrier I thought I would start a new thread.
The two kids are only half my tribe (4 kids) which is why I have converted it to a three seater in the rear, I used 2 two seaters and cut an shut them using both rear locks, the wheel arches have been cut down a little and the seat moved forward. To engineer it I had to have lap sash belts for the two outer positions, 2 child restraint anchor points installed and then due to GVM they would only engineer the rear to carry 3 mpassengers up to 38kg. The belts and anchor points were mounted off an 8 point chromeoly cage which to keep it family friendly is a must. I run 3 child anchor points and use three child harnesses in the rear so the kids have got a four point harness on every time they sit in the car.
Mark
This Zook was built to be a daily driver that I could pick up kids from school, drive round for work (cause I love driving it), do a 4 hour drive or an A grade trip with out changing wheels or set up.NIK wrote:Yep that was me! Dont worry I didnt think you were rude you were unloading a tribe of kids so I wasnt offended
I really liked the look of the top as all the other lwb tops look a bit oridinary. I have a high roof one with the BIG boxy windows but I really like the look of the late model swb tops ( the ones with the diagonal through the side window) and think a lwb version like yours is the way to go.
I wasnt going to ask much about the roof I was interested in the zook as I Im trying to keep mine kinda family friendly but I took out the 3 seat bench and replaced it with split rears from a coily.
Nik
The two kids are only half my tribe (4 kids) which is why I have converted it to a three seater in the rear, I used 2 two seaters and cut an shut them using both rear locks, the wheel arches have been cut down a little and the seat moved forward. To engineer it I had to have lap sash belts for the two outer positions, 2 child restraint anchor points installed and then due to GVM they would only engineer the rear to carry 3 mpassengers up to 38kg. The belts and anchor points were mounted off an 8 point chromeoly cage which to keep it family friendly is a must. I run 3 child anchor points and use three child harnesses in the rear so the kids have got a four point harness on every time they sit in the car.
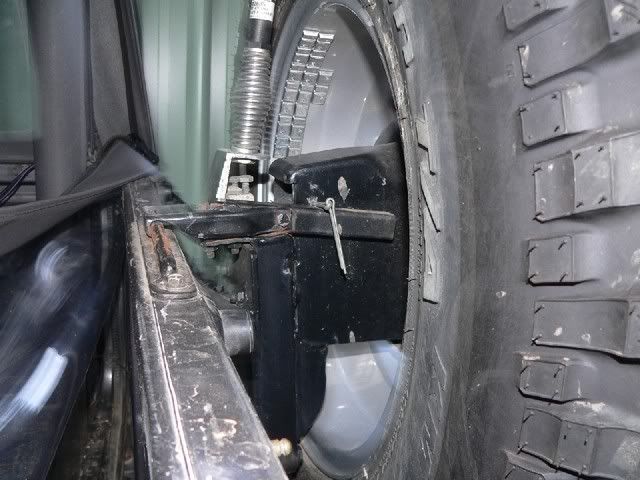
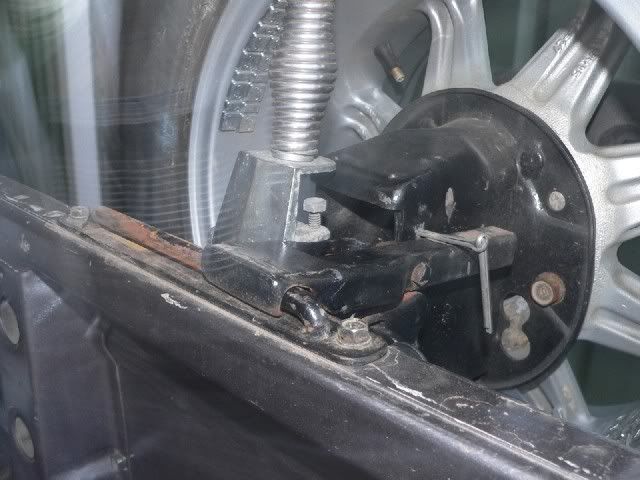
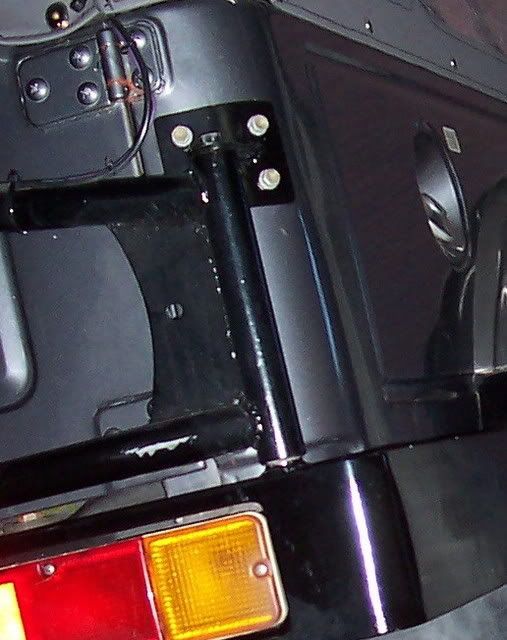
The top mount is 3mm plate and has another 3mm plate shaped to fit inside it. The inner plate has 4 M8 Nuts tacked on and it was inserted to the quarter panel through a small slot I cut inside the boxed section, I migged on some fencing wire to hold the plate in position while getting some bolts in then rivetted the plate in to hold it in place which will make life easy if I ever need to remove the carrier. Even though the rear bar is solid as a brick ...outhouse the carrier still had some movement at the top hence the top mount. The carrier then has a custom made top over centre latch which hooks to the tailgate, the bar that the latch hooks onto has been made wide enough so when you open the tailgate you dont need to open the carrier, it will side along the bar. The bottom has some 1/2 inch nylon chopping board (dont tell my wife she is still looking for it) screwed to the rest which sits on the bar. If you or anyone likes I can take some images of the rest of the carrier, ATM this image is the best I have.NIK wrote:Hey mate just noticed your tyre carrier (man that think zook is nice) how did you attatch the top support to the tub?
Nik
Mark