
I have chosen to build my own sub tank and im thinking steel would be ok, here is what im thinking, any help, advice or experience would be great.
Im looking for the cheapest alternative to the big price tags i have been quoted.
2mm sheet metal all cut and welded, no bends.
Normal breather/filler spout from the wreckers
Using either a gate valve on the breather so i can hook up my air compressor line to the tank close the valve and use air pressure to push the diesel from it into the main tank, or
Using a 12v transfer pump to push it into the main tank, via a missile switch in the cab.
That was my brainstorm at work today.
Notice: We request that you don't just set up a new account at this time if you are a previous user.
If you used to be one of our moderators, please feel free to reach out to Chris via the facebook Outerlimits4x4 group and he will get you set back up with access should he need you.
If you used to be one of our moderators, please feel free to reach out to Chris via the facebook Outerlimits4x4 group and he will get you set back up with access should he need you.
Recovery:If you cannot access your old email address and don't remember your password, please click here to log a change of email address so you can do a password reset.
Building a custom sub tank
Moderators: toaddog, TWISTY, V8Patrol, Moderators
Building a custom sub tank
Get out there!!
Re: Building a custom sub tank
my thought would be to fold the tank where possible as to minimse the welds. 2mm would be fine.
work it as a syphon system to the main tank or "T" the pick up line so it draws from both?
there are also valves and such available from places like brown davis that sort the switching out $$$$ though.
maybe get the system out of an 80 or similar from the wreckers?
work it as a syphon system to the main tank or "T" the pick up line so it draws from both?
there are also valves and such available from places like brown davis that sort the switching out $$$$ though.
maybe get the system out of an 80 or similar from the wreckers?
Keep it shiny side up!
Now doing general fab work and painting
trays, trailers, engine swaps on request, some tube work, silo section sliders, rust repairs, ute chops etc
Now doing general fab work and painting
trays, trailers, engine swaps on request, some tube work, silo section sliders, rust repairs, ute chops etc
Re: Building a custom sub tank
Its coming along well, i warped the outer edges a bit when i welded the baffles in but sorted it out straight again and its now ready to have the top welded on tomorrow and start fitting it up!!
Its capacity is 162L so yeah combine that with my 80L standard tank, 240L of diesel on board means long range trips here we come!
Its capacity is 162L so yeah combine that with my 80L standard tank, 240L of diesel on board means long range trips here we come!
Get out there!!
Re: Building a custom sub tank
Pay attention to your mounting points. Chassis flex off-road, and can rip a tank apart. Think three points only. Four points is a problem waiting to happen.
Road Ranger

Re: Building a custom sub tank
or strap it using steel bands with rubberbetween the tank and strap and use bushes on the strap mounts if that makes sense......-Scott- wrote:Pay attention to your mounting points. Chassis flex off-road, and can rip a tank apart. Think three points only. Four points is a problem waiting to happen.
Just wait wait for the looks you get at the servo when your paying for fuel, I had 240l in my GU some of the comments and baffled looks were priceless
If the above post did not offend you in any way please PM me so I can try harder!!
Re: Building a custom sub tank
Tiny wrote:or strap it using steel bands with rubberbetween the tank and strap and use bushes on the strap mounts if that makes sense......-Scott- wrote:Pay attention to your mounting points. Chassis flex off-road, and can rip a tank apart. Think three points only. Four points is a problem waiting to happen.
Just wait wait for the looks you get at the servo when your paying for fuel, I had 240l in my GU some of the comments and baffled looks were priceless
Thanks for the tip tho!!
Get out there!!
Re: Building a custom sub tank
Seeing you're getting all this practise, interested in making another? 
'95 Maruti lwb, 1.6GTI, 6.5:1, locked F+R, SPOA on 33's.
Re: Building a custom sub tank
Im pretty hard up for time at the moment even flat out just doing my own stuff mate sorry, time management has been a great thing lately, usually im too casual and the days slip away!!mnemonix wrote:Seeing you're getting all this practise, interested in making another?
In hindsight, spending the extra cash and having the most part of it folded up would have been better, adding it up there is 8 metres of welding on it!!!
But i was trying to save $$ and be proud that i built the whole thing from a sheet of steel.
I would have rather oxy welded it than the mig too but have no oxy.
I would post some pics but have no camera at the moment it died last week out hunting so it got shot with my 12gauge
Get out there!!
Re: Building a custom sub tank
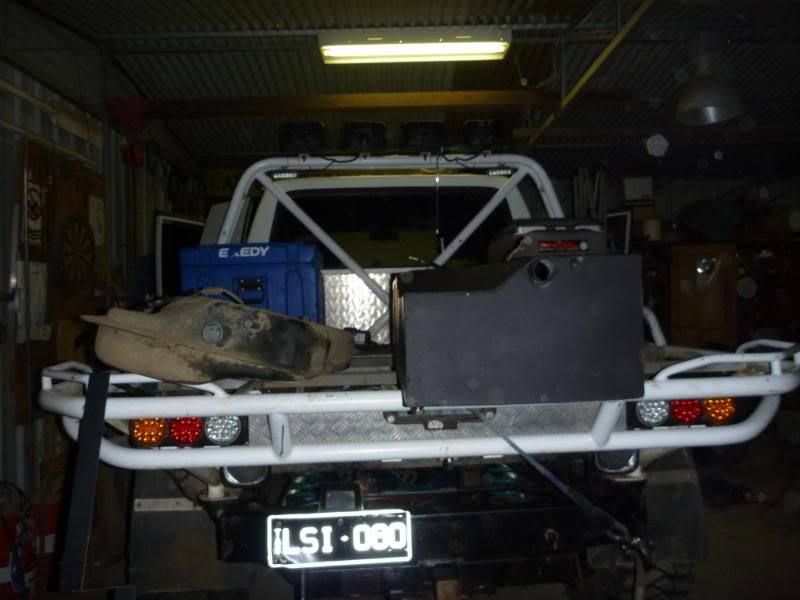
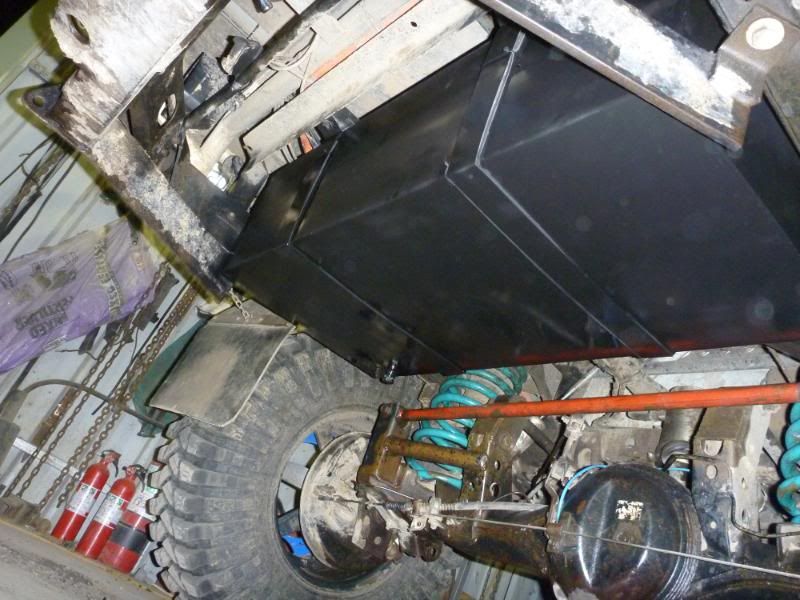
Still no camera, but its fully made and bolted into the gap between the tray and the main tank, i have yet to weld a filler cap into it yet but i have cut out a 100mm x 100mm hole in the wooden floorboards in the tray for access to the filler. And it needs painting too.
I went to my local Panel beater asked for a quote on painting it, he replied with "oh mate about $600" My jaw dropped and i promptly drove out the gate thinking about how much of a robber he was.
Im not sure what pump im using yet but have chosen to stick with the 12v transfer pump.
What type of thread and fitting should i weld into the outlet?
It needs to be universal i suppose.
Get out there!!

Re: Building a custom sub tank
Try the powder coaters, they are often cheaper, and the stuffis harder wearing, not as good looking for body panels, but fine for tray backs.Wozza244 wrote:Still no camera, but its fully made and bolted into the gap between the tray and the main tank, i have yet to weld a filler cap into it yet but i have cut out a 100mm x 100mm hole in the wooden floorboards in the tray for access to the filler. And it needs painting too.
I went to my local Panel beater asked for a quote on painting it, he replied with "oh mate about $600" My jaw dropped and i promptly drove out the gate thinking about how much of a robber he was.
Im not sure what pump im using yet but have chosen to stick with the 12v transfer pump.
What type of thread and fitting should i weld into the outlet?
It needs to be universal i suppose.
hands and mums dont count!!!
Re: Building a custom sub tank
An update on the progress, it is nearly complete, i blasted some air into it and sprayed some soapy water around the welds, found 5 small pin holes over the 8m of welds so i did alright!
First shot was before i put the baffles in, i forgot to get a pic of it but i only did one baffle in the centre running sideways, im pretty sure it will suffice.


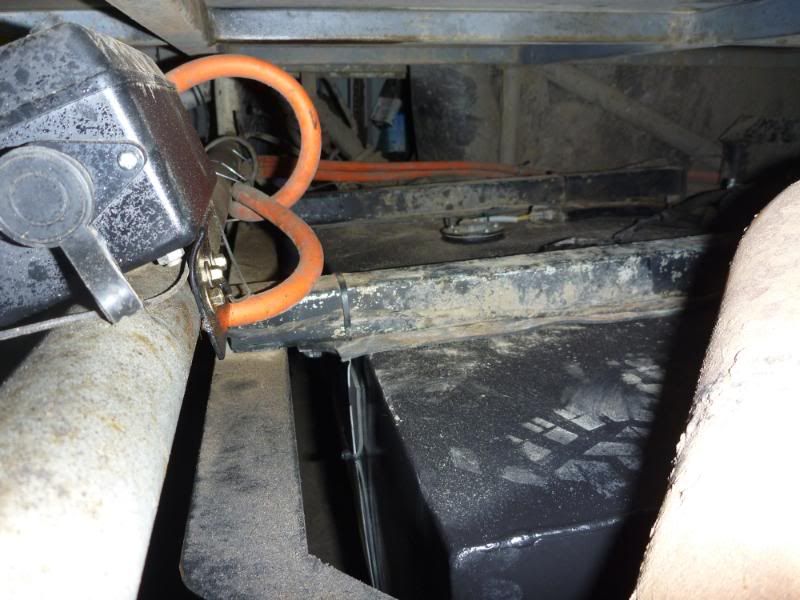
The outlet hole at the moment, it can be adapted easily to whatever thread the pump has.


Its is now painted black i did it myself, that robber from the local paint and panel business wasnt getting $600 from me!!
The pump i have chosen is this one from ebay, i hope it goes ok.
http://cgi.ebay.com.au/12v-Diesel-Oil-B ... 2eaf53ff9d" onclick="window.open(this.href);return false;
First shot was before i put the baffles in, i forgot to get a pic of it but i only did one baffle in the centre running sideways, im pretty sure it will suffice.
The outlet hole at the moment, it can be adapted easily to whatever thread the pump has.
Its is now painted black i did it myself, that robber from the local paint and panel business wasnt getting $600 from me!!
The pump i have chosen is this one from ebay, i hope it goes ok.
http://cgi.ebay.com.au/12v-Diesel-Oil-B ... 2eaf53ff9d" onclick="window.open(this.href);return false;
Get out there!!
Re: Building a custom sub tank
Is the filler and breather on the other side?
What about the return?
What about the return?
hands and mums dont count!!!
Re: Building a custom sub tank
Good on you for having a go and like anything a home made one off can be a lot cheaper than a full production quality versions but I would be worried about large sections of flat steel tank manufactures put crease bends in a cross shape on large flat sections to add strength to stop the sucking in and bloating out forces as the tank heats and cools. These forces should not be under estimated, even jerry cans have this. Over time this will fatigue the metal and cause cracks and leaks
Add this to stress point around the mounts and you can start to see why the big brands don't do cheap tanks
I would have thought the cheapest way out was to go to a truck wreckers and find a tank with similar size and fab the mounts as required
Add this to stress point around the mounts and you can start to see why the big brands don't do cheap tanks
I would have thought the cheapest way out was to go to a truck wreckers and find a tank with similar size and fab the mounts as required
Re: Building a custom sub tank
Its not a source tank its a storage tank, The cap breathes and i have also put a small breather pipe in at the filler neck, ready for some rubber hose which was very very hard to weld!!bj on roids wrote:Is the filler and breather on the other side?
What about the return?
It doesnt need a return because as i said earlier in the build, when i need to top up my main i hit the switch in the cab and it fills the main tank from the sub, it only needs to breathe.
Get out there!!

Re: Building a custom sub tank
Do you have any rubber in the mounting of it at all??? It doesn't appear like you do, and you NEED something that will take some of the torsional forces out of the picture otherwise with that many welds it will all end up in tears (or a very fiery mess) from work-hardening adjacent to the welds. Your tray is still subject to the same torsional forces as your chassis and will transmit these to your tank.
George Carlin, an American Comedian said; "Think of how stupid the average person is, and realise that half of them are stupider than that".
Re: Building a custom sub tank
No rubber there, hmmm yes i thought about chassis twist but didnt put enough thought into chassis transferring twist to the tray......Thanks for pointing that one out and the first thing i can possibly think of now is maybe canning the whole steel tank thing and using it as storage in my shed at home just in case one of the boys has the fuel tank on the ute from work if ya know what i meanDAMKIA wrote:Do you have any rubber in the mounting of it at all??? It doesn't appear like you do, and you NEED something that will take some of the torsional forces out of the picture otherwise with that many welds it will all end up in tears (or a very fiery mess) from work-hardening adjacent to the welds. Your tray is still subject to the same torsional forces as your chassis and will transmit these to your tank.
At the end of the day i havent actually lost anything, i still have the tank for use if i decide to can the whole idea.
Thanks for the help mate
Get out there!!
Re: Building a custom sub tank
Ok tank is built, in and working a charm, except there is a few more very slight leaks around the seams, so slight that over a whole day all that could be seen is a damp patch around the weld on the paint.
Rather than weld them up again is there some paste on sealant i could use that would save me taking the tank back out?
Or would it be a better idea to take the tank out again, flush it and powder coat it?
Would the powder coating be sufficient to plug the minute holes?
Rather than weld them up again is there some paste on sealant i could use that would save me taking the tank back out?
Or would it be a better idea to take the tank out again, flush it and powder coat it?
Would the powder coating be sufficient to plug the minute holes?
Get out there!!

Posts: 689
Joined: Sat Oct 09, 2010 5:12 pm
Joined: Sat Oct 09, 2010 5:12 pm
Location: SMUGGLING COOOOOKIES ACROSS THE MEXICAN BORDER
Re: Building a custom sub tank
weld it with a stick....
you will have heaps of trouble re migging it as oil.....contaminates the weld....
grind where its showing.....
i made mine....and im a boily....
didnt leak for a week.....then it showed up in a few spots....
re done it.....
mig no good for repairs....
oil contaminates the weld pool....
i still have to do it again......but with a stick!!
i have a facet transfer pump......
rated at 134.5 ltrs.AN HR....and ITS
i bought another facet as i lent mine to a mate who broke down on a day trip away..
and had to buy a new one...
WORSE PUMP EVER.......no where near the rate.....not even HALF...of what its rated.....
rubber mounts arent needed....
just dont have a heap of mounts on it...
i have 3......
two at the rear.......and one across the front.......
three bolts at the front.........its .angle...
one each side of the rear tank..
my friend is a weld inspector.....
told me baffles arent needed in tanks on utes....
manufacturers dont put them in .........baffles....
baffles stiffen the tank up and restricts flex.....
you need some give in a large tank....
f0lding as much as possible to minimise welding.....as welding alone puts excessive stresses on the steel.....
really large tanks needs baffles to share the stresses...... spread it out
AUSTRALIA
WORTH LOOKING AT WORTH LOOKING AFTER
WORTH LOOKING AT WORTH LOOKING AFTER

Re: Building a custom sub tank
You sure about that? Series landies don't have rubber mounts = the tank bolts straight to the chassis. I have never seen a tank crack, and some have been in use for over 60 years!DAMKIA wrote:Do you have any rubber in the mounting of it at all??? It doesn't appear like you do, and you NEED something that will take some of the torsional forces out of the picture otherwise with that many welds it will all end up in tears (or a very fiery mess) from work-hardening adjacent to the welds. Your tray is still subject to the same torsional forces as your chassis and will transmit these to your tank.
But maybe landie chassis flex less than Nissotas...
_____________________________________________________________
RUFF wrote:Beally STFU Your becoming a real PITA.

Re: Building a custom sub tank
Don't know about that, I became quite accustomed to jumping over the doors to get out of my series 1!ISUZUROVER wrote: But maybe landie chassis flex less than Nissotas...
My tank (Brown Davis I think, in an HJ75) is bolted straight to the floor; 4 tabs no rubber. It's a fairly complex shape so I can't see the design allowing much flex.
Tetanus rolling on 37's

Re: Building a custom sub tank
patrol wagons, no rubber
patrol utes, no rubber
landcruiser, straps
hilux, no rubber
sierra, no rubber
patrol utes, no rubber
landcruiser, straps
hilux, no rubber
sierra, no rubber
turbos are nice but i'd rather be blown
Re: Building a custom sub tank
Add to that - LR/RR/Disco no rubber. Just remembered that the coilers have a solid mount as well.chunderlicious wrote:patrol wagons, no rubber
patrol utes, no rubber
landcruiser, straps
hilux, no rubber
sierra, no rubber
_____________________________________________________________
RUFF wrote:Beally STFU Your becoming a real PITA.
Re: Building a custom sub tank
just to ad, heres how we did mine, fits in place of the 80 series sub tank. ended up being 135lt 

80 xtra cab
Supercharged LS1, Locked n shit
80 Wagon, TD Tourer, locked, Interco 35s, G turbo
Supercharged LS1, Locked n shit
80 Wagon, TD Tourer, locked, Interco 35s, G turbo
Re: Building a custom sub tank
Well its been 6 months since i installed the custom job, and the only slight faults are minute holes leaving a wet mark in some spots on the seams, (no drips at all) which i havent got around to fixing yet.
And breather issues, as i never put one in for the original design.
I did away with the pump and it now gravity feeds down to my main tank, so when my main tank gauge starts going down i know the sub is empty. Works well.
And breather issues, as i never put one in for the original design.
I did away with the pump and it now gravity feeds down to my main tank, so when my main tank gauge starts going down i know the sub is empty. Works well.
Get out there!!
Re: Building a custom sub tank
Whats the best low pressure tester for building tanks? I've always just taped up all but one of the holes and gave it a couple of squirts with the blow down gun then the ol soapy water.
Re: Building a custom sub tank
Thats all i did mate and found a few little leaks which i welded up but the holes that have appeared since i started using it must have been so small they didnt even bubble with the soapy water when i first tested it.
But a radiator pressure tester would be the go if you could adapt it to the filler neck
But a radiator pressure tester would be the go if you could adapt it to the filler neck
Get out there!!
Re: Building a custom sub tank
How many mounting points? As stated above three is good (no rubber needed), four or more is asking for trouble.ISUZUROVER wrote:Add to that - LR/RR/Disco no rubber. Just remembered that the coilers have a solid mount as well.chunderlicious wrote:patrol wagons, no rubber
patrol utes, no rubber
landcruiser, straps
hilux, no rubber
sierra, no rubber
George Carlin, an American Comedian said; "Think of how stupid the average person is, and realise that half of them are stupider than that".
Re: Building a custom sub tank
4 mounting points and has had some hard usage, no worries at all. With the way i welded the mounts on, i think my ute will fall off the fuel tank before the tank falls off the ute 
Get out there!!
Re: Building a custom sub tank
And you of course base that on a full FEM analysis of the stresses on all possible 4x4 chassis designs and all possible tank designs and tank mounting points???DAMKIA wrote:
How many mounting points? As stated above three is good (no rubber needed), four or more is asking for trouble.
Series landie tanks have a strip of angle right across the front and a strip across the back with 3 bolts in each (6 bolts total). Most landie coiller tanks have 4 bolts - 2 at the back about 6" apart and 2 close to each front corner. I have never seen either fracture (but they can rust through where they are double skinned).
_____________________________________________________________
RUFF wrote:Beally STFU Your becoming a real PITA.
Re: Building a custom sub tank
My point was that any three points in space are always monoplanar if all dimensions are equal (ie no fuel tank stresses can occur due to chassis flexing). Once you add a fourth or more mounting point any torsion of the assembly can result in a biplanar or multiplanar surface ("sheet with creases" meaning transmitted forces from chassis to tank). Going by what you have stated about the Landie coilers, they closely couple one of their mounting points minimizing these forces.ISUZUROVER wrote:And you of course base that on a full FEM analysis of the stresses on all possible 4x4 chassis designs and all possible tank designs and tank mounting points???DAMKIA wrote:
How many mounting points? As stated above three is good (no rubber needed), four or more is asking for trouble.
Series landie tanks have a strip of angle right across the front and a strip across the back with 3 bolts in each (6 bolts total). Most landie coiller tanks have 4 bolts - 2 at the back about 6" apart and 2 close to each front corner. I have never seen either fracture (but they can rust through where they are double skinned).
I still hold the question to the other makes as being a valid question. How many points does your tank mount to?
George Carlin, an American Comedian said; "Think of how stupid the average person is, and realise that half of them are stupider than that".
Who is online
Users browsing this forum: No registered users and 3 guests