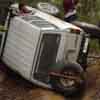
OK, the 60 series shell I got has started to be stripped down to get ready for the chop.(extra cab) Still have to see the engineer and stuff but just wondering the best way to cut it.. grinder, plasma cutter etc so I can start planning it??? Any help???
Also want to get the back panel fab'd up with edges rolled to suit the contours of the body so it'd be a straight fit n weld job. What would be the easiest way to go about this. Anyone know of shops that'd do this in syd, newy, or central coast????
Cheers,
Brighty.
Notice: We request that you don't just set up a new account at this time if you are a previous user.
If you used to be one of our moderators, please feel free to reach out to Chris via the facebook Outerlimits4x4 group and he will get you set back up with access should he need you.
If you used to be one of our moderators, please feel free to reach out to Chris via the facebook Outerlimits4x4 group and he will get you set back up with access should he need you.
Recovery:If you cannot access your old email address and don't remember your password, please click here to log a change of email address so you can do a password reset.
cutting the shell
Moderators: toaddog, TWISTY, V8Patrol, Moderators
cutting the shell
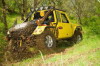
When in doubt..... UTE-ERIZE it!!!


The biggest thing when chopping down a shell like that is to measure twice & cut once. Make sure your cutting line is exactly where you want it, as it is a PITA to add sheet metal if you are short.
There would be 2 was I would approch it.
Tack weld some cross bracing on the front side of your cutting line, to maintain its "squareness" I am sure that once you cut the rear portion of the front, it will spring, thus the suggestion for the cross brace.
I would do, corner to corner in both directions, plus a vertical one from centre of floor to centre of roof, as the roof will be the hardest bit to get right.
The other alternative to maintain its "squareness" is to hold off on the cutting & tack weld in your new rear panel. This will ensure that:
A: You are happy with the location of the panel, room in the extra cab etc
B: Easily adjust the panel location to ensure you are happy with A.
C: Keep the whole thing squre during the cutting operation.
D: Stop the roof panel vibrating like a bastard during cutting.
Personally I would do the second option.
2005 GU3 Patrol ST Ute

ludacris wrote:Cut an overhang of 10 cm then line everything up and then start trimming it square. Use a grinder but take it nice and slow and let the grinder do all the work. Start with a 9inch then smaller to be more precise.
Thats true about the 9inch, it is really easy to get long straight cuts, the 7 inch is also a good comprimise.
I use a cutting disk on the 9 until its worn a little then put it on the 7 for easier operation.
yeshemesh

The 'D' pillars wont be the same height as the 'B' pillar after the cut (roof is curved, so D pillar is lower)
Also, the distance across the body is further than the distance between the D pillars. (body is also tapered inward at the rear)
If I could post pics direct, it would be easier. yeah, me puta numpty.
Al
Also, the distance across the body is further than the distance between the D pillars. (body is also tapered inward at the rear)
If I could post pics direct, it would be easier.
yeah, me puta numpty.
Al
Luv the sound of a diesel,
especially a Chev 6.2!
Its GONE.........Replaced by a qik HDJ105.
The bigger the boy, the bigger the TOY!!
especially a Chev 6.2!
Its GONE.........Replaced by a qik HDJ105.
The bigger the boy, the bigger the TOY!!
Sixty wrote:The 'D' pillars wont be the same height as the 'B' pillar after the cut (roof is curved, so D pillar is lower)
Also, the distance across the body is further than the distance between the D pillars. (body is also tapered inward at the rear)
If I could post pics direct, it would be easier.
Al
I'm not going to use the D pillars but thats good to know. Not sure how I'm going to go about it, might fab up some square tube frame work or something to take the rear sheet i'll get made up + make it a bit stronger. Something to work on over the break when my mind is thinking clearly.
When in doubt..... UTE-ERIZE it!!!

i used a 9" and a hacksaw through the sills for accuracy. i got the sills perfect and overlappd the joins a little to make welding easier.
cheers bru
cheers bru
ADHD Racing would like to thank
Mrs Bru @ Sunshine Coast Developmental Physiotherapy - www.scdphysio.com.au , Ryano @ Fourbys www.generaltire.com.au Blitzkrieg Motorsport
Mrs Bru @ Sunshine Coast Developmental Physiotherapy - www.scdphysio.com.au , Ryano @ Fourbys www.generaltire.com.au Blitzkrieg Motorsport
Who is online
Users browsing this forum: No registered users and 1 guest