Notice: We request that you don't just set up a new account at this time if you are a previous user.
If you used to be one of our moderators, please feel free to reach out to Chris via the facebook Outerlimits4x4 group and he will get you set back up with access should he need you.
Recovery:If you cannot access your old email address and don't remember your password, please click here to log a change of email address so you can do a password reset.
Welding advice.
Moderators: toaddog, TWISTY, V8Patrol, Moderators
Welding advice.
I think im quite good at arc welding but im not sure about the strength of welds & what loads can be applied to welded joins etc.
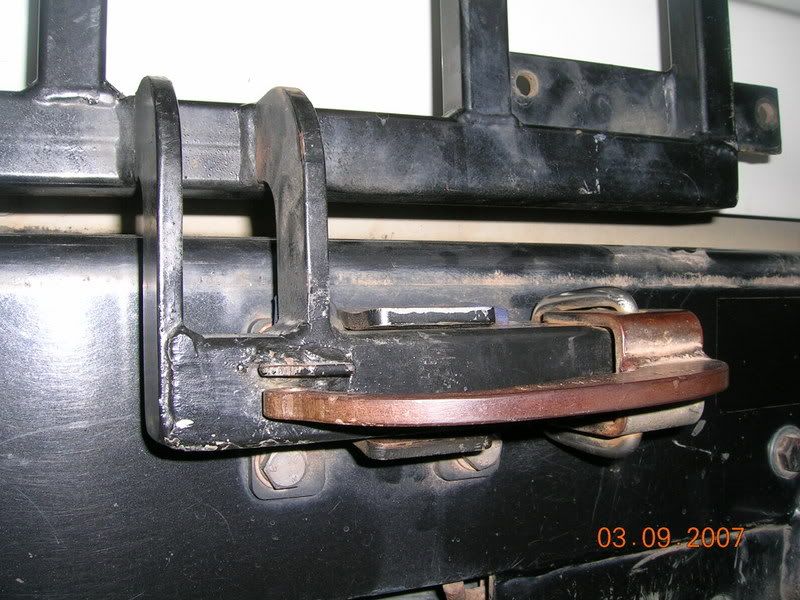
In the pics below is a wheel carrier im upgrading with a swivel hub & considering it will have a 35" steel rim wheel & high lift jack i thought id tack it all together & drop it in to get welded professionally.
My question is this necessary ?
My welder is only the small cheapie that uses 2.5mm sticks & i can easily run a neat bead with this.
Is just one bead enough ?
The last thing i want is for it to fall off half way up the Cape on the rough roads.
What do you welders out there think ?
BTW - there will be a cross brace installed (not in pic)
GXL Turbo Diesel 80 series- 6" King springs + Rancho in-cab kit- 35" BFG Muds Twin ARB airlockers.
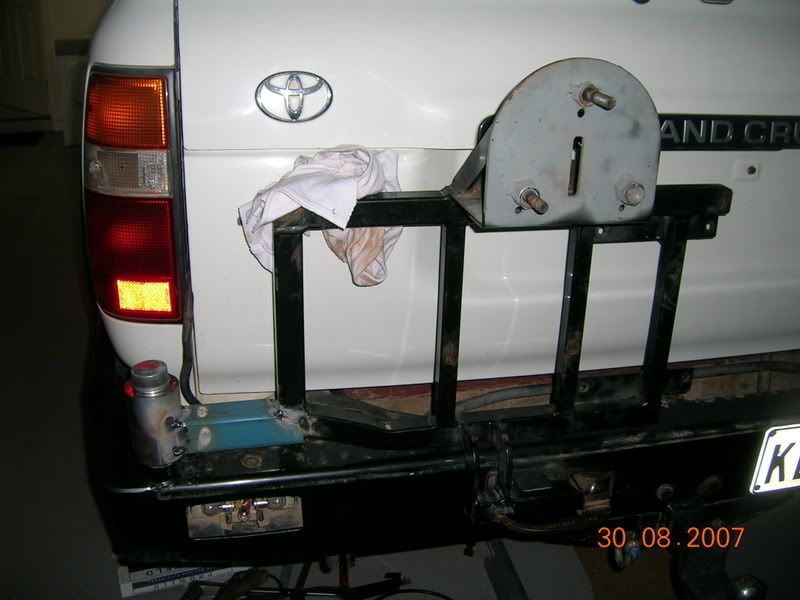
Can triple fillet it.
The only problem might be penetration on the 8mm swing part, your welder might not get get deep enough.
The rest of it would probably be ok, be 3mm square bar I take it?
welds from what I can see look decent, can't really see but they look like they have a good amount of meat in them.
the only other problem would be the kind of roads you'd end up on, some might be ok others could shake the sh*t out of it, that might cause some problems.
all I can see is a few tack weldszagan wrote:welds from what I can see look decent, can't really see but they look like they have a good amount of meat in them.
if you ahve any doubt as to whether it is strong enough or not.. then it most probably isn't.. get a pro to do it.. will only cost a few $$ and worth the piece of mind I suppose
you will need a diagonal brace from the pivot to the top of the main frame .
how many amps is your welder if it is less than 150 it will struggle to get good penertration on the pivot especaly where it is going to need a pretty good weld
the way the other end you should easily get a good weld in there that is up to the task
how many amps is your welder if it is less than 150 it will struggle to get good penertration on the pivot especaly where it is going to need a pretty good weld
the way the other end you should easily get a good weld in there that is up to the task
It said 5mm but looks more like 4mm. (tack welded only)zagan wrote: 3mm square bar I take it?
I want it to handle the worst roads, ie Cape York.zagan wrote: the only other problem would be the kind of roads you'd end up on, some might be ok others could shake the sh*t out of it, that might cause some problems.
I mentioned in my first post that their will be a cross brace, not done yet.AdrianGQ wrote:you will need a diagonal brace from the pivot to the top of the main frame .
how many amps is your welder if it is less than 150 it will struggle to get good penertration on the pivot especaly where it is going to need a pretty good weld
the way the other end you should easily get a good weld in there that is up to the task
The welder amps only go up to 135 as far as i can see.
I might get the swivel bit done properly just to make sure, thanks for the replies.
GXL Turbo Diesel 80 series- 6" King springs + Rancho in-cab kit- 35" BFG Muds Twin ARB airlockers.
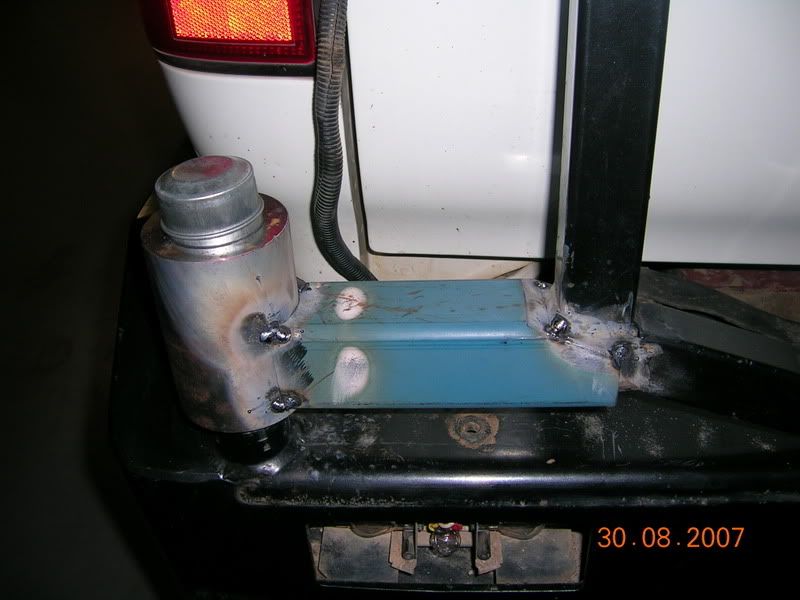
prepare the surfaces as well as you can grind off the blule paint give the weld somthing decent to hold on to ,
turn ya welder up as far as ya can get it and give it your all if ya get a decent weld just one pass but if your that worried do a second pass slightly higher
1995 land rover disco on 265 muddies
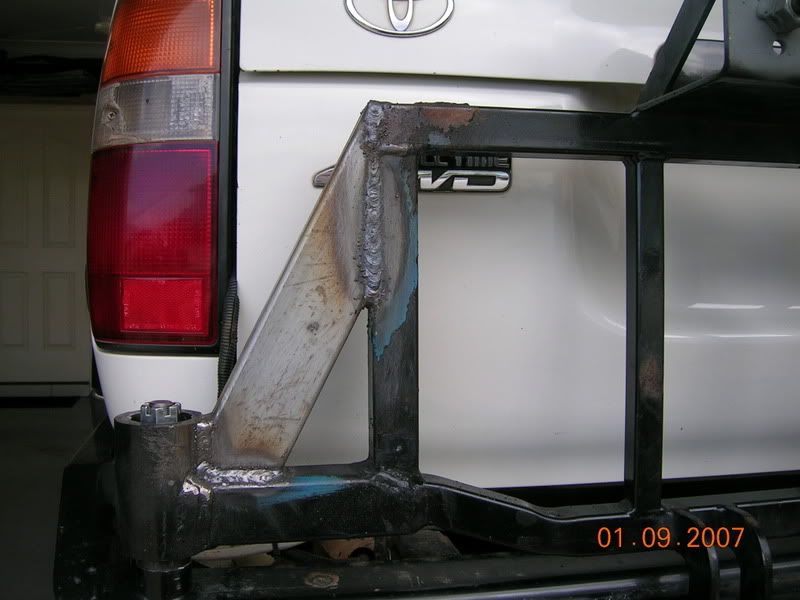
Welded it today, 3 or 4 passes to make sure.
Cranked it right up & took the lid off the welder & had a fan blowing on it to keep it cool as it tripps out with over use some times.
Whats the go with cooling it under the garden hose after welding ?
Is a slow cool or a quick one with water better or does it not make any difference.
Cranked it right up & took the lid off the welder & had a fan blowing on it to keep it cool as it tripps out with over use some times.
Whats the go with cooling it under the garden hose after welding ?
Is a slow cool or a quick one with water better or does it not make any difference.
GXL Turbo Diesel 80 series- 6" King springs + Rancho in-cab kit- 35" BFG Muds Twin ARB airlockers.
The faster you cooler it the harder it will get. Hard = cracking. soft = flexing. in this case you want it to flex. I would reccomend you dont cool anything in the manner you describedKev80 wrote:Welded it today, 3 or 4 passes to make sure.
Cranked it right up & took the lid off the welder & had a fan blowing on it to keep it cool as it tripps out with over use some times.
Whats the go with cooling it under the garden hose after welding ?
Is a slow cool or a quick one with water better or does it not make any difference.
Paul
91 FJ 80 Project on the go - air lockers, 3in lift, super duper 3F, 36" pedes, toyota V8 getting prepped now
I don't want to sound negative, but I think that's going to break. It's not a welding issue but a design issue. Lots of people blame poor welds for stuff breaking, but a design that places unrealistic loads on the welds is really the problem
Can you run 2.5mm rods and weld this job? sure, if the part is designed right.
I think the RHS you have used to run between the old carrier and the swivel is too large - the gaps you have to fill between the RHS and the old carrier are pretty big and you won't generate much strength in the join there.
Likewise, the diagonal cut on the top of the RHS will be getting pretty thin as it runs towards the carrier, you will end up with a huge amount of weld in here and it will form a big hard mass and result in failure of the RHS in the heat affected zone.
A gusset plate will help, but the problem is that gussets are only strong in one plane. (in this case, up and down) whereas what happens on a tyre carrier is that the top of the tyre is trying to move forward and back, so the gusset plate is not adding strength where it is required.
My idea?
source the same RHS size as used for the carrier. run one piece as you have from the carrier to the swivel. weld it in on all sides.
Run another piece from the swivel (shaped in as per your photo) diagonally up as high on the carrier as you can go. (my guess is the top corner where the rag is in the photo.
Buff all outside facing welds flat, then fit 2 gusset plates over the whole area. These can then be fillet welded into the whole existing vertical member, the swivel, and the two new members. these plates don't have to be very thick, 3mm would be heaps. I am a bit perverse, so I'd probably go with 2mm or even 1.6mm - they are taking all the force in tension not shear so the area is doing the work not the thickness.
By my assessment, you will have the maximum weld length possible and the area will be a stiff as practical in all directions.
I am sure your welder and ability will be adequate if you design like this.
PS as per the other post - do not cool your welds in any way. let them air cool. embrittlement will occur if you quench them.
PS I have worked in weld inspection for 11 years and do lots of fabrication which is generally pretty reliable. I am a self taught welder and run a 140 amp ESAB mig which I normally run at around 100-120amps.
Steve.
[quote="greg"] some say he is a man without happy dreams, or that he sees silver linings on clouds and wonders why they are not platinum... all we know, is he's called the stevie.[/quote]
Yes the gap between the 2 rhs was quite big so thats why i inserted 2 pieces of 40mm flat bar & welded them to the original frame before sliding the new 50mm rhs on.
Believe it or not this was a perfect fit.
Once the 50mm piece is in place i welded inside it before welding it to the swivel. You can see the heat marks on the 50mm piece in those pics.
So basicly im not worried about the rhs/ frame welding just the swivel bit.
I dont even know what a gusset is.
After i fit the 65 x 40mm cross brace if i think its necessary i can always wrap some 40mm flat bar around the swivel & along the carrier & weld it in place.
May not look pretty but at least it wont break.
Thanks for the reply, im trying to take it on board.
GXL Turbo Diesel 80 series- 6" King springs + Rancho in-cab kit- 35" BFG Muds Twin ARB airlockers.
No worries.
Not having a go at all - you have done well IMHO.
I was mostly keen to point out that more weld doesn't necessarily make a stronger joint. If the RHS is 4mm thick, for example, 8mm of weld isn't going to fix the problem - it will break at the RHS in the heat affected zone which is more brittle than the parent material, generally. (and especially if quenched) This is why design is more important than the welding. If the design is flawed, no amount of welding (or weld repair) will fix the problem. I see this in industry all the time. Repairs of repairs of repairs all to fix a problem that was created by a design issue.
A gusset is just a reinforcement plate.By welding plate between two sections of box, a very strong structure is created.
Rear wheel carriers are amongst the most fabricated items on a 4WD and also the items that most frequently fail. Most people fail to consider the fatigue created by the vibration of the wheel.
I have never tried to make one and I am not sure I would bother- I don't think I could make one that would last.
Steve.
[quote="greg"] some say he is a man without happy dreams, or that he sees silver linings on clouds and wonders why they are not platinum... all we know, is he's called the stevie.[/quote]
I know your not having a go at me, without good info being good or bad how are you supposed to learn.
I appreciate the comments.
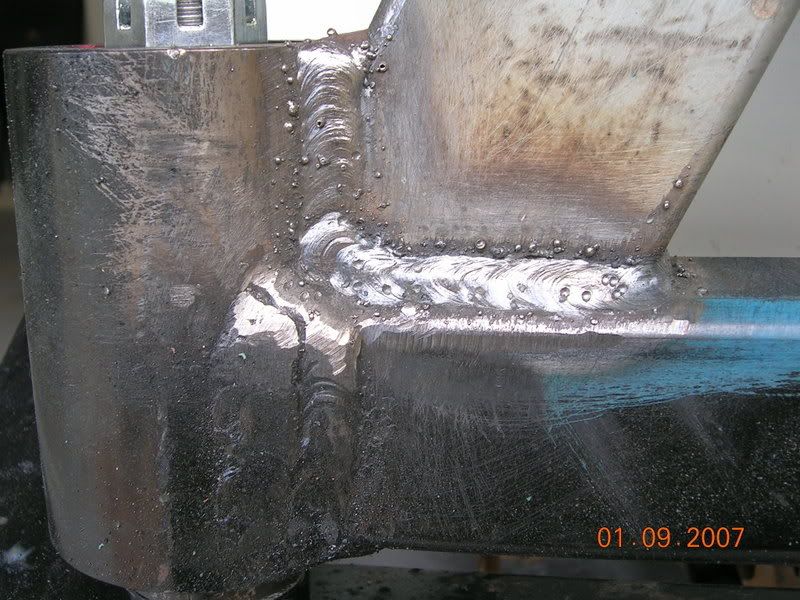
So here are a couple of pics before i lightly grind & paint, im really not thinking i should have too many problems but the constant sideways vibration is the only concern.
Time will tell hey.
BTW - i only removed the old shaft type of swivel that had worn over the years so as you can see the rest is just standard Kaymar wheel carrier.
Link to my first post on this subject a few months ago.
http://carl.outerlimits4x4.com/viewtopi ... 12#1122512
GXL Turbo Diesel 80 series- 6" King springs + Rancho in-cab kit- 35" BFG Muds Twin ARB airlockers.
There are 2 types of welding rods you need for a job like that.
Satincraft and Ferocraft ( sp ? )
It has been a long time since I worked in the welding industry, so I may have the names ass about. ( someone will correct me )
One type of Rod is for penetration - strength ( your first couple of runs ) --
Ferocraft ( I think ? ) Then you have to grind out all the crap - holes, splatter etc then do more runs over that. 2.5 mm is a good size, then you finish off with a bigger rod - Satincraft ( I think )
I really dont like those wheel carriers when you are doing long trips over rough roads. They just seem to be out of balance ?
.
Kev - that's pretty much what I was recommending anyway except the tube would have been closer to what kaymar used (a little smaller) and the little triangle would have been plated over.
I don't think you will have trouble with that.
Steve.
I don't think you will have trouble with that.
Steve.
[quote="greg"] some say he is a man without happy dreams, or that he sees silver linings on clouds and wonders why they are not platinum... all we know, is he's called the stevie.[/quote]
Mate I recon that will be good enough, the strap around the pivot would not hurt either, the cape road will rattle anything of if it is not engineered to buggery, the rest is fine, the brace will take a lot of the load, but all of the stress is still on the weld at the pivot.
Paul
Paul
91 FJ 80 Project on the go - air lockers, 3in lift, super duper 3F, 36" pedes, toyota V8 getting prepped now
In this design the main vibration will prob be the wheel in / out away from the door. This will hinge in a line between the bumber mount and the pivot. As the pivot has a vertical component, this will resist the movement and cop the most strain. Looking at it, I would say the top brace will get the most strain at the weld. It is under tension from weight, and also under tension from the vibration.
If you were plating (is gusseting) the term, I reckon this is the place. As it is narrower than the pivot pipe, there is room to add some. Wider in the currently narrow part of the brace is where is will cop the most work.
My $0.02
If my descfription doesn't make sense, flex it with a bar. You'll see where I am referring to fast enough.
Paul
Lexus LX470 - hrrm Winter Tyres
Gone - Cruiser HZJ105 Turbo'd Locked & Lifted
Gone - 3L Surf
Gone - Cruiser HZJ105 Turbo'd Locked & Lifted
Gone - 3L Surf
There is also a fixing point on the right hand side where the clamp is.
It has 2 bars sticking out above & below that will take the weight of the carrier.
Suppose to a point it could reduce some of the sideways vibration as well as it is a tight fit.
It has 2 bars sticking out above & below that will take the weight of the carrier.
Suppose to a point it could reduce some of the sideways vibration as well as it is a tight fit.
GXL Turbo Diesel 80 series- 6" King springs + Rancho in-cab kit- 35" BFG Muds Twin ARB airlockers.
Gday,
From a boilermakers point of veiw Ill give you a couple of tips,
1. Dont chip off the slag with the pointy end of your chipping hammer unless you really have to, run the blade end in from the side after it cools a bit. (your welds look nearly good enough to do without a chipping hammer, just a scrape to get the spatter off)
2. Possibly drop your amps a bit.
3. Keep practicing mate, Ive seen boilermakers do worse jobs than that, good effort.
4. If you can, enrol in a TAFE course, with a few pointers from the right person, there will be no holding you back.
Id trust it on the back of my car ( the new bit that is)
Cheers
I notice many people using stub axles and wheel bearings to set these up. A bush would be far stronger than a tapered roller in a static non rolling situation. Is there a reason for not using a nylon (or other material) bush?
Thanx
Paul
Thanx
Paul
Lexus LX470 - hrrm Winter Tyres
Gone - Cruiser HZJ105 Turbo'd Locked & Lifted
Gone - 3L Surf
Gone - Cruiser HZJ105 Turbo'd Locked & Lifted
Gone - 3L Surf
I havn't posted because no idea what the roads would be like up there, the only bad thing I can think of is corrogated roads, they are nasty and that's being nice about it.
If you've never been on them you just have no idea how bad they they are, the general idea seems to be drive at 80kph treat it like a cattle grid only problem doing that speed, you can kill shocks due to the shocks always going up and down.
I did 60 and ended up doing 40 and 20kph because the side mirrors seemed like they were going to pop their clogs if I went faster, it also killed the dying shocks anyway the other reason for me going slow.
They will shake the shit out of a dead person, so if you go for a good long trip or at least a few good long trips over this type of road, expect the hinge to kark it at some point, and you'll end up with crack around the welds anyway at some point, you just don't want it straight away.
You also might want to bracket up the ariel mounts on a bull bar as that's a place that gets broken off due to these roads.
The wheel bracket might need extra brackets don't know, would depend on how much the wheel weighs I suppose as that'll get a good shake around as well.
Everything will get a real good shake done to it, that's the only thing I can think of that would be the worse to drive over.
might not be that bad up there, but I was on a forest track and wasn't quite expecting it to be so bad that's all.
Im not worried about the rest of the carrier, they are mass produced & have stood the test of time & haven't heard of any reports of failure.brooksy wrote:Everything looks fine to me Kev. I can only see the weak point being the actual wheel bracket, everything below that has plenty of vertical bracing & the overcentre clamp used is very sturdy.
brooksy
Cheers mate, yeah the flux comes off easily. Kind of like the pointy end though. Probably a good idea though.44-40 wrote:Gday,
From a boilermakers point of view Ill give you a couple of tips,
1. Dont chip off the slag with the pointy end of your chipping hammer unless you really have to, run the blade end in from the side after it cools a bit. (your welds look nearly good enough to do without a chipping hammer, just a scrape to get the spatter off)
2. Possibly drop your amps a bit.
3. Keep practicing mate, Ive seen boilermakers do worse jobs than that, good effort.
4. If you can, enrol in a TAFE course, with a few pointers from the right person, there will be no holding you back.
Id trust it on the back of my car ( the new bit that is)
Cheers
I think a bush especially nylon would flog out quickly, the old shaft was steel on steel & was worn quite a bit. I like the idea of just changing cheap bearings when ever needed.me3@neuralfibre.com wrote:I notice many people using stub axles and wheel bearings to set these up. A bush would be far stronger than a tapered roller in a static non rolling situation. Is there a reason for not using a nylon (or other material) bush?
Thanx
Paul
Ask any one that has done a trip to the Cape when the roads are bad, ive seen many broken springs & even diff housings. My father refuses to do that trip again it was that bad.zagan wrote: might not be that bad up there, but I was on a forest track and wasn't quite expecting it to be so bad that's all.
GXL Turbo Diesel 80 series- 6" King springs + Rancho in-cab kit- 35" BFG Muds Twin ARB airlockers.
The wheel mount could also have a couple of braces going down to the main frame, but maybe a little but of give would be ok anyway. Kinda like wheel carrier suspensionbrooksy wrote:Everything looks fine to me Kev. I can only see the weak point being the actual wheel bracket, everything below that has plenty of vertical bracing & the overcentre clamp used is very sturdy.
brooksy
[quote="fool_injected"]
I pity my brother when she is a teenager[/quote]
Cape York corrugations aren't that bad. Drop your tyres till they visibly bag a bit, and slow to 75-80km/hr and you'll be fine. The tyre pressure takes most of the shock.
Mate of mine I did the trip with did tours up there for 18 years. His interesting comment was that it was nearly always the aftermarket kit that fell off / broke. Lights, bars, antennas etc.
We took a shitty 60 series, a good 60 and a good 80, and apart from comfort and style, none had road related problems.
A bush has a much larger load bearing area than the hardened faces of a roller and some compression to adsorb shock. They should last much longer in a static situation than a roller bearing.
Paul
Lexus LX470 - hrrm Winter Tyres
Gone - Cruiser HZJ105 Turbo'd Locked & Lifted
Gone - 3L Surf
Gone - Cruiser HZJ105 Turbo'd Locked & Lifted
Gone - 3L Surf
Who is online
Users browsing this forum: No registered users and 25 guests