
I took my Hilux (1984 diesel) out through some mud and water the other weekend and ever since, she doesn't always start first pop.
Never had any trouble before the trip. Now sometimes I turn the key and all I hear is a 'click clack'. I turn the key several more times and she starts up, but I may have to turn it up to 6-7 times.
Any ideas?
Notice: We request that you don't just set up a new account at this time if you are a previous user.
If you used to be one of our moderators, please feel free to reach out to Chris via the facebook Outerlimits4x4 group and he will get you set back up with access should he need you.
If you used to be one of our moderators, please feel free to reach out to Chris via the facebook Outerlimits4x4 group and he will get you set back up with access should he need you.
Recovery:If you cannot access your old email address and don't remember your password, please click here to log a change of email address so you can do a password reset.
Lux wont start?
Moderators: toaddog, Elmo, DUDELUX
Lux wont start?
-- [url=http://lowrangetv.com/]LowRangeTV.com[/url] --
Only [url=http://lowrangetv.com/]4x4 and Offroad Videos[/url]
Only [url=http://lowrangetv.com/]4x4 and Offroad Videos[/url]


If you can remove the starter your self, then you can hose it out yourself. Let it dry properly or use compressed air, like at a servo if you haven't got it at home, then grease-up the throw-out shaft. Test it out with some jumper leads off a battery before installing.siringo wrote:Okay, thanks guys, I'll rip out the starter and get her looked at. Is that likely to be expensive?
I'll clean out the rear brakes as well.
Then if the problem persists, take to an auto elec.
I'm the sharpest tool in the shed!
Sorry, I was thinking of stuck "throw out gear", but it might be whats causing the probs, but if it's more, then remove the solenoid from the motor and clean it out too, including inspecting the big contacts in it.siringo wrote:Oh wow, is it that easy? Great. Can I get to that shaft easily?
I'm the sharpest tool in the shed!
Now I can expose my ignorance by asking .. 'the what?' Is that attached to the starter? What does it look like?v6hilux wrote: then remove the solenoid from the motor and clean it out too, including inspecting the big contacts in it.
Thanks again.
-- [url=http://lowrangetv.com/]LowRangeTV.com[/url] --
Only [url=http://lowrangetv.com/]4x4 and Offroad Videos[/url]
Only [url=http://lowrangetv.com/]4x4 and Offroad Videos[/url]

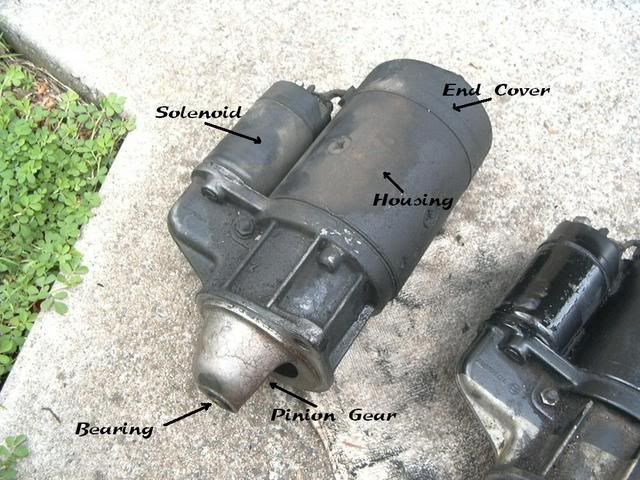
There are 2 types. This is the basic;siringo wrote:Now I can expose my ignorance by asking .. 'the what?' Is that attached to the starter? What does it look like?v6hilux wrote: then remove the solenoid from the motor and clean it out too, including inspecting the big contacts in it.
Thanks again.
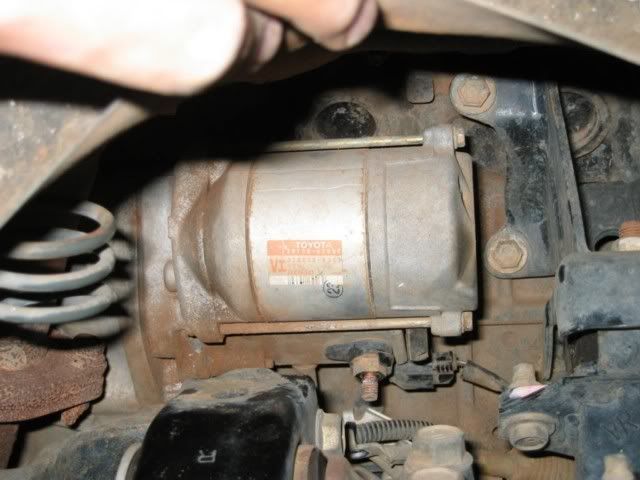
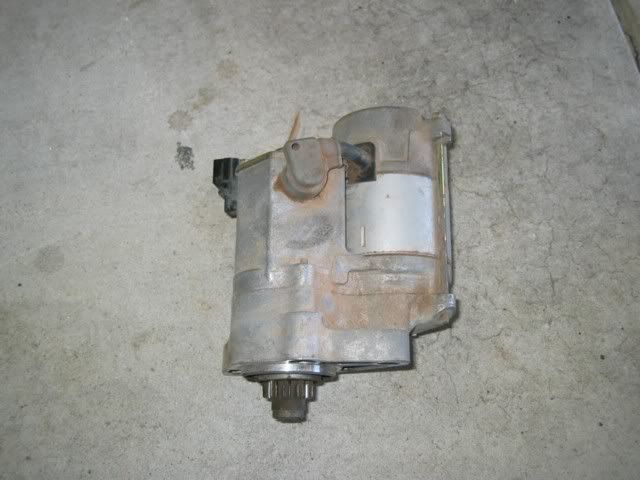
The second type is gear reduction;

The solenoid is the top section in the second type. It usually has the small wire from key or relay going to it.
I'm the sharpest tool in the shed!
Wow, pictures. Thanks for the effort v6Hilux, much appreciated. I can tell from the pics, that mine is the one in the first pic.
I'll try and get it out tomorrow and have a look at it and clean everything I can.
Thanks again, much appreciated.
I'll try and get it out tomorrow and have a look at it and clean everything I can.
Thanks again, much appreciated.
-- [url=http://lowrangetv.com/]LowRangeTV.com[/url] --
Only [url=http://lowrangetv.com/]4x4 and Offroad Videos[/url]
Only [url=http://lowrangetv.com/]4x4 and Offroad Videos[/url]

A DIY I wrote elsewhere as its a common problem:
I had to pull my starter motor out on the weekend to give it a bit of TLC so thought i would write a bit of a DIY report. Its my first so bare with me. The symptoms were the car was not starting intermittently but when this occured there was still a very distinct click from under the bonnet which indicates that the starter motor solenoid is still energising and closing. Therefore the problem is either solenoid contacts or a burn't out starter motor winding (which was not the case as the car would still start on occasions.) So contacts it was.
I began looking for access to the starter motor. And there was no chance of getting to it from under the bonnet and minimal access from under the car as the front diff and exhaust is in the way. So as i climbed out from underneath swearing and cursing i looked in the front wheel arch and there it was staring me right in the face.
First of all you need to disconnect the main starting battery. Then you need to disconnect the active supply to the starter motor and possibly a couple of other small wires which supply the solenoid coil (in my case this was a quick connect plug.) If you think your not going to remember where they go either mark them distinctively and put the same distinctive mark at their location on the starter motor or draw yourself a diagram on a piece of paper.
Next you need to find the bolts that mount the starter motor and remove them. There is generally only two and they are usually rather tight. In my case i could only access one from the wheel arch but i had to get back underneath and undo the second very slowly due to limited spanner room. This part can be a pita due to the limited space in the area so perseverance is key. Once the bolts are undone you should be able to remove the starter motor from the engine.
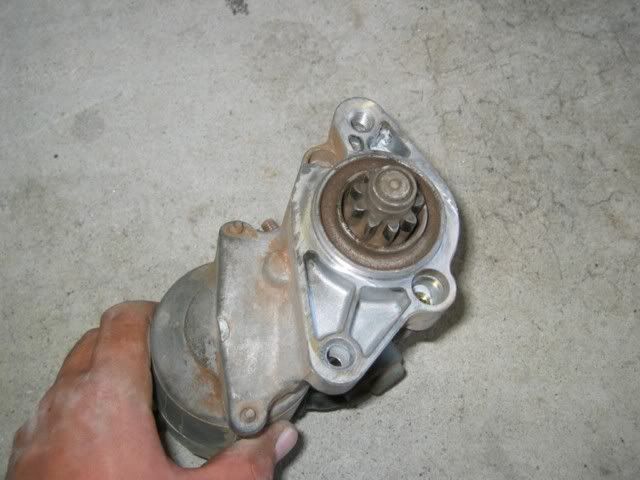
STARTER MOTOR
PINION GEAR (the pinion gear is pushed out and engaged with the flywheel by the solenoid)
SOLENOID COVER
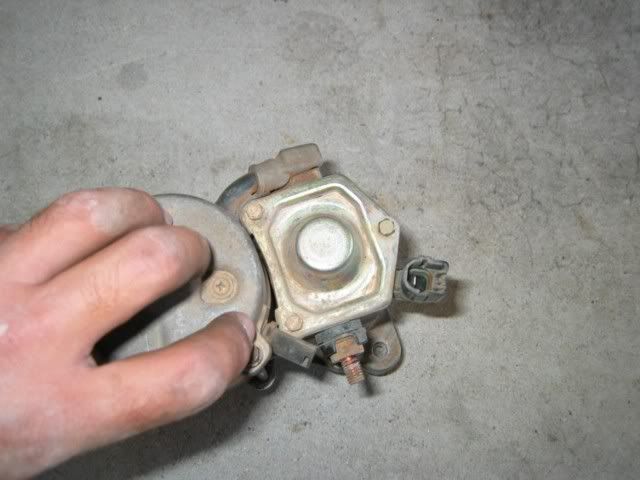
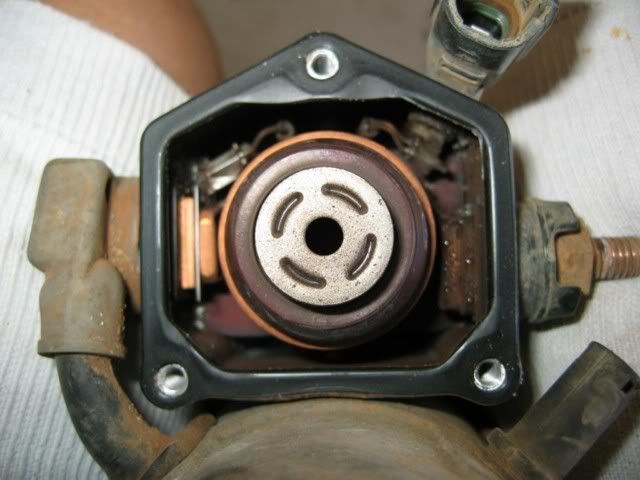
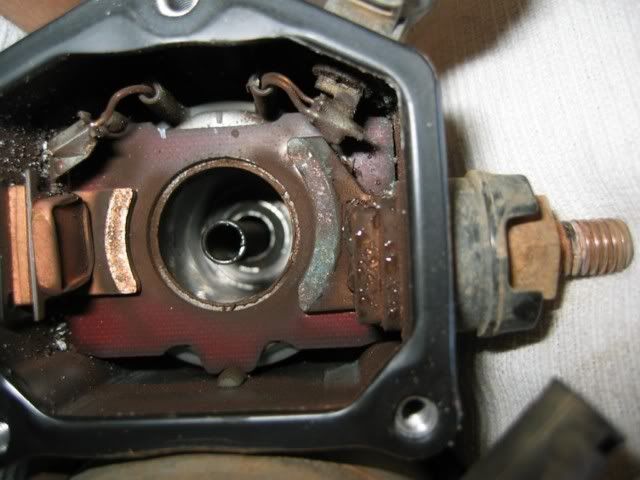
Next remove the three small screws that hold the cover plate onto the solenoid. It may be slightly loaded by a spring inside but the tension should be released as you undo the screws (i.e. nothing is going to pop out at you.) There is a rubber joint underneath so take a bit of care removing the cover otherwise you may need to replace the joint. Once the cover is removed you will be able to see the plunger/armature and the contacts beneath it.
COVER REMOVED SHOWING PLUNGER/ARMATURE
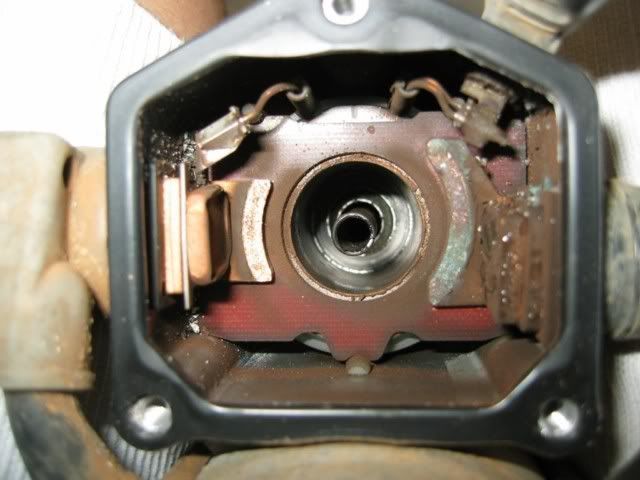
Remove the armature from the solenoid and take note of the arrangement of any springs etc that come out with it. The contacts will remain in the solenoid and are visible on the left and right hand side. You can see the moisture and gunk and other crap that has accumulated in the solenoid in the picture below - the cause of my starting issues.
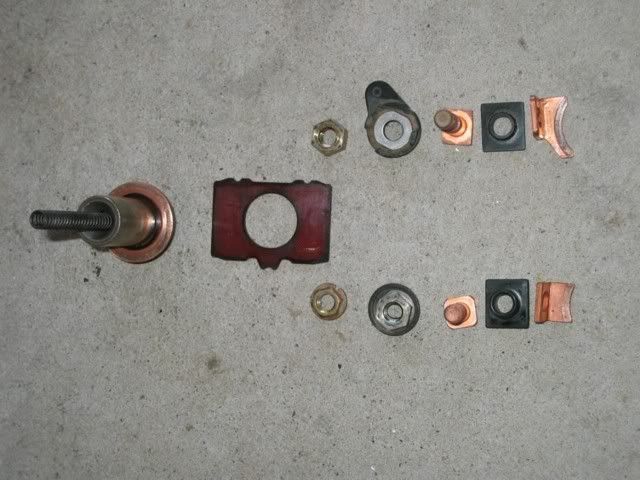
ARMATURE REMOVED
LEFT HAND CONTACT
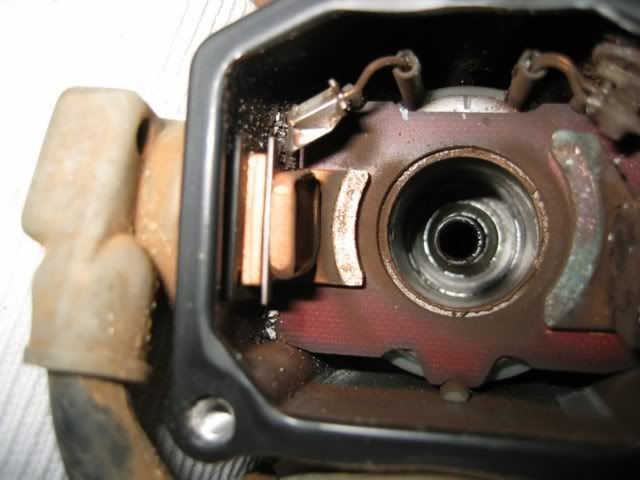
RIGHT HAND CONTACT
The contacts are held in place by a bolt/pin which goes through the housing and is retained by a nut on the outside. One contact is connected to an active supply from the battery to the solenoid (we disconnected this earlier) and the other contact makes the connection from the solenoid to the starter motor. Both pins need to have their retaining nuts removed to allow us to remove the contacts. When removing the pins take note of the arrangement as there is a few insulators and o-ring seals which will come apart aswell. Take a picture or draw a diagram and lay the parts out methodically.
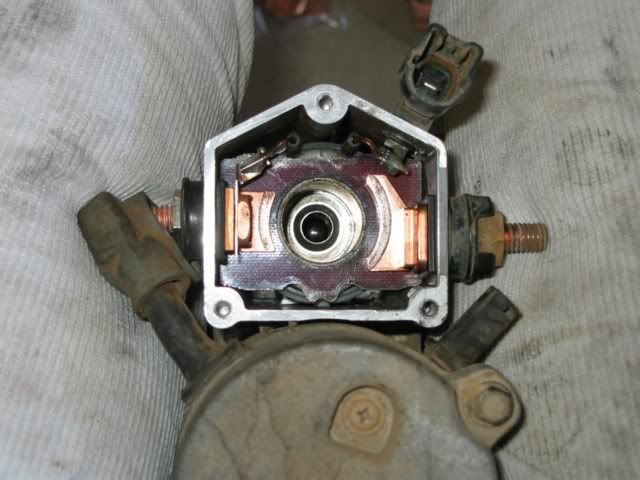
Now the contacts weren't too badly worn and after me stuffing around at coventrys trying to get the right contacts but not having a sample to compare them too and me buying every set they had to suit a hilux i established that i still didnt have the right contacts. So i cleaned all the componets with co-contact cleaner, cleaned up the contacts with some glass paper as i did the contact on the armature and proceeded to put it back together. When reinstalling the contacts and tightening them up you need to get them nice and flat and hold them with another spanner to prevent them from spinning as you nip them up.
NICE AND CLEAN
Reinsert the armature and spring and put the solenoid cover back on and tighten it up. The little screws dont need to be supertight as firstly they're only small and secondly you tend to squash and distort rubber joints if you do things up to tight. Having said that we don't want the screw to vibrate loose because we didnt do them up tight enough.
Reinstalling the starter motor to the engine is just a reversal of the first steps. Check that you have removed all tools from the engine bay before starting.
Easy peasy.[/quote]
I had to pull my starter motor out on the weekend to give it a bit of TLC so thought i would write a bit of a DIY report. Its my first so bare with me. The symptoms were the car was not starting intermittently but when this occured there was still a very distinct click from under the bonnet which indicates that the starter motor solenoid is still energising and closing. Therefore the problem is either solenoid contacts or a burn't out starter motor winding (which was not the case as the car would still start on occasions.) So contacts it was.
I began looking for access to the starter motor. And there was no chance of getting to it from under the bonnet and minimal access from under the car as the front diff and exhaust is in the way. So as i climbed out from underneath swearing and cursing i looked in the front wheel arch and there it was staring me right in the face.
First of all you need to disconnect the main starting battery. Then you need to disconnect the active supply to the starter motor and possibly a couple of other small wires which supply the solenoid coil (in my case this was a quick connect plug.) If you think your not going to remember where they go either mark them distinctively and put the same distinctive mark at their location on the starter motor or draw yourself a diagram on a piece of paper.
Next you need to find the bolts that mount the starter motor and remove them. There is generally only two and they are usually rather tight. In my case i could only access one from the wheel arch but i had to get back underneath and undo the second very slowly due to limited spanner room. This part can be a pita due to the limited space in the area so perseverance is key. Once the bolts are undone you should be able to remove the starter motor from the engine.
STARTER MOTOR
PINION GEAR (the pinion gear is pushed out and engaged with the flywheel by the solenoid)
SOLENOID COVER
Next remove the three small screws that hold the cover plate onto the solenoid. It may be slightly loaded by a spring inside but the tension should be released as you undo the screws (i.e. nothing is going to pop out at you.) There is a rubber joint underneath so take a bit of care removing the cover otherwise you may need to replace the joint. Once the cover is removed you will be able to see the plunger/armature and the contacts beneath it.
COVER REMOVED SHOWING PLUNGER/ARMATURE
Remove the armature from the solenoid and take note of the arrangement of any springs etc that come out with it. The contacts will remain in the solenoid and are visible on the left and right hand side. You can see the moisture and gunk and other crap that has accumulated in the solenoid in the picture below - the cause of my starting issues.
ARMATURE REMOVED
LEFT HAND CONTACT
RIGHT HAND CONTACT
The contacts are held in place by a bolt/pin which goes through the housing and is retained by a nut on the outside. One contact is connected to an active supply from the battery to the solenoid (we disconnected this earlier) and the other contact makes the connection from the solenoid to the starter motor. Both pins need to have their retaining nuts removed to allow us to remove the contacts. When removing the pins take note of the arrangement as there is a few insulators and o-ring seals which will come apart aswell. Take a picture or draw a diagram and lay the parts out methodically.
Now the contacts weren't too badly worn and after me stuffing around at coventrys trying to get the right contacts but not having a sample to compare them too and me buying every set they had to suit a hilux i established that i still didnt have the right contacts. So i cleaned all the componets with co-contact cleaner, cleaned up the contacts with some glass paper as i did the contact on the armature and proceeded to put it back together. When reinstalling the contacts and tightening them up you need to get them nice and flat and hold them with another spanner to prevent them from spinning as you nip them up.
NICE AND CLEAN
Reinsert the armature and spring and put the solenoid cover back on and tighten it up. The little screws dont need to be supertight as firstly they're only small and secondly you tend to squash and distort rubber joints if you do things up to tight. Having said that we don't want the screw to vibrate loose because we didnt do them up tight enough.
Reinstalling the starter motor to the engine is just a reversal of the first steps. Check that you have removed all tools from the engine bay before starting.
Easy peasy.[/quote]
Who is online
Users browsing this forum: No registered users and 4 guests