Notice: We request that you don't just set up a new account at this time if you are a previous user.
If you used to be one of our moderators, please feel free to reach out to Chris via the facebook Outerlimits4x4 group and he will get you set back up with access should he need you.
Recovery:If you cannot access your old email address and don't remember your password, please click here to log a change of email address so you can do a password reset.
ifs steer box conversion tips.
Moderators: toaddog, Elmo, DUDELUX
ifs steer box conversion tips.
if you're going to do it, DO IT PROPERLY THE FIRST TIME!!!!!!
On my way to work yesterday my steering felt a bit funny, as it turned out, the steering box was trying to pull the crush tubes through the chasis and all the inside face of the chasis was cracked.
HUGE THANKS goes out to Tony and Sam for helping me re plate and brace the chasis after their work day had finished.
We did it with 6mm steel plate on both sides of the chasis and crush tubes through, fully welded running from the engine mount to the front of the chasis. This will spread the load over a greater area.
If you do this conversion any other way you are kidding yourself and putting yourself and others in danger, this is your steering we're talking about here, it's kind of important! Mine lasted a year in it's old form, i was lucky.
After shots.
Outers & Arms up stickers coming soon you hungry bitches!
http://www.myultimate4wd.com
GRIMACE wrote:How I miss the days of care free wheelin with the crews!
steering
HUNTERLUX wrote:yeh but criss every1 pointed out 2 u b4 u left sydney that your p/s box was flexin on the chassis big time
i know that, and i fixed it as soon as i was in a position to do so, it just happened to be the day after it tore off the chasis.
Outers & Arms up stickers coming soon you hungry bitches!
http://www.myultimate4wd.com
GRIMACE wrote:How I miss the days of care free wheelin with the crews!
arm
STUMPY wrote:what pitman arm are you using?
it's an surf arm drilled out and sleved, (it came with the steering box)
a 75 series one would be better in my case because that one has too much drop on it and the springs hit the bottom of the tie rod at full d/side flex.
Outers & Arms up stickers coming soon you hungry bitches!
http://www.myultimate4wd.com
GRIMACE wrote:How I miss the days of care free wheelin with the crews!
Scott wrote:Does anyone sell plates like that? All I've seen from shops so far is crush tubes, and I don't feel like cutting the plates out with a hacksaw.
with a 2000W (ie fairly low power) 9" angle grinder it took me less than 10 minutes to cut out and drill a pair of plates for stumpy's conversion, and from memory he loving supplied me with 10 or 12mm plate so cutting them out of 6mm even with a 100 or 125mm angle grinder shouldn't take long. you need to get the hella mega thin cutting discs (Pferd brand) and then any angle grinder slices through steel like a hot knife through butter. since I discovered these discs I hardly ever touch the oxy to cut, even for chopping up scrap to throw away it's faster and cheaper.
that's some tidy welding there Ruff, you must have a pretty steady hand.
cheers
Brian
Free air locker to the first 20 callers!
dumbdunce wrote: you need to get the hella mega thin cutting discs (Pferd brand) and then any angle grinder slices through steel like a hot knife through butter.
Yeah those 1mm discs for 4 inch grinder rock.
Just a note about them though, when I bought mine I had to buy a steel washer as well to make them clamp down on the grinder shaft because they are so thin.
Paul.
R.I.P Brock Fontanini 28-3-06 - 16-2-08
www.teamcarnage.net
www.teamcarnage.net
ausyota wrote:dumbdunce wrote: you need to get the hella mega thin cutting discs (Pferd brand) and then any angle grinder slices through steel like a hot knife through butter.
Yeah those 1mm discs for 4 inch grinder rock.
Just a note about them though, when I bought mine I had to buy a steel washer as well to make them clamp down on the grinder shaft because they are so thin.
Paul.
I just flipped the outer clamping nut, or maybe had to skim a little bit off the boss. but yeah some modification needed for some grinders. also they don't like being twisted, but last longer than other discs, don't get hot.
Free air locker to the first 20 callers!
Scott wrote:What do people normally do with the steering shaft when installing an IFS box? Do you extend it, get a longer one, or buy the snake racing extender? Is the snake racing extension long enough?
the manual steer shaft is long enough. with Stumpy's conversion, I think we managed with the standard shaft, and from memory his was power steer... there is a bit of stretch in the rag joint but not too much.
Free air locker to the first 20 callers!
Has anyone thought about copying these plates onto paper causeyou can get fabshops to do a quantity on profile cutters places like queensland rail have the best rates going usually.
What about a list of parts and mods needed to do a crossover steer conversion. I can help with photo's of all the different pitman arm's.
Lenght's of steering arm's and draglinks.
Steering shaft's to steering boxes should they be collaspable or solid.
Surely between all the brains we can come up with a solution that everyone can use safely to get thru rego in all states.
Places like Snake racing and Superior do the work but are hard to get to if you live over 600klm's away and need vehicle every day.
I have made up 40ser P/Steer kit (79-)useing bolt on parts(toyota) with a collaspable steering shaft which should go thru any inspection.
ANYTHING IS POSSIBLE WITH A BIT OF TEAM WORK
I'm not stuck I'm over here!
Watch where you driven!!!
dumbdunce wrote:that's some tidy welding there Ruff, you must have a pretty steady hand.
The welding on my conversion was done by Sam and most of it was done with a mirror as it was hard to get to. The welding on Chris's was done by me. Its not a nice as Sams but it will do the job fine.
We usually cut 6mm plates to shape with a Jig saw. The plates on Chris's were done with a flame though as it was to late in the afternoon to make to much noise.
RUFF wrote:dumbdunce wrote:that's some tidy welding there Ruff, you must have a pretty steady hand.
The welding on my conversion was done by Sam and most of it was done with a mirror as it was hard to get to. The welding on Chris's was done by me. Its not a nice as Sams but it will do the job fine.
props to Sam then!
RUFF wrote:We usually cut 6mm plates to shape with a Jig saw. The plates on Chris's were done with a flame though as it was to late in the afternoon to make to much noise.
nah it's never too late to go the grind!! If the neighrbours don't like it, they can move!
Free air locker to the first 20 callers!
even with 80s pitman arm mine still hits chris and mine is almost in the same spot as yours get the pitman arm drilled out an sleeve it so as the ball joint goes in through the top otherwise tou may snap sterring shaft off and then that would not be funny
94 HJZ 80 GXL 4 Inch lift 35s. TJM Accessories Front to back
dumbdunce wrote:props to Sam then!RUFF wrote:The welding on my conversion was done by Sam and most of it was done with a mirror as it was hard to get to. The welding on Chris's was done by me. Its not a nice as Sams but it will do the job fine.dumbdunce wrote:that's some tidy welding there Ruff, you must have a pretty steady hand.
nah it's never too late to go the grind!! If the neighrbours don't like it, they can move!RUFF wrote: We usually cut 6mm plates to shape with a Jig saw. The plates on Chris's were done with a flame though as it was to late in the afternoon to make to much noise.
My neighrbours hate me couse of all the the noise I make in my shed and so they put the house on the market good riddens bunch of busy body whiners.
current truck, 105 series GXL diesel 6" springs & twin pro lockers
sierra LWB spoa one wide track diffs twin locked
Sierra Parts Wanted pm me
sierra LWB spoa one wide track diffs twin locked
Sierra Parts Wanted pm me
Bubs sells them,Scott wrote:Does anyone sell plates like that? All I've seen from shops so far is crush tubes, and I don't feel like cutting the plates out with a hacksaw.
[url=http://downunder4x4.net/forum/showthread.php?t=1650]86 Hilux[/url]
and a 84 extra cab
If Rocks Had P^ssies Our Lives Would Be Perfect :D...
and a 84 extra cab
If Rocks Had P^ssies Our Lives Would Be Perfect :D...
NOTE : it is not legal for on road use and is not something you can unbolt and bolt the stock stuff on.
Cut old box mounting gear off
Clean and prep chassis
Dummy box with steering shaft in place to check everything, locate as close to rad support as you can get it
dummy fit new plates, mark them, drill crush tube holes and fit them, tack the ifs box mounting plates on, temporarily mount box to mounts and check nothing will bind up steering shaft wise etc.
My box is mounted a little on the piss. to give me more room from pitman arm to leaf pack as mine isn't lifted much and have no intentions of doing so.
Once everything is right, remove box etc, weld on the plates, we welded the crush tubes also, paint everything.
You'll need to fit the steering shaft onto the box's spline before mounting the box or its a PITA to get on.
When putting everything back together you need to align the centre of the boxs movement to the wheels being in the straight position, not doing so will not give u 50 left turn 50 right turn.
Then either fit a double arm to the pass side knuckle, or hi steer arm, and purchase relevant rods, tierods etc.
Take it for a wheel alignment.
thats the basic jist of it, but im sure its been explained in greater detail somewhere on here before.
I have pics of the steps and better pics that show everything although i seem to have misplaced them ahah
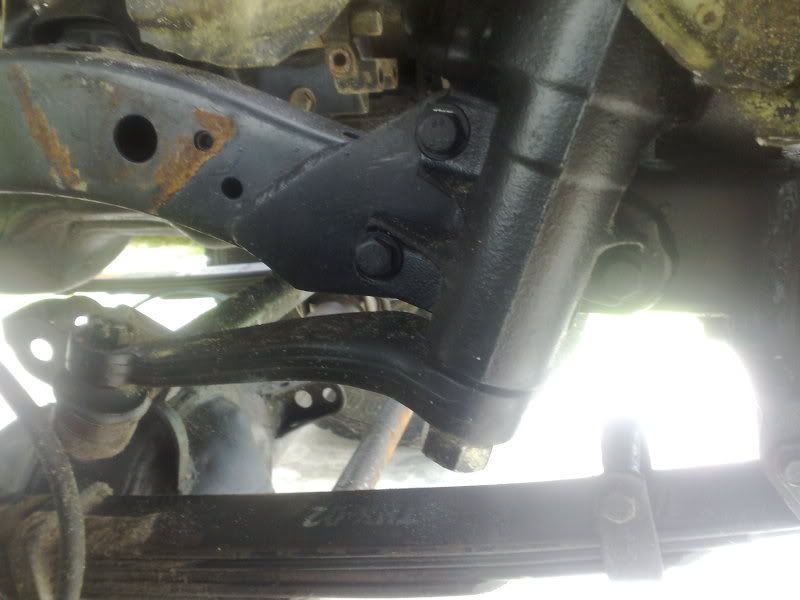
80 series pitman arm
this photo is upside down but gives you an idea of mounting location that we put it in and works fine.
Cut old box mounting gear off
Clean and prep chassis
Dummy box with steering shaft in place to check everything, locate as close to rad support as you can get it
dummy fit new plates, mark them, drill crush tube holes and fit them, tack the ifs box mounting plates on, temporarily mount box to mounts and check nothing will bind up steering shaft wise etc.
My box is mounted a little on the piss. to give me more room from pitman arm to leaf pack as mine isn't lifted much and have no intentions of doing so.
Once everything is right, remove box etc, weld on the plates, we welded the crush tubes also, paint everything.
You'll need to fit the steering shaft onto the box's spline before mounting the box or its a PITA to get on.
When putting everything back together you need to align the centre of the boxs movement to the wheels being in the straight position, not doing so will not give u 50 left turn 50 right turn.
Then either fit a double arm to the pass side knuckle, or hi steer arm, and purchase relevant rods, tierods etc.
Take it for a wheel alignment.
thats the basic jist of it, but im sure its been explained in greater detail somewhere on here before.
I have pics of the steps and better pics that show everything although i seem to have misplaced them ahah
80 series pitman arm
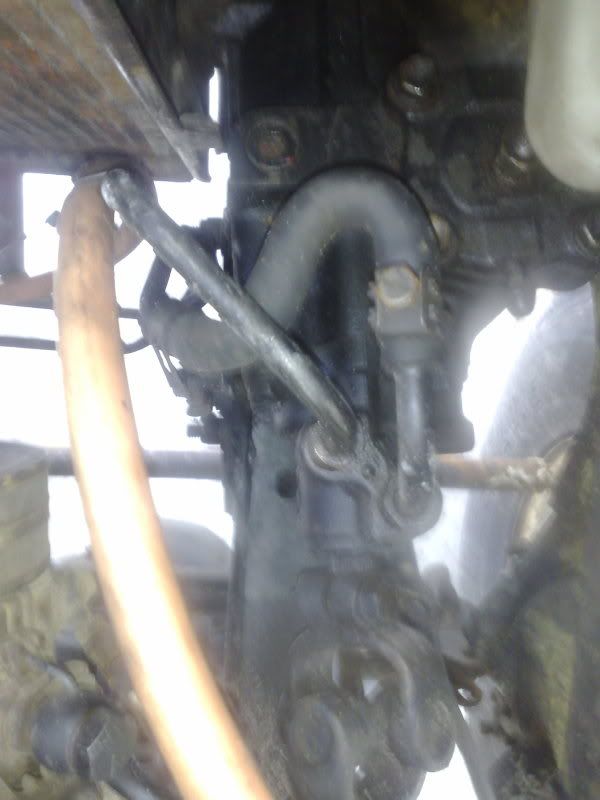
this photo is upside down but gives you an idea of mounting location that we put it in and works fine.
BBP Offroad
Boondall Backyard Performance
They call me the MR. throw cash at shiz til its comp specccccc
Boondall Backyard Performance
They call me the MR. throw cash at shiz til its comp specccccc
no because it will hit your radiator support panel or your body mount.Roboat wrote:Does already having a bodylift and raised radiator help in getting the ifs box further forward?
you can do as im doing and move the body mount.
make sure you know what your doing though as if you dont do it right you wont get in engineered
Who is online
Users browsing this forum: No registered users and 2 guests