So, about 3 years ago, a horrible grinding noise was coming from the engine bay. It turned out to be the AC compressor, which I got replaced on my lease. Cost was over $1000 for the new compressor, regassing, and fitting.
After coming back from our trip over the Simpson a couple of months ago, over the last few weeks, I have had that same bearing grumble coming from under the bonnet. Not really wanting to shell out mega bucks for another compressor, I decided to do a bit of hunting on the net.
I found that, in spite of what Nissan says, replacing the pulley bearing is a relatively easy job. A little bit of research, and some simple hand tools, had the pulley off in less than an hour. A phone call to the bearing supplier in the major town less than an hour away, and a quick squirt on the bike, saw the bearing in my hands for less than $25. The light failed me this afternoon, but I expect to have it all back together in less than an hour tomorrow.
Just a little bit peeved that I was, essentially, ripped off last time.
If you want the procedure to do the job, just ask. The bearing is O/D 55mm, I/D 35mm, width 20mm.
Notice: We request that you don't just set up a new account at this time if you are a previous user.
If you used to be one of our moderators, please feel free to reach out to Chris via the facebook Outerlimits4x4 group and he will get you set back up with access should he need you.
If you used to be one of our moderators, please feel free to reach out to Chris via the facebook Outerlimits4x4 group and he will get you set back up with access should he need you.
Recovery:If you cannot access your old email address and don't remember your password, please click here to log a change of email address so you can do a password reset.
GU ZD30 A/C compressor noise
GU ZD30 A/C compressor noise
Mud makes excellent toothpaste.
Re: GU ZD30 A/C compressor noise
Quite often, with a little ingenuity, the irreparable can be repaired. I take it the pulley doesn't seal the compressor?
Don't ask me, ask them. I'm just runnin for my life myself.
Well they are all following you...
No they ain't, I'm just in front...............
Well they are all following you...
No they ain't, I'm just in front...............
Re: GU ZD30 A/C compressor noise
Nope, no need to degas the system, or move the compressor from its mounts. About the only specialist tool required is a pair of circlip pliers.
Mud makes excellent toothpaste.
Re: GU ZD30 A/C compressor noise
BundyRumandCoke wrote:Nope, no need to degas the system, or move the compressor from its mounts. About the only specialist tool required is a pair of circlip pliers.
Don't ask me, ask them. I'm just runnin for my life myself.
Well they are all following you...
No they ain't, I'm just in front...............
Well they are all following you...
No they ain't, I'm just in front...............
Re: GU ZD30 A/C compressor noise
Here is the step by step guide. Remember, this MAY NOT be a genuine compressor as fitted new, as this compressor has been fitted as a replacement to the original. But I would expect the procedure is pretty much the same.
Tools required, socket set with 10 and 12mm sockets
circlip pliers,
Hammer
Block of timber
3 x M5 (or M6, I cant remember which they are) and appropriate spanner
Large socket or press for removing and replacing bearing into pulley
19mm socket and breaker bar to suit
Screwdriver
Proceedure--
Remove plastic under body splash guard
Remove fan shroud
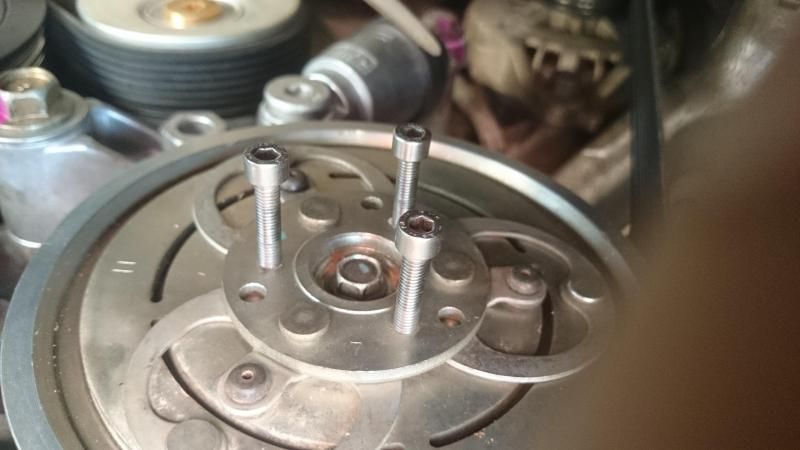
Screw the 3 M5/M6 bolts into the clutch plate of the compressor.

Use a screwdriver to hold the pulley still, while undoing the centre bolt with 10mm socket
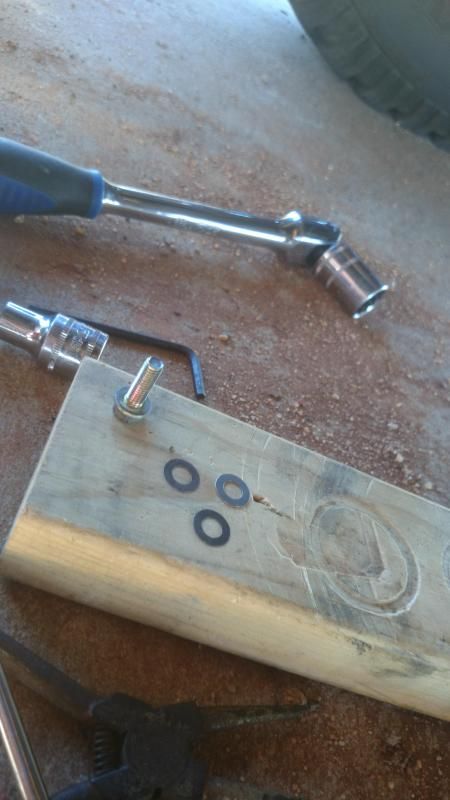
Screw the bolts in to act like a puller, and pull the clutch plate off the front of the compressor. Be mindful that 3 small thrust washers will fall out of the centre of the spline of the clutch plate. Don't lose them.

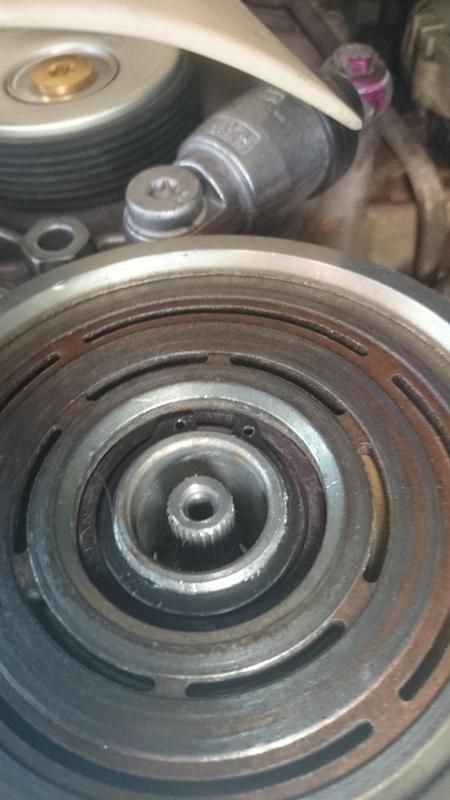
This is what is revealed,

Remove the fan belt.
Remove the circlip.
Use the hammer and block of timber to carefully drive the pulley assembly off the compressor.
Remove the stuffed bearing from the pulley.
Fit new bearing to pulley, and pein the pulley over a little bit to retain the bearing.
Clean the circlip slot.
Reassemble in the reverse order, using some locktite on the centrebolt thread. Don't forget the 3 thrust washers.
Tools required, socket set with 10 and 12mm sockets
circlip pliers,
Hammer
Block of timber
3 x M5 (or M6, I cant remember which they are) and appropriate spanner
Large socket or press for removing and replacing bearing into pulley
19mm socket and breaker bar to suit
Screwdriver
Proceedure--
Remove plastic under body splash guard
Remove fan shroud
Screw the 3 M5/M6 bolts into the clutch plate of the compressor.

Use a screwdriver to hold the pulley still, while undoing the centre bolt with 10mm socket
Screw the bolts in to act like a puller, and pull the clutch plate off the front of the compressor. Be mindful that 3 small thrust washers will fall out of the centre of the spline of the clutch plate. Don't lose them.

This is what is revealed,

Remove the fan belt.
Remove the circlip.
Use the hammer and block of timber to carefully drive the pulley assembly off the compressor.
Remove the stuffed bearing from the pulley.
Fit new bearing to pulley, and pein the pulley over a little bit to retain the bearing.
Clean the circlip slot.
Reassemble in the reverse order, using some locktite on the centrebolt thread. Don't forget the 3 thrust washers.
Mud makes excellent toothpaste.
Re: GU ZD30 A/C compressor noise
I forgot to mention. The offending bearing PN is NSK 35BD219DUM1. The replacement supplied to me is FBJ 83A694CS30.
Mud makes excellent toothpaste.
Re: GU ZD30 A/C compressor noise
Excellent! Thanks for this write-up! Just in time as my bearing also packed it in after my Cape York trip 
2001 GU Patrol DX wagon, TD42, Air Lockers, twin spare carrier, Barrett HF, 35" Treps, high pinion rear, Staun beadlocks, 60l Engel and more!
Who is online
Users browsing this forum: No registered users and 2 guests