Hi chaps.
Ive started on a spare wheel carrier for my ln106.
It bolts onto the towbar on the side with some 5mm steel plate, and then some 70mm sq tube takes that outboard to under the lights where I have used some shackle bushes for the pivot, the arm that has the upright for the tyre comes back along to the center of the towbar where it hooks up to the bar.
Load is taken directly onto the 5mm section by the outer bar having top and bottom pieces welded to it, so the tubes support each other, if that makes sence.
What have others done, sorry I dont have any piccys as I dont have a digi camera ;(
Cheers
Trains
Notice: We request that you don't just set up a new account at this time if you are a previous user.
If you used to be one of our moderators, please feel free to reach out to Chris via the facebook Outerlimits4x4 group and he will get you set back up with access should he need you.
If you used to be one of our moderators, please feel free to reach out to Chris via the facebook Outerlimits4x4 group and he will get you set back up with access should he need you.
Recovery:If you cannot access your old email address and don't remember your password, please click here to log a change of email address so you can do a password reset.
Who has made up their own spare wheel carrier Now with pics*
Moderators: toaddog, Elmo, DUDELUX
Who has made up their own spare wheel carrier Now with pics*
Last edited by trains on Tue Aug 22, 2006 10:58 pm, edited 1 time in total.
Save the Whales......Collect the whole set.
My Wife Can't Shear..............But You Should See Her Crutch !
My Wife Can't Shear..............But You Should See Her Crutch !
http://www.outerlimits4x4.com/PHP_Modul ... el+carrier
I'll get pics of the finished product tomorrow night. Turned out great and cost less than $100
I'll get pics of the finished product tomorrow night. Turned out great and cost less than $100
Hi chaps.
Just as follow up on the spare wheel carrier.
The suspention bushes worked well for the pivot of the carrier, and carrier with spare wheel/ tyre on it worked very well over all road surfaces etc.
Basic design worked well, and for 2 days work, and rummaging thru the scrap bin, im very happy with a cheap wheel carrier, ie free !.
I used old worn bushes from when I did the suspention, and I didnt bother getting new ones till I had tested the design.
Im now very happy with the result, and will get some new bushes and it will work a treat.
The top of one of the bushes cut out, but as they were old stuffed bushes, they worked very well.
If I can get a piccy of it, I will post if if people are interested.
cheers
Trains
Save the Whales......Collect the whole set.
My Wife Can't Shear..............But You Should See Her Crutch !
My Wife Can't Shear..............But You Should See Her Crutch !
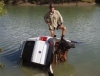
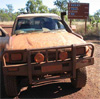
Hi chaps,
Here are some piccies that should explain the spare wheel carrier a little better.
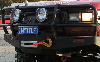
Where it bolts to tow bar frame.

Shows the hinge point which is 2 rubber spring shackle bushes.
Will put some new ones in, and it wont droop like it currently does when open, as the old bushes I used are really badly worn.

This shows the clamp that holds it closed.

Close up of the lock.

Partly open, you can see where the vertical loads are taken when its closed, where it comes out from the side of the tow bar, and where it locks nearer the tow ball attach point, the bushes only take load when its open fully.


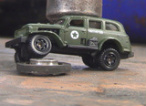
some piccies of my dual battery setup too.
Who said it wouldnt fit in a lux .
.
Made up the cradle out of some scrap 90deg angle iron. Its bolted in 2 seperate places on the body, each with 2 bolts, and a reinforcing plate on the other side of each bolt.

Just enough room for the motor to rock and roll, and not foul the side of the carrier.


Cheers
Trains
Here are some piccies that should explain the spare wheel carrier a little better.
Where it bolts to tow bar frame.
Shows the hinge point which is 2 rubber spring shackle bushes.
Will put some new ones in, and it wont droop like it currently does when open, as the old bushes I used are really badly worn.
This shows the clamp that holds it closed.
Close up of the lock.
Partly open, you can see where the vertical loads are taken when its closed, where it comes out from the side of the tow bar, and where it locks nearer the tow ball attach point, the bushes only take load when its open fully.
some piccies of my dual battery setup too.
Who said it wouldnt fit in a lux
Made up the cradle out of some scrap 90deg angle iron. Its bolted in 2 seperate places on the body, each with 2 bolts, and a reinforcing plate on the other side of each bolt.
Just enough room for the motor to rock and roll, and not foul the side of the carrier.
Cheers
Trains
Save the Whales......Collect the whole set.
My Wife Can't Shear..............But You Should See Her Crutch !
My Wife Can't Shear..............But You Should See Her Crutch !

Posts: 3725
Joined: Wed Jun 30, 2004 1:45 pm
Joined: Wed Jun 30, 2004 1:45 pm
Location: Blue Mountains, or on a rig somewhere in bumf*ck idaho

nice
Trains -
Nice work with the second battery
What is the bottle behind it, bigger wiper bottle
Nice work with the second battery
What is the bottle behind it, bigger wiper bottle
Kind Regards,
Brad
Brad
yeah it is the wipper bottle as u said but he has moved it when he put the dual bateries in for more room because they are genaeral mounted between the radiater panel and the black battery. just a guees i dont no 4 shure though.
nice fab job tooo
nice fab job tooo
Big thanks to Northern Suburbs Radiators and Melbourne Drive Shafts and Balancing for all your help and support.
that carrier for the tyre looks great, but maybe i'd suggest drilling a hole through the carrier above or below the latch so that you can fit a lock pin or something that will keep the gate closed if the latch breaks.
I made dual carriers for the 40, which were crude compared with yours, however latches always seem to be the cause for concern, especially after heavy corrugations. (nearly hit a copper with the spare whilst he was booking someone, he was very nice about it)
And it appears, as well as you have made the frame, the catch might be the week point here also.
Hope this helps, but i'm sure you know your stuff.
Cheers
Sam
Hi chaps.
Thanks for the kind words.
LuxyBoy, that wiper bottle was on the vehicle when I got it, I just moved it back, and closer to the exhaust, so far, its not been affected by said exhaust, infact its pretty cool there. I was worried that the 2nd batt would be too close to it as a heat source, but its fine.
Kinglakekustoms is on the money.
A very basic cradle to hold the wiper bottle assy, bolted onto one of the vac booster bolts, and down near the bottom of the wheel well area.
Pongo
Go for it mate, your welcome to .
I dont think those plates will move too much, have already done some hard corrogations ( a good few days worth) , and 5500kms on it, and its fine so far.
I think if you used nolathane they may not be needed. I used rubber ones, as thats what I had laying around at the time.
The 90deg piece that bolts onto the tow bar frame, I added 2 sq flat pieces to reduce the flex in that piece when the wheel was extended.
For extra strength, I should have filled in the end of the outer carrier piece near the hinge point.
I left the sq tube open near the latch point so i could easily get to the nuts inside to replace the latch if it broke. Where it slides into the female piece, I closed that end off, so It wouldnt crush, as its a very low tolerance fit there so it will take some of the vertical twisting loads that the wheel puts on that point of the unit.
Speaking of that female piece, thats bolted with 2 bolts at the back, so It can be removed completely if required.
I added another 90 deg section where the 90 deg piece (that bolts to the towbar), and the small sq tube piece that has the bushes in it at the end joins, this took alot of the side load stresses, and closed up the end of the square tube, you can also see how the vertical load is taken up at this point as the extendable bit sits on the 90 deg angle piece here too.
Well it made sence to me
GeneralFubashi,
Very good idea, I will have another look at it, and try to add it sometime this week. That clamp is good, but I dont think its as *robust* as the rest of it. Thats why I made it easy to remove, and replace it if the time comes.
A drop pin to secure it in long transit would be the finishing touch.
Thanks for the suggestion, its a goodie.
Ps, many thanks for not pointing out the rough rush job, 2 min wonder white battery clamp I whizzed up just before I left the workshop, yes its rough, looks tardy, but its strong, and works
The other battery top holder is just that, a holder
Trains
Thanks for the kind words.
LuxyBoy, that wiper bottle was on the vehicle when I got it, I just moved it back, and closer to the exhaust, so far, its not been affected by said exhaust, infact its pretty cool there. I was worried that the 2nd batt would be too close to it as a heat source, but its fine.
Kinglakekustoms is on the money.
A very basic cradle to hold the wiper bottle assy, bolted onto one of the vac booster bolts, and down near the bottom of the wheel well area.
Pongo
Go for it mate, your welcome to
I dont think those plates will move too much, have already done some hard corrogations ( a good few days worth) , and 5500kms on it, and its fine so far.
I think if you used nolathane they may not be needed. I used rubber ones, as thats what I had laying around at the time.
The 90deg piece that bolts onto the tow bar frame, I added 2 sq flat pieces to reduce the flex in that piece when the wheel was extended.
For extra strength, I should have filled in the end of the outer carrier piece near the hinge point.
I left the sq tube open near the latch point so i could easily get to the nuts inside to replace the latch if it broke. Where it slides into the female piece, I closed that end off, so It wouldnt crush, as its a very low tolerance fit there so it will take some of the vertical twisting loads that the wheel puts on that point of the unit.
Speaking of that female piece, thats bolted with 2 bolts at the back, so It can be removed completely if required.
I added another 90 deg section where the 90 deg piece (that bolts to the towbar), and the small sq tube piece that has the bushes in it at the end joins, this took alot of the side load stresses, and closed up the end of the square tube, you can also see how the vertical load is taken up at this point as the extendable bit sits on the 90 deg angle piece here too.
Well it made sence to me
GeneralFubashi,
Very good idea, I will have another look at it, and try to add it sometime this week. That clamp is good, but I dont think its as *robust* as the rest of it. Thats why I made it easy to remove, and replace it if the time comes.
A drop pin to secure it in long transit would be the finishing touch.
Thanks for the suggestion, its a goodie.
Ps, many thanks for not pointing out the rough rush job, 2 min wonder white battery clamp I whizzed up just before I left the workshop, yes its rough, looks tardy, but its strong, and works
The other battery top holder is just that, a holder
Trains
Save the Whales......Collect the whole set.
My Wife Can't Shear..............But You Should See Her Crutch !
My Wife Can't Shear..............But You Should See Her Crutch !


Who is online
Users browsing this forum: No registered users and 1 guest