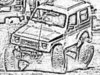
hey can everyone post up pictures of 80 series utes
am thinkin of doin it
Notice: We request that you don't just set up a new account at this time if you are a previous user.
If you used to be one of our moderators, please feel free to reach out to Chris via the facebook Outerlimits4x4 group and he will get you set back up with access should he need you.
If you used to be one of our moderators, please feel free to reach out to Chris via the facebook Outerlimits4x4 group and he will get you set back up with access should he need you.
Recovery:If you cannot access your old email address and don't remember your password, please click here to log a change of email address so you can do a password reset.
80 series utes
Moderators: toaddog, Elmo, DUDELUX
80 series utes
brentz
TUF-60 starting build soon
TUF-60 starting build soon


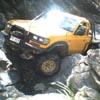
The yellow one can be found at Slee Offroad. Also good for any Toyota info.
Cheers
Corry
http://www.sleeoffroad.com/index.html
Cheers
Corry
http://www.sleeoffroad.com/index.html
'98 80 4.5/Auto 40th Anniversary - Tour
'92 80 6.5V8TD/Auto/37's - Toy
VE HSV Senator 6.2/Auto - Play
'92 80 6.5V8TD/Auto/37's - Toy
VE HSV Senator 6.2/Auto - Play
CruiserCruising yeah like hardcore said there is a full build up their of two chopped 80`s
plenty of pics too
the yellow 1 http://www.sleeoffroad.com/technical/wa ... ortbus.htm
and another one
http://www.sleeoffroad.com/technical/vl ... k_main.htm
plenty of pics too
the yellow 1 http://www.sleeoffroad.com/technical/wa ... ortbus.htm
and another one
http://www.sleeoffroad.com/technical/vl ... k_main.htm
Big thanks to Northern Suburbs Radiators and Melbourne Drive Shafts and Balancing for all your help and support.

no its not my truck I wish but once I cave in my roof in the bush my 80 will look like this toknown 2 wrote:is that your car jimbo or do u know the guy who owns it, it's frigin awsome that style side looks shit hot.
current truck, 105 series GXL diesel 6" springs & twin pro lockers
sierra LWB spoa one wide track diffs twin locked
Sierra Parts Wanted pm me
sierra LWB spoa one wide track diffs twin locked
Sierra Parts Wanted pm me


The 1st pic is Wallys. (80UTE on here) The best Ive seen by a mile. Awesome rig. Would love to do mine too, one day...
Check out:
http://www.outerlimits4x4.com/PHP_Modul ... hp?t=13466
Cheers
Jeff
Check out:
http://www.outerlimits4x4.com/PHP_Modul ... hp?t=13466
Cheers
Jeff
" Some days you are the bug; some days you are the wind screen"
Thanks for that yeh if i ever rolled my 80 and had the cash that would be my model to base wat id like my car to bekinglakekustoms wrote:CruiserCruising yeah like hardcore said there is a full build up their of two chopped 80`s
plenty of pics too
the yellow 1 http://www.sleeoffroad.com/technical/wa ... ortbus.htm
and another one
http://www.sleeoffroad.com/technical/vl ... k_main.htm
does anyone on here have the contact details of the owner of that green ute.
would like some info on how he did the chop and style side
would like some info on how he did the chop and style side
kaylee 2004 hdj78 RV. 33 mickey atz's, winchbar, 3i lift, 3i exhoust, spoties, roofracks and ufh. pimped interior .
86 lwb zook wt soa, 33's, locked, bard up, prety lights. monster tacho:/
86 lwb zook wt soa, 33's, locked, bard up, prety lights. monster tacho:/

yeh it kinda looks like a small f150
as soon as i sell my 75's i can start on a 80 ute a v8 one ohh the anticipation
as soon as i sell my 75's i can start on a 80 ute a v8 one ohh the anticipation
kaylee 2004 hdj78 RV. 33 mickey atz's, winchbar, 3i lift, 3i exhoust, spoties, roofracks and ufh. pimped interior .
86 lwb zook wt soa, 33's, locked, bard up, prety lights. monster tacho:/
86 lwb zook wt soa, 33's, locked, bard up, prety lights. monster tacho:/


nice pics dere
hey duck did u get that off ebay cause i saw it advertised a while bak on ebay im preetyy sure?
pesky pete: hey can u give me some more info on ure's? ie. how much did the converison cost? did u do it ureself or get someone to do it? and if u did it ureself wats involved in it besides the basic stuff that meets the eye???
and do u have nemore pics on dat white 1?
brentz
TUF-60 starting build soon
TUF-60 starting build soon
brentz wrote:nice pics dere
hey duck did u get that off ebay cause i saw it advertised a while bak on ebay im preetyy sure?
pesky pete: hey can u give me some more info on ure's? ie. how much did the converison cost? did u do it ureself or get someone to do it? and if u did it ureself wats involved in it besides the basic stuff that meets the eye???
and do u have nemore pics on dat white 1?
not mine mate, just saw it at denny ute muster on the weekend dont know whos it is
The white and yellow ones of Pesky Pete are the same car. Pete done the chop himself.. I basically watched mine get chopped... I couldnt tell you how much mine cost to do really as i never kept tabs on it... But at a guess maybe 2k... I had about $1500 in my chop fund and it blew out real quick... Its the little stuff that stings your wallet... Like half a dozen tubes of sikaflex is almost 200 bucks... What ever you think it will cost to do yourself, almost double that figure... By doing it yourself the end result will be that you get what you wanted  not what someone else wants to do...
Yeah did mine myself with a few mates. Actually did 2 at the same time. Never really kept tabs on mine but I reakon it cost under 1k to do, but a lot of the stuff I didnt need to by.
I wanted enough room behind the seats to fit a fridge, a few clothes and enough camping gear for a weekend away, so I went for an extra cab. It was pretty simple to chop, and here is the basics on what we did
1. Remove the rear quater glass from the rear doors. Flip the glass, left to right right to left. We then cut the rear door frame out and pushed it up to the glass to make a frame for the rear cab window. Then chopped out the C Pilar of the wagon and moved it up to form the rear pilar of the cab. This gave us the line to chop the rear of the wagon off
2. Marked the cab where we needed to cut. Then took to the doors and roof with a 9" grinder. Did the floor with a 5" grinder so that we missed everything we could hit with the 9". Also remember that the insulation inside the hood lining is flamable, so remove as much as you can before cutting
3. Once the rear of the cab was removed, we braced up the inside of the cab to ensure it was true and straight. Easy with the roll cage still in as I could just wedge body around the cage.
4. We then set about reinforcing the old C Pillar to make the edges of the cab straight. We used a body Jig, but you could trace around the body and cut the rear wall out allowing about 40mm to fold over and place inside the cut cab. Once the rear wall is in place we tacked it from the outside going from one side to the other so that the wall did not distort. Once tacked outside we ran around the inside in 50mm runs to keep the distortion to a minimum. Once the inside was welded we welded up the outside. At this stage the rear wall was very straight with hardly any distortion.
5. once the rear wall was welded we put bracing in the inside of the cab. This is where we went wrong, as when we welded up the bracing it distroted the rear wall. We should have tacked the bracing in then welded the rear wall to avoid distortion.
6. Next we cut out the window hole. We just cut out what looked right and got custom glass cut to fit. A lot of other people have used 75 series or other models glass but it is much easier to make a piece of glass fit a hole, than make the wall fit the glass.
7. Next we Ground it, bogged it all up and painted it. Really a very simple exercise. Check out the slee off road site linked above and that will give you more pointers on how to do it.
All I can say is that if you are planning to do it, give yourself heaps of time to do it. It cost me a lot less than I thought, but took about 20 gazillion times longer than I planned. Its all the little fiddly bits that take the time. the actual chop to bog stage only took me two days, but the other bits took forever.
Who is online
Users browsing this forum: No registered users and 4 guests