Notice: We request that you don't just set up a new account at this time if you are a previous user.
If you used to be one of our moderators, please feel free to reach out to Chris via the facebook Outerlimits4x4 group and he will get you set back up with access should he need you.
Recovery:If you cannot access your old email address and don't remember your password, please click here to log a change of email address so you can do a password reset.
HOW TO FIT HZJ75 POWER WINDOWS ...FROM START TO FINISH..DONE
Moderators: toaddog, Elmo, DUDELUX
HOW TO FIT HZJ75 POWER WINDOWS ...FROM START TO FINISH..DONE
LETS GO..
The whole process of fitting power windows to my 75 series ute was the simple fact that, I was sick of my knee hitting the window winder handle (crank) when driving.. In the bush its even worse. So the only remedy was electric.
But they dont make electric window regulators for 75 series as I know of.
Or if they do imagine the cost... 1 window motor from toyota is $900 .....crazy.....and you need 2 regulators aswell .( the mechanical bit).
Only other option is to buy a universal window kit. DONT BOTHER, BEEN THERE DONE THAT....DONT WORK REAL GOOD AT ALL.
So lets go the factory look.
WHAT YOU NEED TO DO FIRST BEFORE ANYTHING ELSE is go the the wreckers and get youreself, 2 front door, left & right electric window regulators with motors.
THESE MUST BE FROM A "TOYOTA".
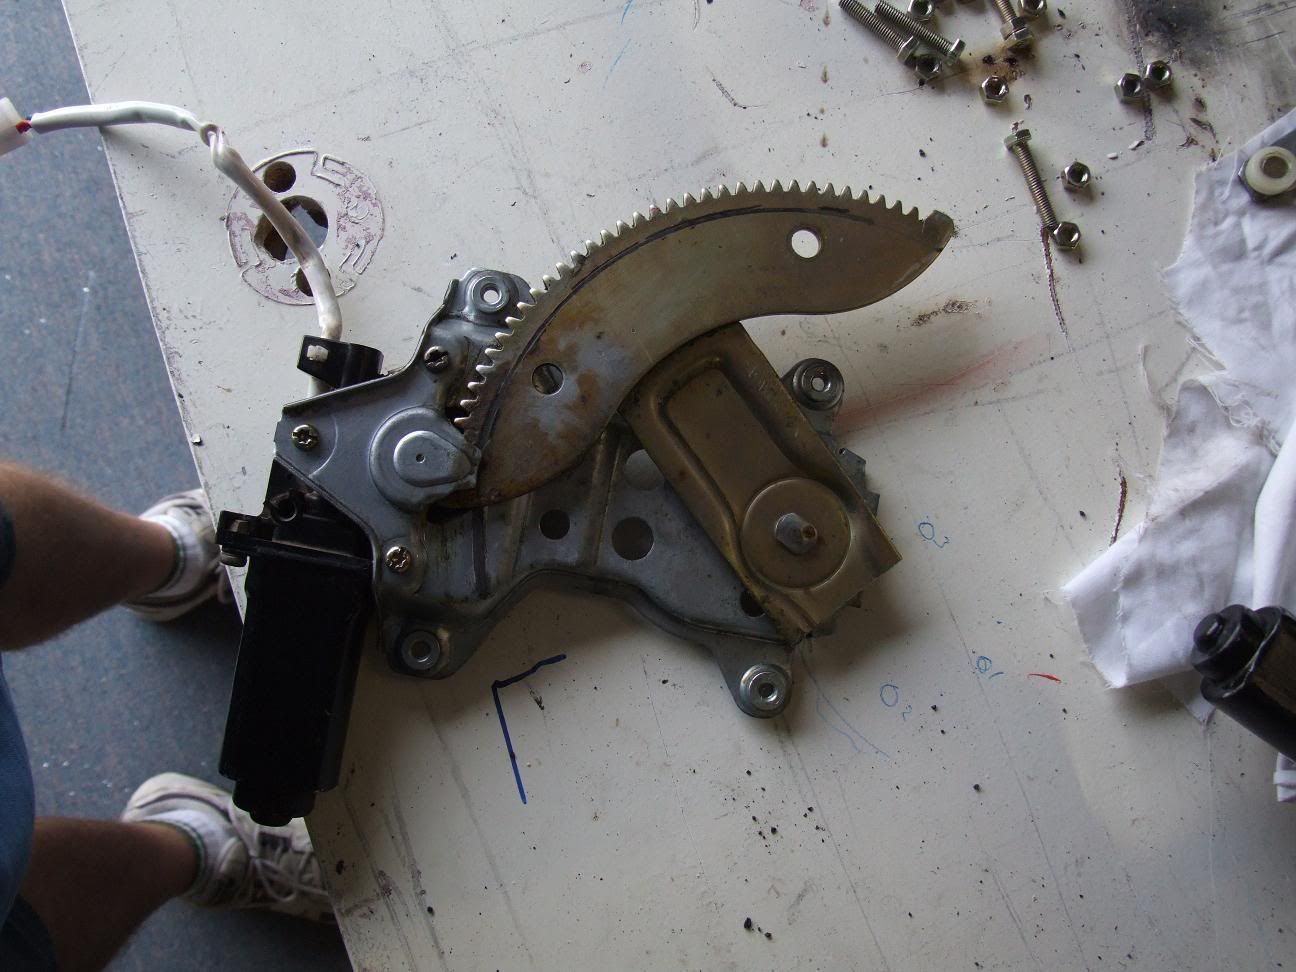
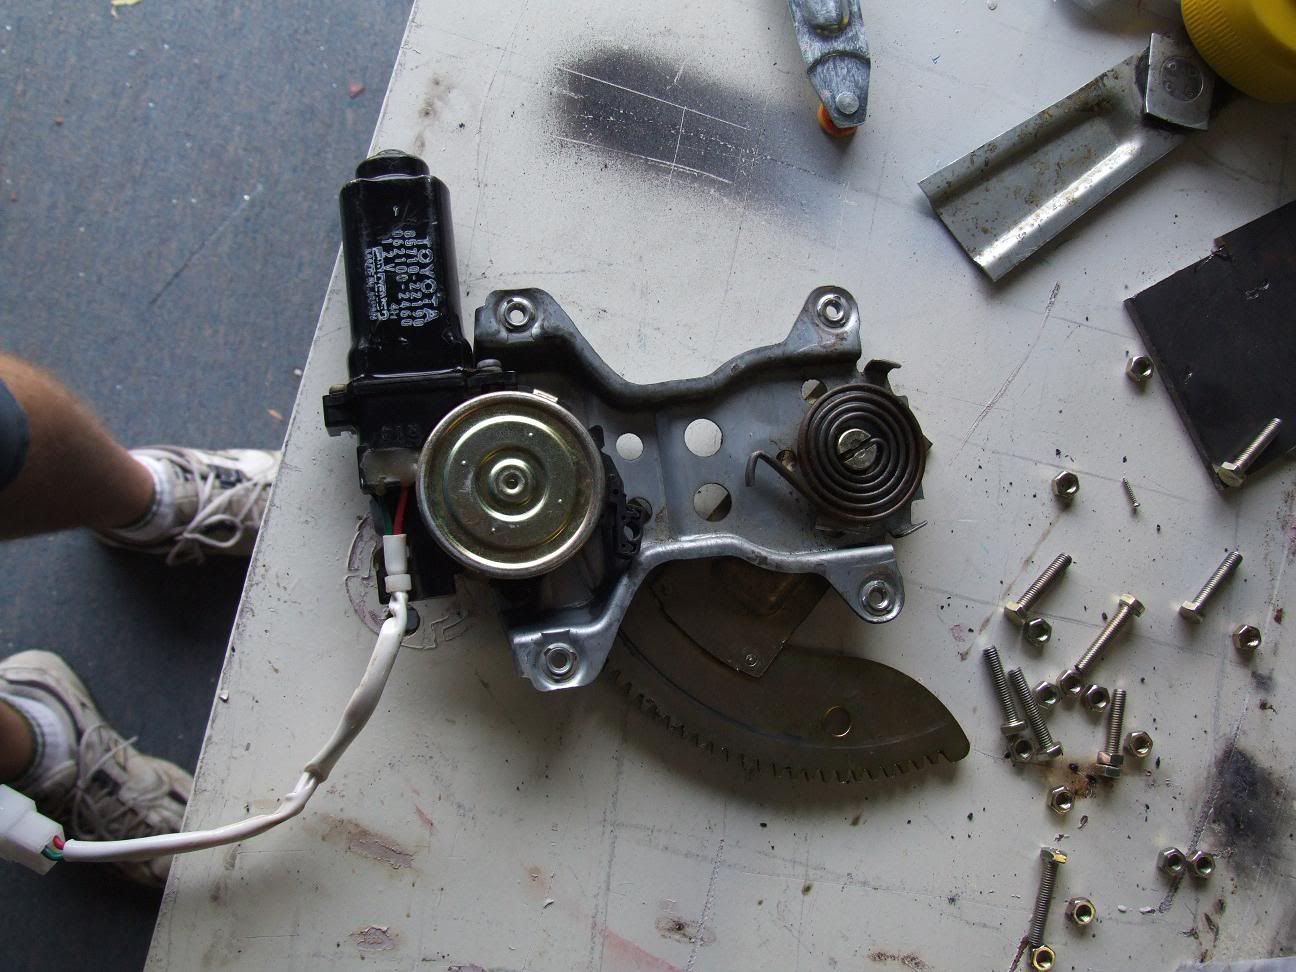
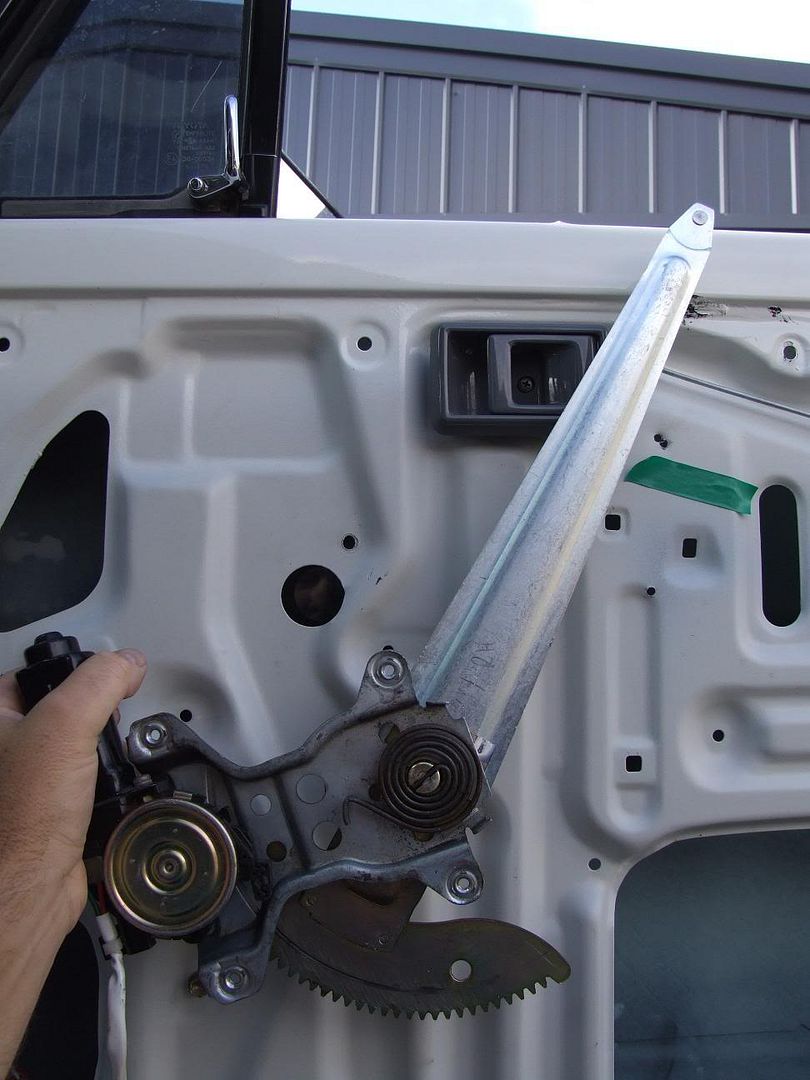
What model?....Camry, Cressida, Landcruiser...dosent matter.. as long as tthey look like the one below.....NON-Cable type.
These ones are the scissor type and are from a Toyota Cressida...and an old one at that.
I paid $80 for both... TEST the motors before leaving the wreckers so you know the motors are ok.
I had a look at alot of regulators whilst I was there and apart from the arms the motor and housings are all the same dimensions for mounting.
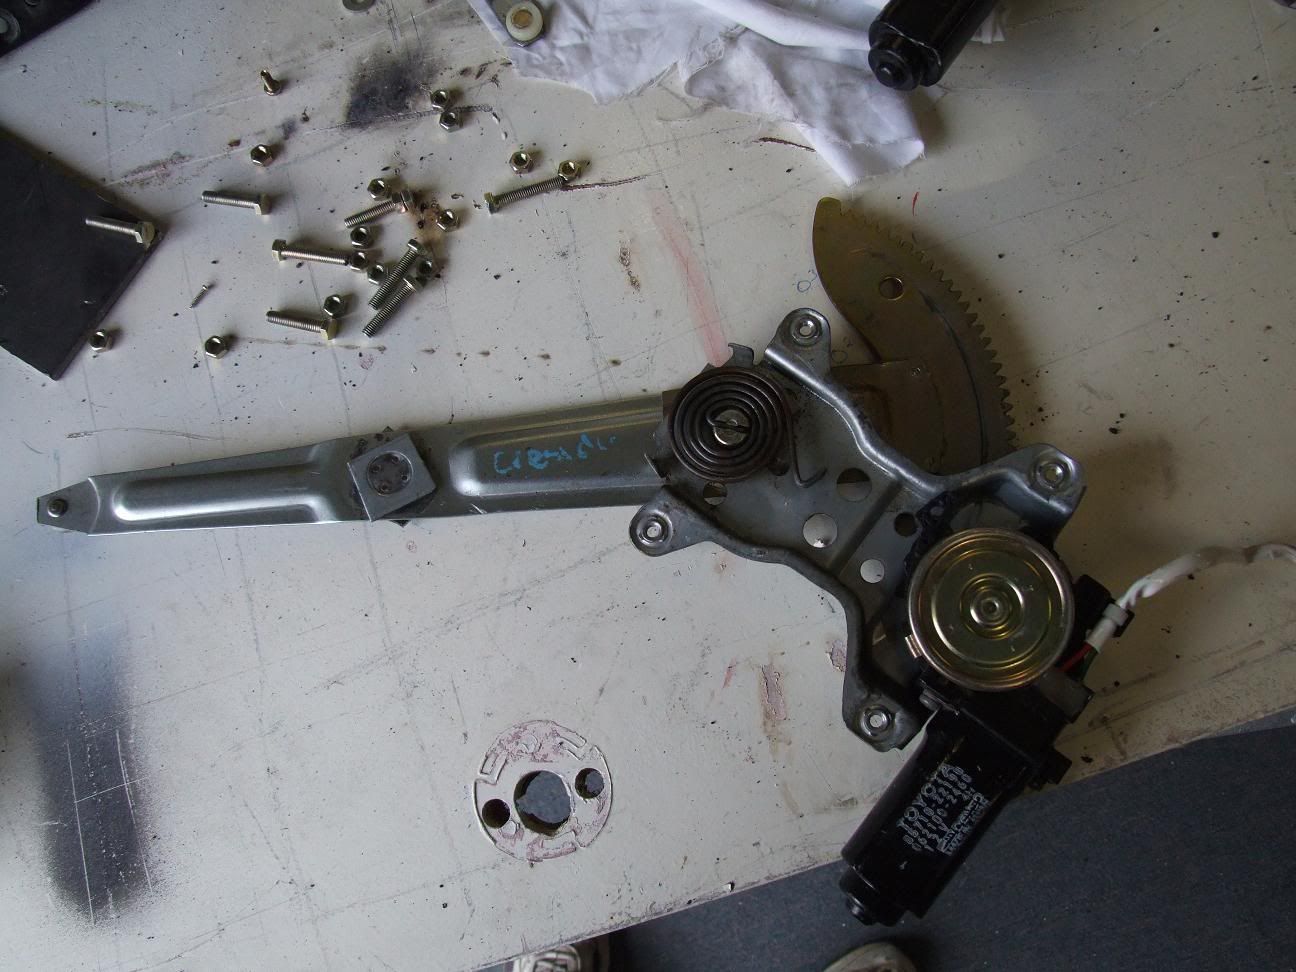
WHEN YOU HAVE 2 OF THESE LEFT & RIGHT THEN FOLLOW MY THREAD.
Last edited by crozza on Mon Apr 13, 2009 4:10 pm, edited 3 times in total.
1....
Remove youre original manual regulators but keep them as youre going to need the arms.. see below.
Grind off stud as per image..This is the drivers side winder.
[img][img]http://i275.photobucket.com/albums/jj28 ... EMOVAL.jpg[/img][/img]
Remove youre original manual regulators but keep them as youre going to need the arms.. see below.
Grind off stud as per image..This is the drivers side winder.
[img][img]http://i275.photobucket.com/albums/jj28 ... EMOVAL.jpg[/img][/img]
2....
you should now have this off.
3...
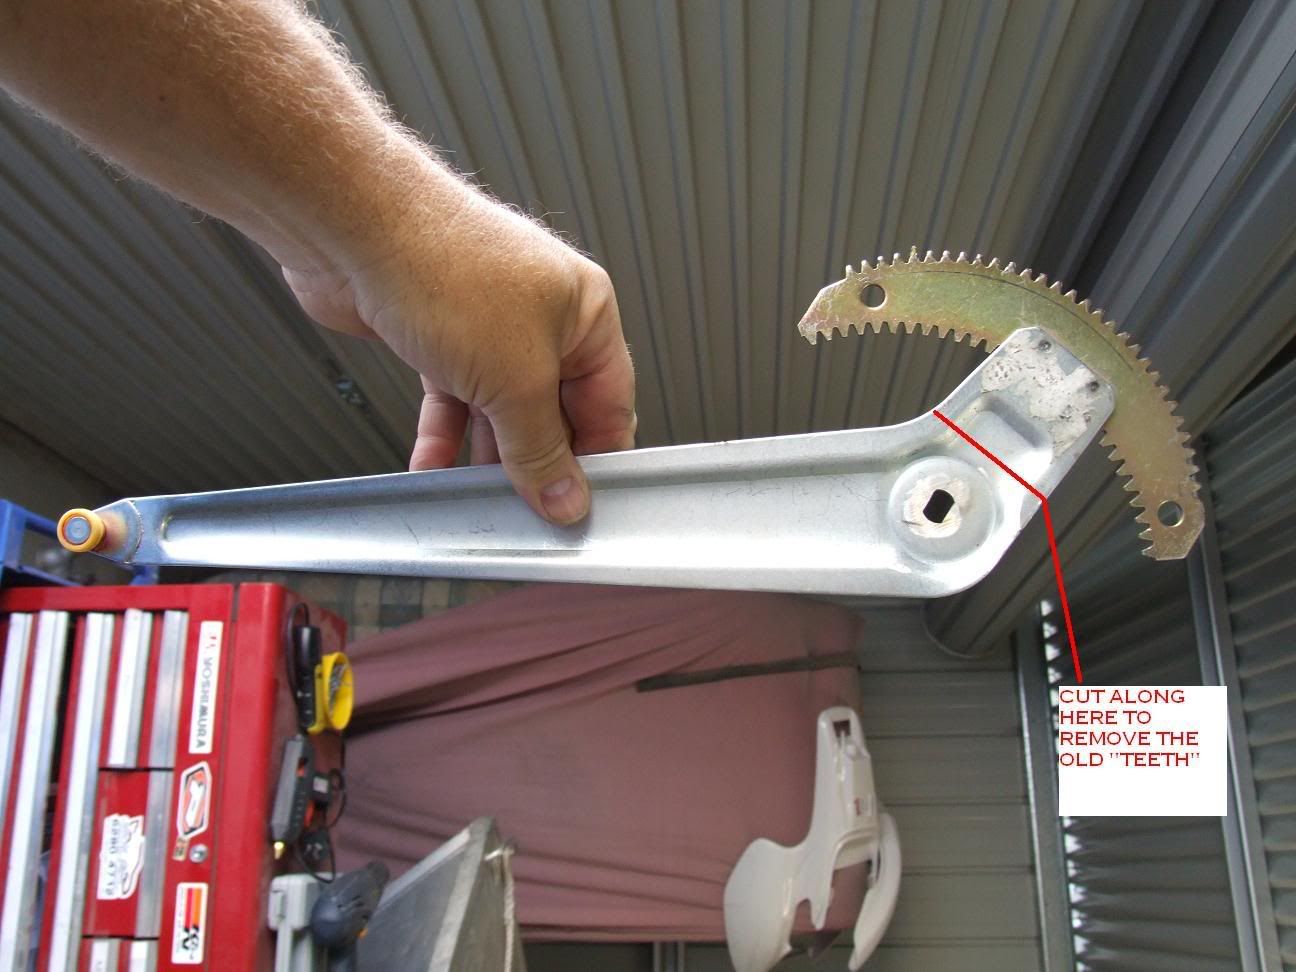
Cut of the teeth at this point roughly as per photo.
4....
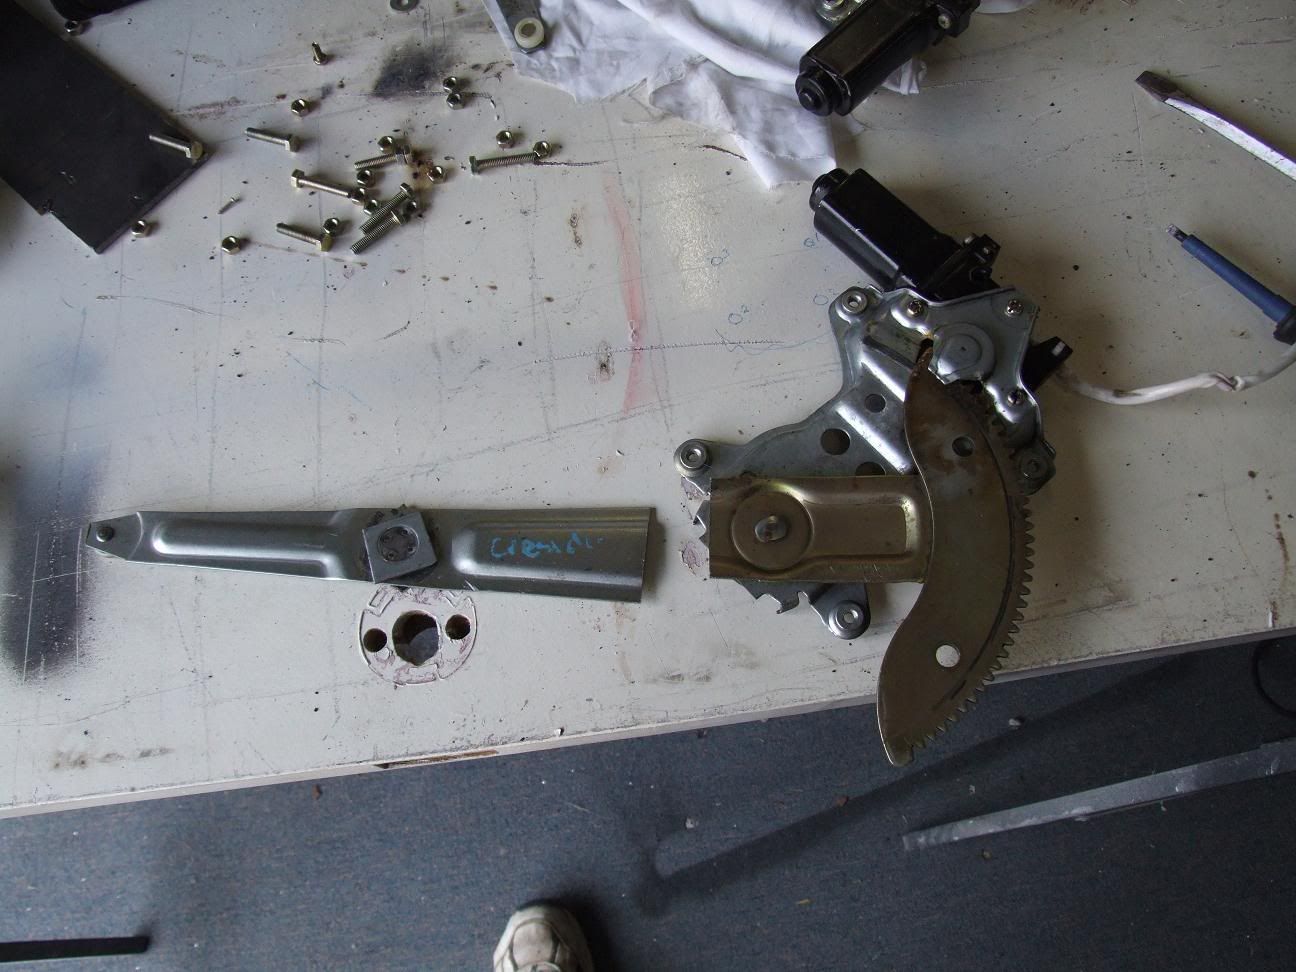
Cut off the arm from youre electric regulator..as per photos
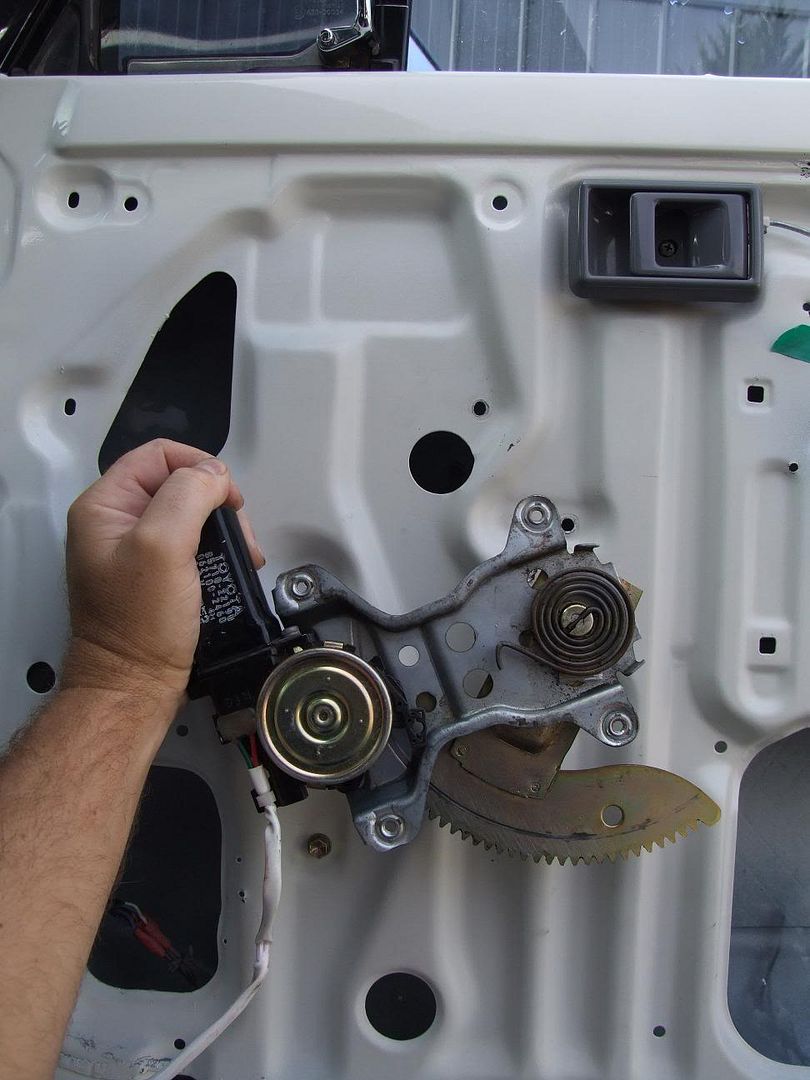
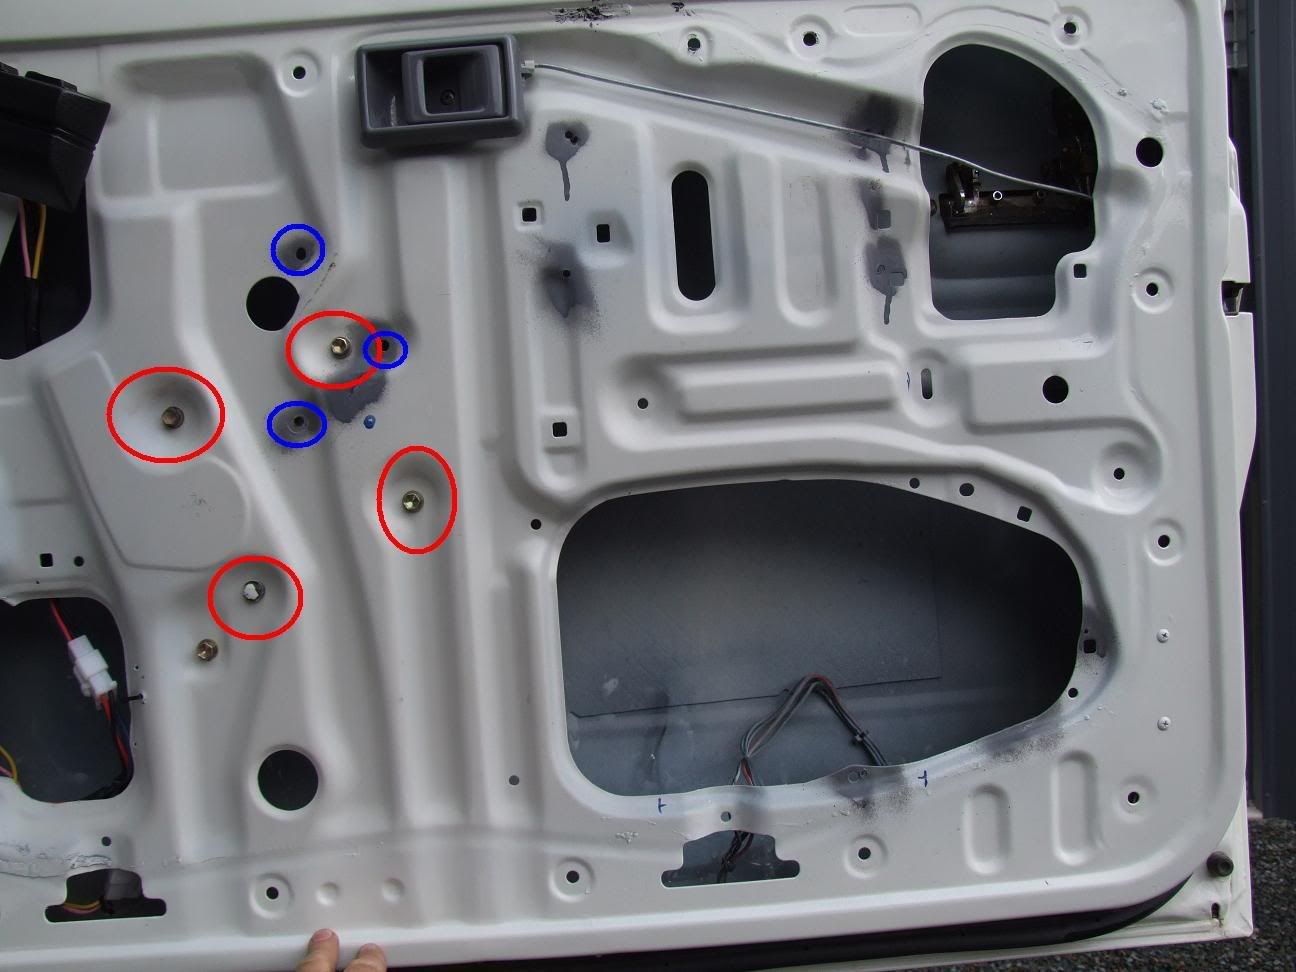
5....This is the location of where youre new regulator fits...holes are already there..no need to drill.
should sit about here...ther are 4 screws to hold it on. You can use the same ones from the manual winder as the threads are the same..
Do a test fit 4 now ONLY if you like..
AT NO POINT DO YOU WELD THE ARMS ON YET...
THAT IS THE MOST CRUCIAL PART OF THE WHOLE JOB..
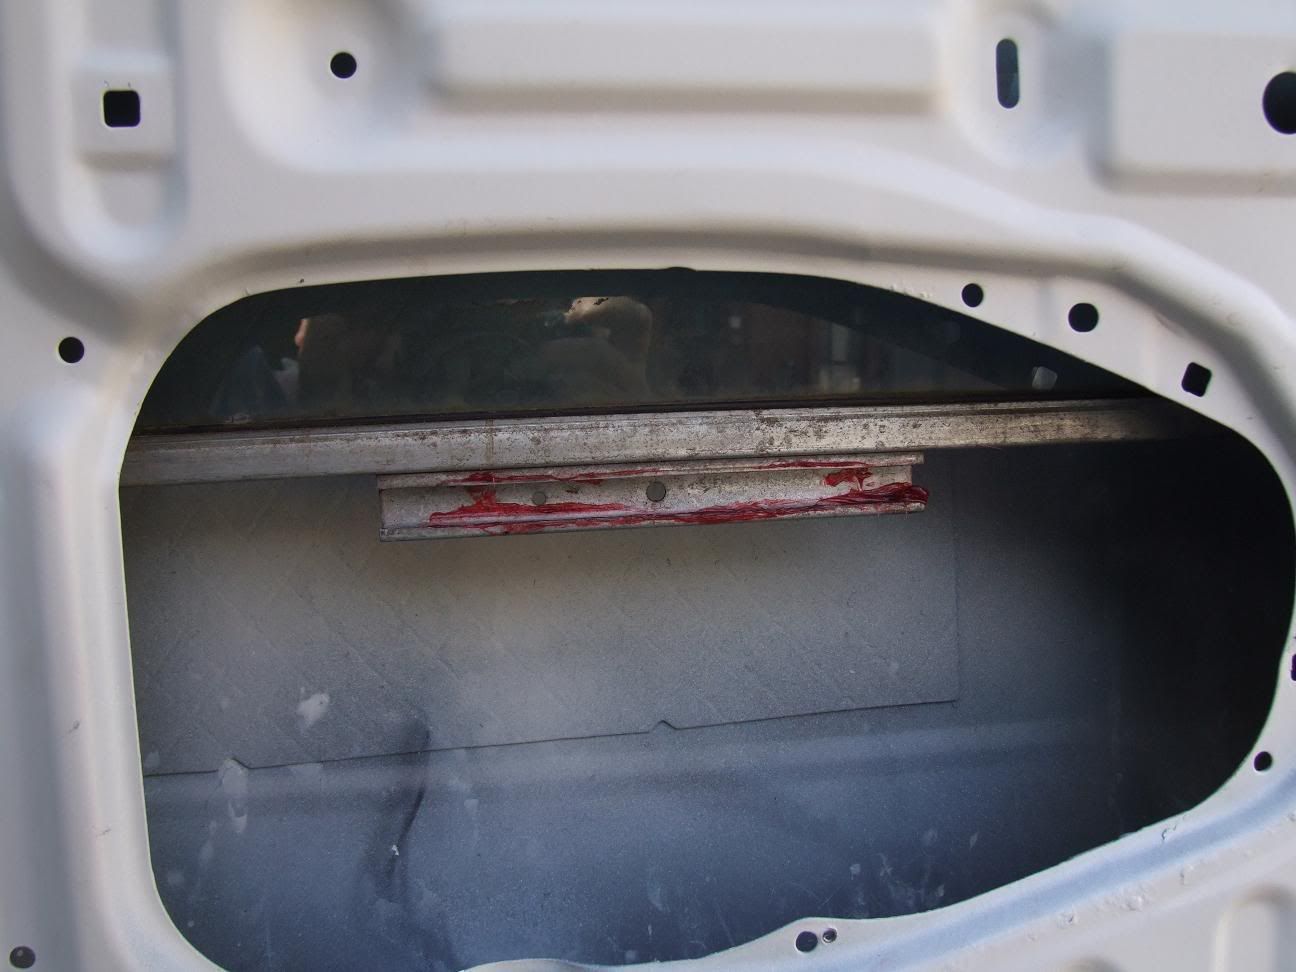
With the regulator out, lower the window down by hand if it hasnt already fallen down, untill you see the bottom window chanel as per photo...
Lower the window down enough so none of the top of the window is sticking out the top ( ie the window is in the fully open position)...
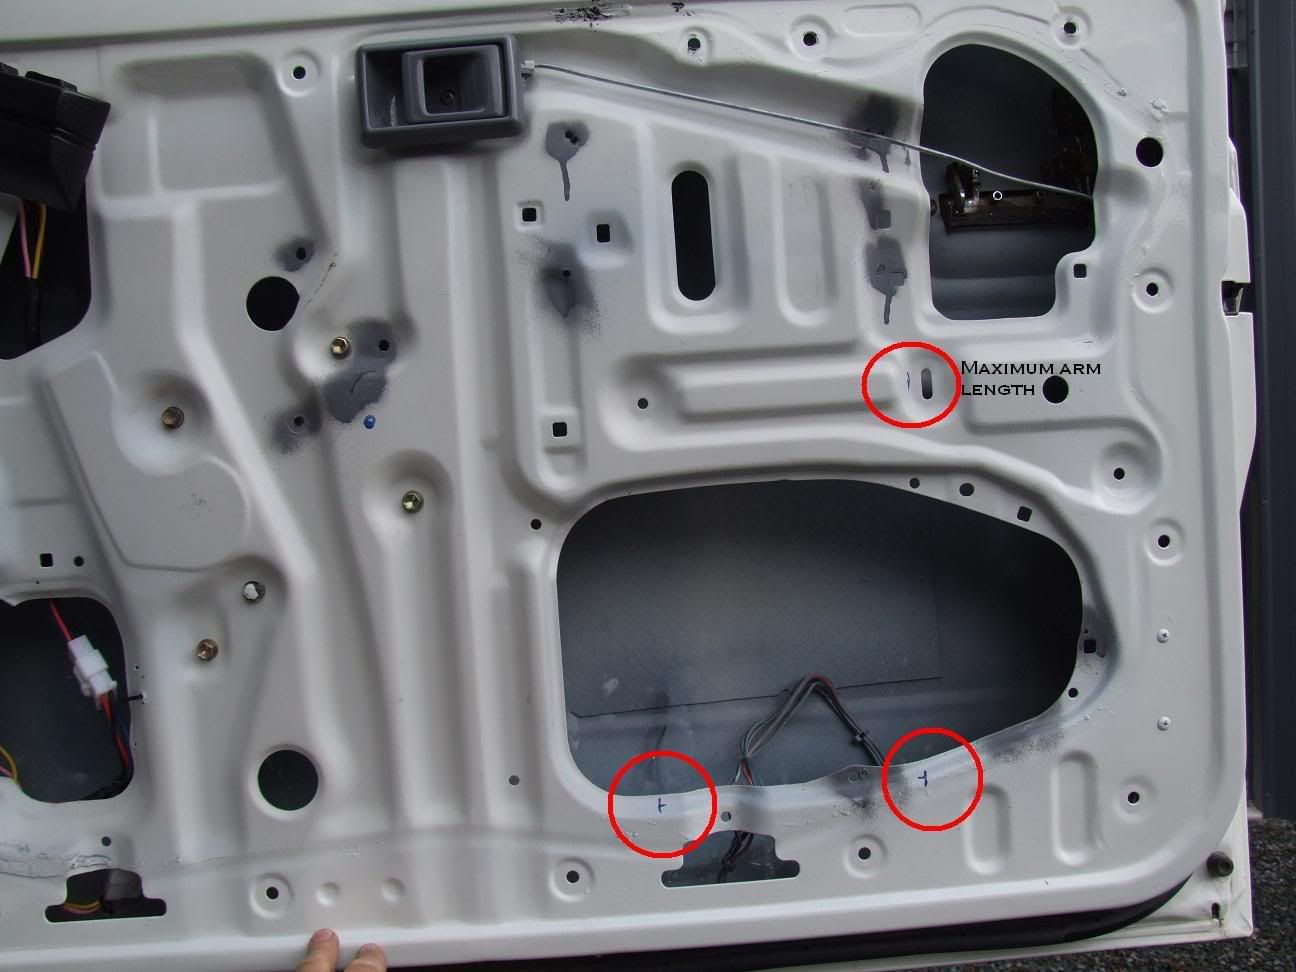
With a felt pen mark on youre door where the outer edges of the chanel are..You can youse my photo as a reference as it will be the same as youres anyway.. Marked with RED circles on photo.
In the above image, there is a "maximum arm length" mark.
What this means is when you have welded youre arm onto the new electric regulator the bearing runner that is on the end of youre old regulator arm MUST NOT exceed this point when it drives up and down. If it does the bearing runner will come out of the window chanel and the window will collapse and the whole thing wont work..This is one of the MOST CRUCIAL measurements you will need.. I will post this measurement further along the thread.
Last edited by crozza on Sat Mar 14, 2009 5:46 pm, edited 1 time in total.
These are the marks with the window fully down.
The widow of course will fall all the way to the bottom of the door if not supported. But when a regultator is attatched it will only travel as far as this.
TIP..you can do these markings with the manual winder still attatched. Its a lot easier.
THIS IS WHAT I MEAN ABOUT MAXIMUM ARM LENGTH..WHEN THE REGULATOR ARM HAS TRAVELED ITS MAXIMUM DISTANCE TO THE RIGHT.
I have deliberatly got the roller out of the chanell for measuring purposes.
THE WINDOW HERE IS ROUGHLY HALF WAY DOWN/UP.
Last edited by crozza on Sat Mar 14, 2009 6:11 pm, edited 2 times in total.
OK
DO NOT WELD ARMS ON YET OR YOU WILL CRASH AND BURN...
If youre totally confused by now then just post a question and I will run you through it.
Now for the tricky bits........
This is roughly what youre new rebuilt regulator will look like when welded up.
This is a fully functioning regulator.....1 weld on the front and 2 on the other side as seen on the back of the arm..
MAKE SURE THE ARMS BEARING RUNNER IS FACING OUT "TEETH SIDE" TOWARDS WINDOW WHEN FITTING. Otherwise when you fit it to the window it will be facing away from the window chanell runner..
TAKE NOTE>>>>
If you do not get the new angle right or the length from the pivot point..( ie middle of the spring) to the end of the roller arm on the tip of the arm
perfectly, give or take a mm or two.
1 of 3 things is going to happen..( worst case you totally stuff up and get all 3 )....
1..the regulator roller will fall out of the window runner cause youre arm is too long..
2..If the angle aint right the window will open fully but NOT close fully.
3. If the angle aint right youre window will close fully but NOT open fully leaving some of the top of the window sticking out, just enough to annoy youre arm when youve got the window wound down...
<<<<<< DONT WELD YET>>>>>>
I will post some more info 2morrow as Im going for a beer...
Last edited by crozza on Sun Mar 15, 2009 7:35 am, edited 2 times in total.
Awesome work Crozza!!!
I have just been asking about fitting power windows to my HZJ78 troopy campervan on a few other forums over the past few days, and someone kindly pointed me to this thread (thanks Phil!).
I have been trying to find out if I can source the power window mechanism from another 70 series model and fit it to my doors, or if I would have to find whole doors with the power windows in them and swap them over.
I don't think I could handle the DIY approach myself, so will keep looking for 70 series power window mechanisms/doors from wreckers.
I am really interested in how yours work out, please keep us updated as to the progress and outcome.
Thanks,
Simon
Canberra
Other 70 series ones will work, but more rareSimonInAustralia wrote:Awesome work Crozza!!!
I have just been asking about fitting power windows to my HZJ78 troopy campervan on a few other forums over the past few days, and someone kindly pointed me to this thread (thanks Phil!).
I have been trying to find out if I can source the power window mechanism from another 70 series model and fit it to my doors, or if I would have to find whole doors with the power windows in them and swap them over.
I don't think I could handle the DIY approach myself, so will keep looking for 70 series power window mechanisms/doors from wreckers.
I am really interested in how yours work out, please keep us updated as to the progress and outcome.
Thanks,
Simon
Canberra
hands and mums dont count!!!
I wonder... Do the regulators from an 167 series with electrickery windows work with the older 106 series doors..... Might have to visit a wreckers- cos if the door skins swap over too, ive got an easy solution to my mangled door skins AND electric windows! I know my surf loom has all the wiring and fuses ready to go too!
2005 HDJ100 Manual, ARB bar, XD9000 winch, ARB rooftop tent + awning, Drawers, Engel, 2" OME lift, 285/75R16 KM2's, iCom, HID XGT's.
where did u mount the swich crozza i got the motors now and going to have a go this weekend (im going to my cousins to clam back my mig)
thanks jono
Skip 1995 tdi disco the new tourer
Tin Worn the scat crawler with charade (fwd) motor and auto patroll transfer and locked yota diffs all for under $1000
Skip 1995 tdi disco the new tourer
Tin Worn the scat crawler with charade (fwd) motor and auto patroll transfer and locked yota diffs all for under $1000
I mounted mine on the right side of the dash below the air vent. 2 switches , 1 for each window. Most people have there driving light switches there. I did, but moved them over to the left of the dash instead.
I did this as I use the window switch more than the driving light switch for ease of access.
You could cut them into the door trim if you wanted somehow.
Do you know how to make a wiring harness for them?
I will post the rest of the photos including measuring on SATURDAY.
All other switches I mounted here.
This is an old photo for refernce only..as u can see it still has a winder
Ok
Sorry to those who have been following this post and who have maybe taken on the task of fitting this mod to their car, but my PC blew up so I had to get another..It too blew up so I have had to repair this old one instead.
Im now back on air and will post the rest of the pics and instructions ASAP.
Crozz
Cutting and welding the two together...SimonInAustralia wrote:Not as much work as I had expected, the new power mechanism seems to bolt straight in, he is just swapping the arm from the manual winder onto the power winder.
But it is giving me a great head start, I am pillaging some mechs off a camry...
hands and mums dont count!!!
Here is the rest of the photos for the mechanicals
The following measurements in this photo are for the right hand window winder. You need to mirror image it for the left side..easy..
Have the winder on a flat surface and have it wound up as far as it will go for these measurements..As you can see there is a slight angle on the arm.
I didnt have a protractor to measure this so I figured this was just as easy and better.
JUST TACK WELD AND TEST IN THE CAR...DONT "OVERWELD "AS THEY WILL WORP AND TWIST.
THIS IS WHERE I PUT MY WINDOW SWITCHES
PYRO POSITION
IF YOU FIT A REVERSE CAMERA I PUT MINE HERE USING AN ALUMINUM BRACKET I MADE...DOESNT WOBBLE OR VIBRATE TOO.
I DID ALL THE ELECTRICALS MYSELF, CAUSE I CAN. DO IT 4 A LIVING
HOPE THIS HELPS ANYONE WANTING TO DO IT...TOOK ME AROUND 2 DAYS.......BUGGER ALL FOR SOMETHING I WILL USE EVERY DAY..
GOOD LUCK
Who is online
Users browsing this forum: No registered users and 0 guests