Notice: We request that you don't just set up a new account at this time if you are a previous user.
If you used to be one of our moderators, please feel free to reach out to Chris via the facebook Outerlimits4x4 group and he will get you set back up with access should he need you.
Recovery:If you cannot access your old email address and don't remember your password, please click here to log a change of email address so you can do a password reset.

Welding practice

General Tech Talk

Moderators: toaddog, TWISTY, V8Patrol, Moderators

Posts: 713
Joined: Tue Nov 05, 2002 2:12 pm
Location: Brisbane

Welding practice

Post by Hybrid »

Ive been practicing my arc welding and this arvo though I'd take the major step of joining two bits together not just welding beads on flat plate. :oops:

Got some pics of the welds and hoped you guys might be able to point out if I'm making any mistakes. They look ok to me but im a newb.

Sry bout the pics but the cam just wouldnt focus. Hope you can see enough to criticise.

First pic shows welds done with the job horizontal and the second with it vertical (only the two left welds). The vertical welds are a couple mm thinner.

Image

Image


Cheers

John
Posts: 1516
Joined: Wed Mar 10, 2004 3:36 pm
Location: melbourne australia

Post by pcman »

looks damn good to me tho im a crap welder and i admit it lol
Posts: 3073
Joined: Sun Jul 27, 2003 5:37 pm
Location: Mornington Peninsula, Victoria

Post by bj42turbo »

Bloody hell they look good to me too, wish I could weld half as good


Dazz
Posts: 713
Joined: Tue Nov 05, 2002 2:12 pm
Location: Brisbane

Post by Hybrid »

LMAO Thanks guys. Reason I'm practicing is so I can weld on engine, body and radiator mounts soon. If I can make em this good on the chassis will they pass engineering? I realise the chassis will be thinner but im gonna practice with some chassis of cuts in the next couple of days.
Posts: 2176
Joined: Sat May 31, 2003 1:30 am
Location: BrisVegas

Post by Mad Cruiser »

Errr.... you're going to use an Arc Welder to weld on a chassis ?
1998 Toyota Landcruiser 100 series GXL
1976 FJ45 Landcruiser ute
Posts: 713
Joined: Tue Nov 05, 2002 2:12 pm
Location: Brisbane

Post by Hybrid »

Yup, All I got and I've watched beebee do it enough.

Whats the prob with using it anyway? Just more chance for blowing through?
Posts: 510
Joined: Wed Sep 15, 2004 7:07 pm
Location: Pheasant Creek

Post by HEY CHARGER »

Nah, you'll be no worries using a stick welder your welds dont look to bad ,
a quick tip if your welding two different guages of steel concentrate your arc slightly more onto the thicker piece and let it spill onto the thinner piece to avoid huge blow holes,
and practice , practice , practice , and burn your self some more ! and youll be right ... I hope you dont need to weld lying on your back underneath cause thats always shite loads of fun ,, OUCH !!!

Have a go well done !!
Posts: 510
Joined: Tue Jul 22, 2003 9:42 pm
Location: melbourne

Post by modman »

you can cut a section of the weld job then stick it in a vice to test tjhe strength.
we use a press at tafe .
david
Posts: 3288
Joined: Sun Feb 02, 2003 10:15 pm
Location: Central West NSW

Post by Slunnie »

What he said. Also practice welding with the plates at different angles and using the stick to control the lay of the weld. When the weld is fluid it wants to drop, so lay the stick a little flatter. No slag which is excellent.
Cheers
Slunnie

Discovery TD5, Landy IIa V8 ute.
Posts: 342
Joined: Sun Sep 19, 2004 3:49 pm
Location: gippsland vic

burns

Post by ratboy »

try to get that lieing on your back under a car being burnt getting cramp
on fire it becomes harder trust me
ok it was me
Posts: 1544
Joined: Tue Oct 22, 2002 8:37 am
Location: Performing booty fab in my Garage

Post by Wooders »

I'm one good at sculpting bird poops with welds....too me the bead look really good (especially for stick welder......
BUT I was wondering should the amperage be a bit higher for that gauge of metal? The penitration looks a bit light??
Someone correct me and explain why my braile screen isn't working...
Cheers [url=http://www.wooders.com.au]Wooders[/url]
Posts: 713
Joined: Tue Nov 05, 2002 2:12 pm
Location: Brisbane

Post by Hybrid »

Yeah I wondered bout the penetration but on the box of rods it sez 2.5 mm use.....um it was somehting - 80 amps. Ive got the welder on 120 there. So I dunno.
Posts: 2853
Joined: Tue Nov 30, 2004 10:55 pm
Location: All over the world or your mum

Post by toughnut »

Next time your under you truck have a look at the factory welds. If you want it to pass inspection you'll have to have a lot more splatter and gaps and crap that just doesn't look right otherwise it just wont pass :D
j-top paj wrote:gayer than jizz on a beard
http://www.outerlimits4x4.com/viewtopic ... 6&t=231346
God of Magnificant Ideas!
Posts: 6774
Joined: Mon Aug 04, 2003 11:22 am
Location: Balls Deep

Post by V8Patrol »

I see that the "Quality" improved in the photo series :D

120 amps for a 2.5 rod is ok but you run the risk of blowing holes in the material you are welding, try lowering the amps in stages and you will come to a more "balanced" setup. I'd also suggest that you practice on the same thickness material as the chassis you intend to weld..... using a heavier practice material may give you a false sence of security !

Once you have reached a level that you are happy with then start practicing verticle welds........ you'll need to learn this unless you plan to roll ya rig onto its side to weld !!!
good info here on verticle welding...
http://www.outerlimits4x4.com/PHP_Modul ... hp?t=22379


Like anyting it takes practice and then even more practice..... once you become a master I have a 10foot diameter castiron pipe comming here that needs to be welded using castcraft rods and the long arc style....should take a master a day to weld it back up !....why do I do this shyte :cry:


Kingy
[color=blue][size=150][b]And your cry-baby, whinyassed opinion would be.....? [/b][/size][/color]
God of Magnificant Ideas!
Posts: 6774
Joined: Mon Aug 04, 2003 11:22 am
Location: Balls Deep

Post by V8Patrol »

Mad Cruiser wrote:Errr.... you're going to use an Arc Welder to weld on a chassis ?

What do you think I learnt on ?????
Migs havent been around that long !

I have a full "Chassis Welders Licence" and we had to qualify using an arc & mig welders to get a "A Grade" ticket...... those that used a mig only qualified as a "C class" Chassis welder.

I perfer using arc on truck chassis but generaly use mig for 4x4 or car stuff. You can do alot more with arc compared to mig under certain circumstances..... switch on the fan and pass me the rods!!!

Kingy
[color=blue][size=150][b]And your cry-baby, whinyassed opinion would be.....? [/b][/size][/color]
Posts: 1084
Joined: Sun Apr 04, 2004 9:33 pm
Location: Aotearoa

Post by J Top »

I didn't realise ypu were that old V8 Pootrol,
Migs have been arround since the second world war.
J Top
God of Magnificant Ideas!
Posts: 6774
Joined: Mon Aug 04, 2003 11:22 am
Location: Balls Deep

Post by V8Patrol »

J Top wrote:I didn't realise ypu were that old V8 Pootrol,
Migs have been arround since the second world war.
J Top
True ..... so has the "A Bomb", and their numbers back then were pretty similar too as were the price tags !!
Migs in construction/engineering business' didnt happen in any real numbers for many years after the Hirishoma experiment. We take them as common everyday welding equipment these days much like the computer you're sitting infront of.

Kingy
[color=blue][size=150][b]And your cry-baby, whinyassed opinion would be.....? [/b][/size][/color]
Posts: 713
Joined: Tue Nov 05, 2002 2:12 pm
Location: Brisbane

Post by Hybrid »

V8Patrol wrote:I see that the "Quality" improved in the photo series :D

120 amps for a 2.5 rod is ok but you run the risk of blowing holes in the material you are welding, try lowering the amps in stages and you will come to a more "balanced" setup. I'd also suggest that you practice on the same thickness material as the chassis you intend to weld..... using a heavier practice material may give you a false sence of security !

Once you have reached a level that you are happy with then start practicing verticle welds........ you'll need to learn this unless you plan to roll ya rig onto its side to weld !!!
good info here on verticle welding...
http://www.outerlimits4x4.com/PHP_Modul ... hp?t=22379


Like anyting it takes practice and then even more practice..... once you become a master I have a 10foot diameter castiron pipe comming here that needs to be welded using castcraft rods and the long arc style....should take a master a day to weld it back up !....why do I do this shyte :cry:


Kingy


Thanks Kingy. The second picture is actually vertical welds. I couldnt't weld up though only down. As far as practicing on the chassis I'm cutting the ends off the chassis this arvo and intend on practicing with that for a while.

Thanks to all the other guys for all your input too. I'll post up some pics of my chassis practice later on.

John
Posts: 1403
Joined: Fri Jul 11, 2003 7:59 pm
Location: Melbourne

Post by DaveS3 »

When i did a welding course, i was told that a vertical up weld was the strongest vetrical weld if done correctly, even if it wasnt as pretty as a vetical down.

So i guess try practising ups?

Dave.
Land Rover Discovery - GQ conversion underway
Posts: 713
Joined: Tue Nov 05, 2002 2:12 pm
Location: Brisbane

Post by Hybrid »

:x :x :x Well cut my chassis rails back this arvo and started practicing welding the cut offs. I wasnt even close to blowing holes in it but now my welds suck. I struggle just to get em started then they spit and crap on. A hose busted under the house last night and soaked the floor but my welding rods were up on the table. Would they just get damp with the moisture in the air down there? And if they were damp would the arc react the way I stated?

Damn was starting to think I might be able to do these mounts myself. Also is it ok to beef the welds up by running multiple beads? This is the only way I could get em to look half decent tonight.

Cheers

John
Posts: 687
Joined: Sun Apr 04, 2004 9:54 am
Location: Sydney

Post by up2nogood »

Well, they could have got moist, but the biggest mongrel is the coating on the chassis.

One of the most important parts to welding is that the surfaces are free of paint and galvanising (if it is gal'd).

If you clean the job and the welds still don't tidy up you might have to duck down to the shop and grab some more rods.

Good luck!
Posts: 1170
Joined: Tue Jun 01, 2004 4:27 pm
Location: Goodna, Queensland

Post by Bartso »

yea exactly run a grinder over the chassis till you see nice clean shiny silver then weld then paint with something
MUD BEERS & MAYHEM 4x4 & SOCIAL Group
[url=http://www.fourbys.com.au/]Fourby's tyre and mechanical[/url]
[url=http://www.4wdmonthly.com.au/forum/showthread.php?t=24441/]My build up for ttc[/url]
Posts: 1544
Joined: Fri Jan 03, 2003 10:33 am
Location: Wahgunyah(REDNECK WONDERLAND) Victoria

welding

Post by Webbie »

Put the rods in the oven on about 80 c to 100 c for about 1/2 to 3/4 of an hour ,that should dry them out.Beware they will be very heavy :lol:
Lockers or Knockers ,both will make for fun.

HYBRID 4B PRDUCTS Visit Tigerz11 here http://www.tigerz11.com.au/ and LOCKTUP 4x4 here http://www.locktup4x4.com.au/ cheers

www.trailtrack4x4.com
God of Magnificant Ideas!
Posts: 6774
Joined: Mon Aug 04, 2003 11:22 am
Location: Balls Deep

Post by V8Patrol »

Where I live in Vic ......it rains for 9 months of the year and drips off of the trees the other three ! .....
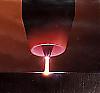
Wet welding rods arent a pleasure to use but they still work fine, the 120 amps you were running would have dried em out in the first 2 inches of welding !!!!

As for the poor welds you have now,

Arc is a much more tollerant welder when it comes to shyte on the surfaces be it paint/gal/rust/oil/grease/cement etc etc etc, it will by and large "burn through" the crap to find the steel beneath. But for a "L"plater welder ;) cleaning up around the weld will give you another advantage.
Migs are really susceptible to crud on the materials surface to the point where I grind brand new steel to reveal the shinny stuff below ..... in this case I'm removing what is called "Mill Scale" ...... Every bit of "black steel has mill scale on it and migs dont like it much...... for those in the game I do this on structal beams IE: 200UB and up where connection plates are attatched, the connection plates, usually 16mm and up in thickness are also ground to remove the mill scale.


Have you change something else either the welder, style, even a change in the powerpoint can effect welding performance. Where i live there are some other "heavy" electrical users on the same line, as a result there are times that they have some serious gear going and it sucks the power dry to the point where my mig may be set at 220 amps but it will be really only putting out 80 amps !!!. I've had times here where I couldnt even shake the molten drop off of the end of the arc welding rod !......
These things dont sound like much but DO effect performance and end result.

The querry about verticle ups versus verticle downs .....

There is far more strength in an "up" over a "down", reason being that 99% of ppl make only 1 pass on the "down" so it lacks what is known as "fillet" or in laymans terms "size .... thickness ....width etc etc."
Several passes using the verticle down will build up the fillet to an equal size and thus dramatically increasing strength. This style is used mainly for chassis welding where a down pass is made then ground back and the process is repeated yet again as many times as is required to enlarge the weld to the correct size fillet. Verticle downs generate much less heat within the material being welded so there is a far less likelyhood of distortion and therefore stress, compared to an up pass.
I have seen too many "stress fractures" on truck chassis's from ppl doing verticle ups, sure they welded it but the cracks always show up down the track.

Oh yeah.....
Fillet welds are measured therefore have a size ......
Judging by your pics and taking a blury guess ;) it looks as if you used 50x6 plates in your practice welds. At a stab in the dark Id guestamate the fillet is around a 3mm fillet weld ....you'll work it out from there I'm sure.

Kingy
[color=blue][size=150][b]And your cry-baby, whinyassed opinion would be.....? [/b][/size][/color]
Posts: 141
Joined: Fri Nov 12, 2004 4:46 pm
Location: Newcastle

Post by mickbeny »

Hi all...Hybrid,different metal thicknesses require different amperages.Different weld positions require different amperages.

Too keep things simple for you,firstly use a general purpose electrode that is suited for all positions,vertical UP and DOWN,The numbers of the electrode will be something like 4112,its the last two digits that are most important to YOU,the number 12 means ALL POSITION.Now,the back of the packet will have a general guide line for the size electrode to use and is quite accurate but has a wide range.The important thing is amperage selection for weld position and metal thickness.
When welding vertical UP you uses the lower amps within the range.If you are doing vertical DOWN you use the higher amps within the range.Down hand welding is in the middle range.

Just another thing,its easier to use larger diameter electodes than smaller,i'm assuming you welder is a 240volt unit,i would suggest if it can pull atleast 120 amps to try a 3.25 diameter electrode rather than a 2.5 dia.

As for vertical up versus vertical down,vertical up is a deeper penetrating weld and in theory is a stronger weld,but it comes back to alot of factors,morso to the person welding and his ability to weld and amperage selection,i could go on.


peace...
PEACE...
Posts: 410
Joined: Tue Nov 16, 2004 11:05 pm
Location: Ipswich, Queensland

Post by Mytqik »

mickbeny wrote: its the last two digits that are most important to YOU,the number 12 means ALL POSITION.


Close, I will elaborate further for you.

There will be a number on the rods you are using, It should also be on the box. The number is normally printed on the rod at the end you insert into the electrode holder. The number will be EXXXX.

Where E = mild steel, other letters will be here if the rods are for cast iron, stainless etc.

The first 2 numbers are the approximate tensile strength of the electrode in thousands of PSI, therefore the higher the number, the higher the tensile strength, but this also increases the brittleness of the weld.

Therefore for shockloadings like an engine mount, you would want a E41XX not a E60XX. Since your chassis is more than likely made from 250MPa steel - a E41XX weld will be 282MPa, which means in theory the steel around the weld should fail just before your weld does.

The third number indicates the usability of the rod.
1= all positions, including overheads
2= flat or horizontal positions
3= flat only

The forth number indicates the type of flux coating on the rods. This will dictate the amperage required, penration, noise, etc. There are many tables around which have these listed.

so a EXX12 = an all positional rod with high rutile coating, bonded with sodium silicate. Quiet arc, medium penetration, all position, AC or DCEN.

Hope this clears it up.
2005 GU3 Patrol ST Ute
Posts: 928
Joined: Tue Apr 06, 2004 5:42 pm
Location: newy

Post by customhilux »

hey
V8Patrol
, do u use spatter sticks on vert down,


i'm not a welder, just a dumb fitter, but if i was you i would be doin a root run if your doin vert up. there is heaps of differen't ways to run your beed with vert up, find one that makes u confortable, when i first started welding vert up's, i used to use the couting method, counting 1 to 4 from one side to the other, give it a go, also ya said ya arc is playing up, check ya leads, could be loose.
Posts: 722
Joined: Sat Nov 09, 2002 9:31 pm
Location: Berwick, Melbourne

Post by awill4x4 »

Just Tig weld the bastard, doesn't matter if it's upside down, inside out, back to front, whatever. :D
All the Chrome/Moly tube welding we do is "in position" but I guess it helps if you've been welding nearly 30 years I suppose :lol:
Regards Andrew.
Oh, and another thing, ZERO spatter :P
We are Tig welders, gravity doesn't worry us.
[img]http://www.studmonkeyracing.com/forums/smilies/weld.gif[/img]
Posts: 1619
Joined: Wed Dec 24, 2003 11:26 pm
Location: Brisbane, Australia

Post by Rainbow Warrior »

I am definately NOT posting any pics of my welds replacing my rusted box trailer 50x25 rhs cross member last weekend, I re-learned verticle up's, downs, upside downs, blow/rust hole filling, a thick brush coat of killrust to hide it, slag & all. It did pass a 110kg load test though. :)
Pat,
Brisbane, Australia,
JK 4door Rubicon, currently 4 Sale :(
It's a Jeep thing, I don't understand........
Posts: 275
Joined: Wed Aug 27, 2003 7:21 pm
Location: sunny melbourne

Post by 85lux »

i pride myself on my welding and respect all good welders immensely.
however...
yesterday i was shown something pretty funny at work

take a toothbrush(preferably ergonomic handle), pull out all the bristles and file end of brush square with small radii on corners.

clean the area to be welded thoroughly with a wire brush.

apply a generous fillet of silicone to the area to be welded.

use the toothbrush to form the desired fillet size and pool pattern.

allow to cool, wire brush and paint.

you now have a perfect looking imitation fillet weld.


one thing i am learning in my apprenticeship is there are two types of tradesmen. those whome you should look to to learn from and those who put out trade to shame.
Post Reply

Who is online

Users browsing this forum: No registered users and 0 guests