Notice: We request that you don't just set up a new account at this time if you are a previous user.
If you used to be one of our moderators, please feel free to reach out to Chris via the facebook Outerlimits4x4 group and he will get you set back up with access should he need you.
Recovery:If you cannot access your old email address and don't remember your password, please click here to log a change of email address so you can do a password reset.
Bodylift for my 1997 Rodeo is complete (pics added)
Moderator: Moderators
Bodylift for my 1997 Rodeo is complete (pics added)
Hi all,
I've finally finished the body lift for my Rodeo. I had the inspection today and to my surprise it passed a full inspection with no problems.
I did cheat a bit with the lift though. Instead of modifying my ARB winch bar to suit the lift I removed it and modded the original bumper bar instead. I was thinking of selling the bar and getting a custom bar made up in a bid to reduce the weight over the front. Looks funny with a polished chrome front bumper
I felt sorry for the guy who got inspected before me though. He was in a very new looking Wrangler with a body lift and 35in tyres. The guy wasn't very happy when they told him he couldn't keep his nice new muddies on it Guess he should have done his homework before buying them.
It should be noted though that with all the bad talk you here about the inspectors up here, I found the guys at Zillmere were the nicest bunch of blokes around. There was even a whole row of fourbies where the inspectors parked there cars
Pics of the bodylift will follow along with a small write up when I get my laptop back from the repair shop.
Last edited by Utemad on Sat Aug 27, 2005 3:15 pm, edited 1 time in total.
Land Rover Discovery series 1 V8
Well done.
Great can't wait for the write up as I'm now looking at doing mine within the next couple of weeks, just brought a Dremal, as I scraped all the mud of my bolts and found some where welded too. I be grateful in knowing the bolt sizes for all fourteen. As it be a lot easier to get these before I start ripping it apart. Also what diamater blocks where used 40- 60mm???, also where did you leave the the rubbers on top or bottom.
One last question I have is it possible to lift the fuel tanks by 2 inches now that the body lift is compete as I have a 100litre fitted and it really needs to be brouight up higher to stop it from scraping.
Can't wait to make it a real Tonka truck!!
Last edited by saigo on Mon Aug 01, 2005 6:40 pm, edited 1 time in total.
All the cab bolts are the same and all the tray bolts are the same. Cab bolts are 10mm diameter and the tray are 12mm diameter I can't find the bolts receipt so can't quote exactly what I replaced them with. Although as there are only two types of bolts (tray and cab) just remove one of each and take them to the bolt shop along with the nuts. I reused the old nuts and washers.saigo wrote:I be grateful in knowing the bolt sizes for all twelve. As it be a lot easier to get these before I start ripping it apart.
The blocks I used were 60mm diameter aluminium blocks and the blocks go on top of the rubbers.saigo wrote:Also what diamater blocks where used 40- 60mm???, also where did you leave the the rubbers on top or bottom.
I have been told that the Rodeo long range tank sits lower than the factory one and I already have dents in my factory tank's bash plate. If you made up some new brackets that made the tank sit higher I imagine it would be okay.saigo wrote:One last question I have is it possible to lift the fuel tanks by 2 inches now that the body lift is compete as I have a 100litre fitted and it really needs to be brouight up higher to stop it from scraping.
Have fun. The lift is quite simple to do. It is the small stuff you need to adjust which takes some time.
Land Rover Discovery series 1 V8
Ok time for my dodgy write up.
First thing I did was to get the lift blocks made. I needed 14 blocks in total. All 40mm tall and 60mm diameter alloy blocks. The cab required 8 of them with 10mm holes and the tray required the other 6 with 12mm holes.
Then I waited a few months.
Then I sussed out the bolt situation wich required me to buy 8x M10 bolts 30mm longer than standard and 6x M12 bolts 40mm longer than standard. I reused the old nuts and washers.
I needed to lift up the floor covering and remove the back seat to access the bolt heads.
Then came the fun part. As Rainsey also discovered the front tray bolts are welded in. This required a trip to Bunnings to get one of those Dremel rotary grinder tools. Although I bought a knock off Ozito for $40. So about 6hrs later over two days and many hits with a hammer I managed to removed the two bolts.
The next step involves removing the bracket that goes between the tray and cab. Also the two brackets which go between cab and chassis.
I went around and removed all the nuts while leaving the bolts in place. The problem with this step as the ARB winch bar covered the two front body mounts. I had to loosen the bar and remove all but two of the bolts (one each side) and lower it down onto jacks. This gave me enough room to wrangle the bolts out an later replace with the longer ones. Although the longer ones had to go in from underneath with the nuts on top. As did some of the longer tray bolts.
Then I removed all the drivers side cab bolts and jacked up the drivers side of the body with a bottle jack with a peice of wood on top to prevent punching through the floor. This enabled me to slip all the blocks in. I then repeated this on the passenger side. Once all the cab blocks were in I put all the nuts and washers on finger tight.
Then I removed all the bolts from the drivers side of the tray. I was wondering how I was going to jack up the tray................... then it came to me. I put the jack on top of the tyre and jacked the tray from under the wheel arch Worked like a charm. Then I slipped all the blocks in. I then did the same to the passenger side and put all the nuts and washers on.
Once this was done I gave the cab a quick once over to make sure it was straight and then tightened all the nuts on the cab. Then I looked at the tray for straightness and decided it was too far over on the passengers side. So I beat the crap out of it until it looked even.
Then came the little jobs to make it all work. I went around and made sure all the hoses and wiring was okay. My diff breathers needed repositioning as did the tail light wiring but nothing major. However the clutch flexible hose was tight. So I removed the bolt which attached the bracket on the higher end of the hose to the copper line and moved it forward which then gave some slack in the flexible line.
The next problem was the radiator fan. The fan was touching the shroud so much that you couldn't turn the fan. I removed the shroud but the fan was rubbing on the lower hose. I was thinking of removing the fan and putting a thermo in which I already had but I had a look and decided it would be much easier to just lower the radiator. So I removed the four radiator bolts and lowered the radiator onto it's little rubber bottom strip and the passenger side upper bolt lined up with an existing hole so I whacked a bolt in there. Then I got the radiator sitting correctly and removed the front grille so I could drill another hole for the driver side and put a bolt in there. I still only have the two bolts holding the radiator in at the moment but this weekend I plan to pull the radiator out and drill two holes in the side barackets of the radiator so I can bolt through them and into the original lower holes.
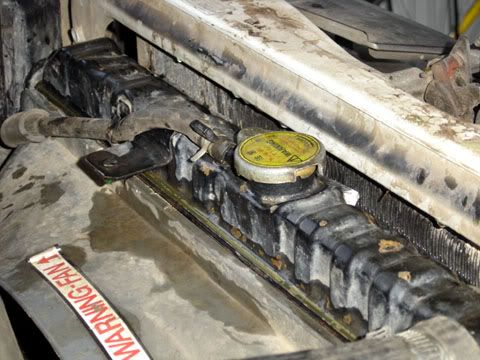
However this created another problem. I went to remove the radiato cap to top up the fluid (lost some when I removed the upper hose to remove the shroud) and I couldn't get the cap off as it hit the body work when you turned it. So I had to loosen the radiator bolts to remove the cap. I then got my new little rotary grinder and cut the offending part of the radiator cap off. Once all was put back together it worked like a charm.
I then reattached the cab to tray bracket which is simple enough as both tray and cab are raised. However the cab to tray created a problem. I ended up usng the original brackets but bolting them on top of the chassis instead of underneath. This puts them on top of the captive nuts so I got new nuts to put on underneath as well. With the brackets bolted on they were hard up against the loopy things which I figured they shouldn't be. So with the bolts in finger tight I once again got out my trusty bottle jack and jacked up underneath each bracket until there was clearance between the rod and the bracket. I had to redo the passenger side one later as it wasn't bent far enough and creaked when going over bumps and around corners. Then tightened the bolts and nuts.
This left the gearsticks to look into. After a quick drive I decided that there was no point in pulling the center console out to trim anything as it still shifted okay. You can feel that 2nd is a little harder to get into as the shifter presses against the rubber seal but it is okay. I then installed the shifter extensions to bring the shifters back nto position. However I have since removed the gear selector one because I prefer the shorter stick as I have long gangley arms being 6ft2in. Thanks go to Toby for the extensions.
Somewhere in there I realigned the bullbar and tightened it all up. The bar won't adjust up far enough and blocked the headlights a little at the top so I removed it for the inspection. Removing the winch bar with a winch in it is not a lot of fun by yourself but I did manage it eventually
I put the stock bumper back on which was easily modded for the lift with a 13mm drill bit and a round file.
I also used Loctite on all the bolts.
For the Qlders out there, when you book your inspection keep in mind that the next available inspection from when I called was 3 weeks away. Not exactly a fast process.
Mine has been been inspected and passed first go with no problems.
I think that about does it. I'll load some photos now and then put a few more up later as I reduce them etc.
Removing the bullbar. I managed to wedge some of my smaller tyres under the bar and then pull the bar off. Took ages but I got there.
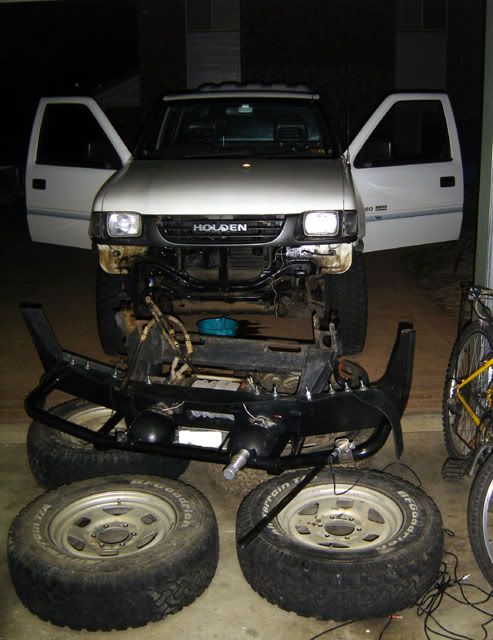
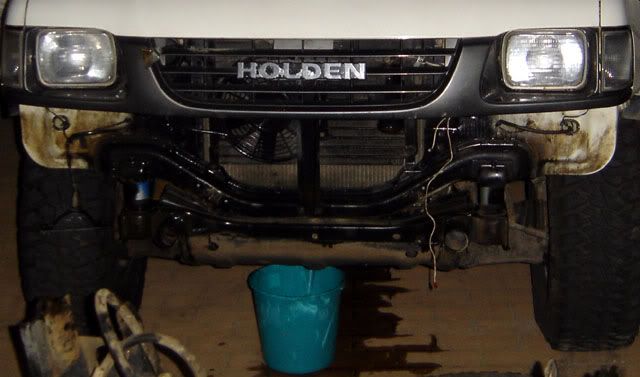
You can see the two front mount in this photo. All the fluid under the car is power steering fluid as my winch runs off the power steering.
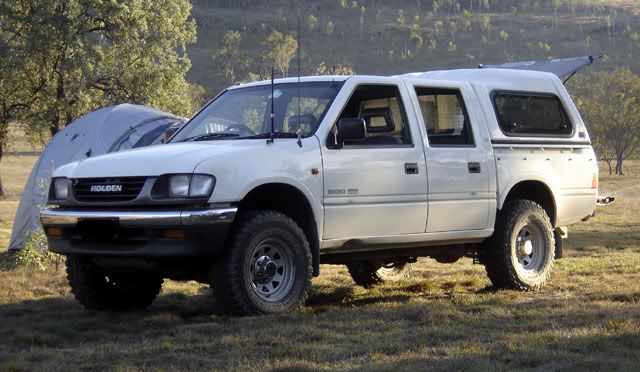
Finished product
Last edited by Utemad on Thu Aug 11, 2005 4:48 pm, edited 1 time in total.
Land Rover Discovery series 1 V8
I finally got around to bolting the radiator in properly yesterday. I pulled the radiator out and drilled two holes in its mounting brackets to line up with the factory lower radiator bolt holes with the captive nuts. I forgot to take pics so there are no progress pics just finished pics. While I had the radiator out I hosed the fins from behind. Before doing it there were so many bugs and so much dirt and seeds that I couldn't see through it. The path was brown with dirt etc after I hosed it out. Although even with all that blockage it never even hinted at overheating. Must be that great Isuzu build quality
This is the radiator in its final position. It is actually lowered more than the body is lifted but it lines up perfectly with the fan Notice I had to cut one of the grips off the cap so it would turn enough to remove it.
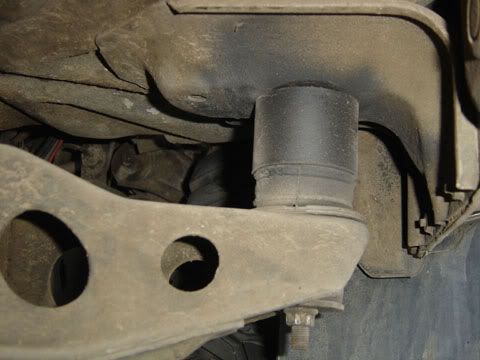
This is one of the cab blocks with a liberal coating of matt black paint (where I could reach). For all you people who haven't seen a block before
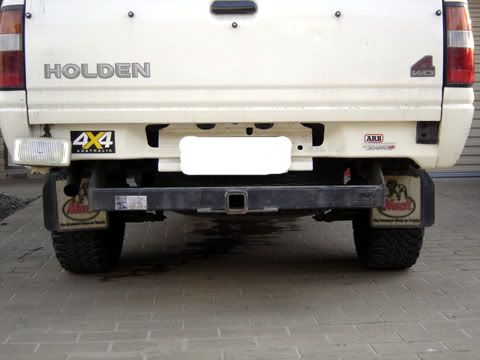
This is for Rainsey. My towbar sits low too.
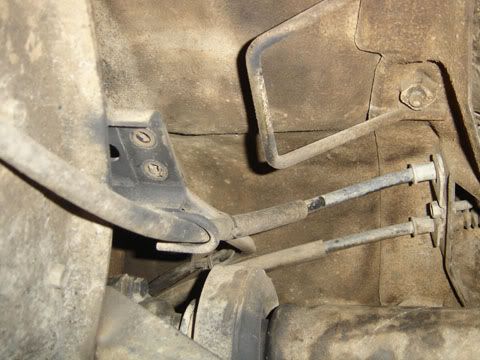
This is my body to chassis safety loop (one of them anyway). Once the body lift was in the brackets (removed) hit the loops. I originally bent the brackets and re mounted them above the chassis bracket instead of below which worked okay for a while. However I have since removed them as they made noises when they touched which annoyed me. I intend on folding up some new brackets. What has everyone else done?
Land Rover Discovery series 1 V8
Utemad,
Yep, you are in the same boat re the tow bar... must admit though, was out on the weekend in a ref hairy spots and it did not bottom out so I am going to leave it for the moment.
Re the Chasis to body brackets.... left mine off. Fihured that if my body falls off the chasis... I am in more strife that I could get my self out of...
I got the car engineered friday (finaly gor my arse into gear) and got a blue slip and neither the engineer or the blue slip guy picked up on not having the brackets.
Cheers
Graham
Temporary Australian
Looks good mate What you need now is a snorkel I have started my little project this weekend..... i'm going to start a thread here and in general tech as well..... some of the guys that can help don't always come into the Isuzu section check the for sale section too..... i got some stuff to get rid of.
There is no "I" in Team, but there are 5 in Individual Brilliance
I'm not too concerned about the brackets. I'll replace them beacuse it isn't hard but I agree that they seem pretty useless. I had them in place for my inspection so don't know if they would like to see them off.
I ground my towbar all the time. I know I would be less likely to hit if I removed it but without another bar it is only sheetmetal then. That could hurt
I don't think that your snorkel would fit my petrol Roedao Plus I am trying not to spend anymore money on it for now. I'm weighing up the pros and cons of selling it at the end of the year. Not 100% sure what for yet but I want more off road ability but not much bigger. So thinking about a Rover probably a Disco.
I have been following the RoeDao build up thread on 4wdMonthly. Was going to ask about your locker but noticed it was already sold. It has been quite a build up! You just seem to always be improving something.
Land Rover Discovery series 1 V8
mmmmmmmmmmmmmmmm air locker
My tyres are 31x10.5 too. They are Goodyear MT/Rs. I wouldn't want any bigger as the rears scrub a lot already and the gearing would then be really up shit creek.
There was a guy that had the pre 96 single cab tray back that lived near me and he ran 32s with the 2.6 petrol motor. Never asked him how it went though.
Land Rover Discovery series 1 V8
When the rear has one wheel all the way up and the other all the way down the higher tyre scrubs the inside of the wheel well. Nothing I am worried about but if I went taller or wider I'd want to get rims with more offset.
I see yours has flares. My 31s sit right on the edge of the guard without flares. Maybe you already have more offset than me?
Land Rover Discovery series 1 V8
Fair dinkim... am I having a Shi$%#T week for forum usage... I have tried multiple times to send a photo of my rear end..... sorry let me clarify this... my trucks rear end, to demonstrate the flairs and wheel offset and each time I get an error ... sooo...
No pictures...
My flares were on the truck when I bought it. The are pretty lame and I do want to replace them but looking at the wheels square on, I am in a similar situation whereby the outer profile of the wheel is pretty close to the edge of the tray... so why the flares... who knows.. predates me.
I have placed on my rig the heaviest duty spings that tough dog make, possibly to my detriment, hence the amout of flex I have in my rear end is pretty limited. At the time of suspension mod, articulation was not on the prime adgenda, load capacity was.
Thus, the reason I think why I have never scraped my wheels... cause they cannot reach there. (Hopefully the locker will fix some of the resulting traction probs)
I spoke to a guy at Bob Jane the other day re wider tyres and he mentioned that basically there are two offset types, those for the Navara / Hilux / rodeo and those for the Landcruiser, the latter being deeper. Apparently if one uses the Landcruiser offset, thus increasing ones track, some of these probs may be negated.
Ironically, this same Bob Janes fitted the tyres to the show boat Hilux that belongs to the company that fitted my rear locker, that, has the landcruiser offset with 32 / 11.5 / 15's. The Lux lookes a treat so I am going to grovel to them to see if their spare might fit on my truck to verify if the Landcruiser offset will not go past my present flairs... and so on and so on.
Sorry for the long winded reply.. but what do they say.. a pic paints a thousand words!!
Cheers
Rainsey
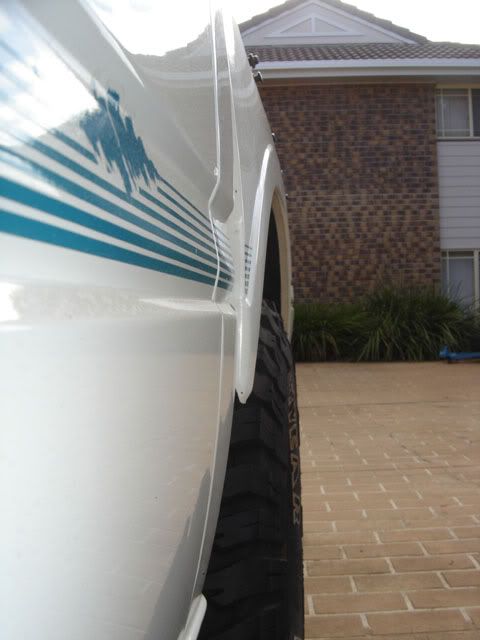
This is what my rear tyres look like in relation to the guard (pre body lift). The photo is taken on slight angle so the tyre looks like it sticks out more than it does. In reality it is only the bulge of the sidewall that extends past the guards.
These are the Navara offset. As you said the Landcruiser offset will give you a wider stance. You would most likely be able to pick up a really cheap set of 15x7 or x8 sunnies off one of these forums.
My rear springs will be more flexy than yours as they are from an 89 Jackaroo. Less load carrying ability but they give a much better ride.
I have always meant to remove my rear shockies to see if I could get any more wheel travel if I had longer shocks but I never have. The front shocks are heavy duty OME but the rears are the ones that I bought it with. They are genuine Isuzu ones probably the ones on it from new.
Land Rover Discovery series 1 V8
body lift
Just wondering, Whats the main advantages of a body lift?
I know it's not for ground clearance a susp lift would fix that as everythings bolted to the chassis so is it more for tyre clearance etc?
BTW your ute looks good. Hows it go with the 2.6. My father in awe has one in his Rodeo and it goes pretty good. Use to borrow it for surf fishing until I got my 1st fourby: 2.6 petrol Triton and still goes like fark.
I hear you about them low tow bars. mines the same but the susp lift should improve that
Do you think I could fit 265/80/16 A/T's in mine without scrubbing at full steer lock and full up travel. They are 806mm diameter (almost 32")
Bordertrek 4X4 & Fabrication
0400 250 734 Bordertown SA
I love terra firma-the less firma the more terra
0400 250 734 Bordertown SA
I love terra firma-the less firma the more terra
The main reason for body lift is to fit bigger tyres supposedly. However I did mine so I could fit bar work under the sills and around the rear without reducing my ground clearance. I have a small suspension lift and was considering trying to get more but will hold off for a bit. I have never fitted the tyres you mention but I would imagine you would need some wider offset rims and then you would probably need the body lift as on the rear when a taller and further spaced tyre came up it might clip the wheel arch.
My 2.6 goes great offroad. It has good torque figures lowish in the rev band. When unloaded it will easily overtake on the highway and long highway hills are no problem. However when loaded up and in the mountains it can run out of puff quickly. We were in such a situation today with 5 people and a little bit of gear. We only just made it up some hills in 2nd gear.
I do love my Rodeo but I want more wheel travel and MORE POWER!!!
Land Rover Discovery series 1 V8
Who is online
Users browsing this forum: No registered users and 10 guests